5
Filter operation and replacement
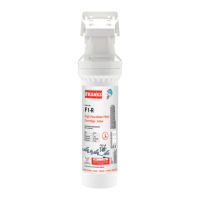
Installation of the lter
The system can be operated either
free standing or wall mounted in a
vertical or horizontal position.
► Insert the filter cartridge
into the filter head and turn
counterclockwise.
► After first installation the system
must be flushed with a minimum
of 2 litres.
Note: The ush water will be milky or
cloudy at rst. This is due to the
dispersing air and will clear up
quickly.
Installation with external lter head
- see page 42.
Installation with internal lter head
- see page 43.
Replacing the lter
► Turn filter clockwise to remove it
from filter head.
Note: During this process, incoming
tap water supply and outgoing
ltered water valves in the lter head
shut o automatically. The system
will expand and a small amount of
expansion water may escape from
the ush hose due to peaks in
pressure. Please keep this in mind
and place a suitable container
underneath the ush hose.
► Repeat operations in the chapter
“Installation of the filter”.
Service / Maintenance
Reliable system function can only be
achieved if the lter cartridge is
replaced on a regular basis. The
replacement cycle depends on the
carbonate hardness of the water
supply and the bypass level. We
would recommend replacing the
lter cartridge after 6 months and no
later than 12 months depending on
usage.
Pro M Connect and Clear Water
Connect lters, thanks to the
integrated RFID technology, inform
instantly the system when the lter
needs to be replaced.
EN