EasyManua.ls Logo

FRIEDLAND SPECTRA 140 - User Manual

FRIEDLAND SPECTRA 140
10 pages
Print Icon
To Next Page IconTo Next Page
Loading...
Instruction Manual
BEFORE STARTING ANY
INSTALLATION WORK,
PLEASE READ CAREFULLY
List Numbers L210S BLK / L210S WHI
ENG
SAFETY
Always follow the manufacturers advice when using
power tools, steps, ladders etc. and wear suitable
protective equipment (e.g. safety goggles when
drilling holes). Before drilling holes in walls, check for
hidden electricity cables and water pipes, the use of a
cable/pipe locater maybe advisable if in doubt.
The mains supply to this product should be installed
by a competent person (e.g. a qualified electrician)
in accordance with these instructions and in
accordance with the appropriate clauses of the current
edition of the IEE wiring regulations (BS7671).
DANGER - 240 VOLTS. To prevent the risk of
electrocution, always turn off the mains electricity
supply before commencing any work on the installation
or opening the detector.
It is essential that all connections are made as
instructed, that cables are not stressed and that
terminals are fully tightened.
TOOLS NEEDED
Drill and 6mm Masonry Drill Bit
Wire cutters and Wire Strippers
No.2 Philips Screwdriver
Terminal or Electricians Screwdriver
Large Bladed Screwdriver
1
L210S 6017 ENG 1-10 8/15/06 10:10 AM Page 3
Question and Answer IconNeed help?

Do you have a question about the FRIEDLAND SPECTRA 140 and is the answer not in the manual?

Summary

SAFETY

SELECTING A LOCATION

Detector Head Positioning

Guides on tilting and swiveling the detector head for optimal performance.

Directional Sensitivity and Placement

Explains PIR sensitivity to movement direction and optimal facing angles.

Avoiding Interference Sources

Advice on siting the PIR away from heat sources and reflective surfaces.

Masking the Lens for False Triggers

Solution for persistent false activations by masking the detector lens.

MOUNTING

Unit Cover Removal

Instructions for removing the unit's top cover using a screwdriver.

Back Plate Installation and Drilling

Guidance on positioning the back plate, marking holes, drilling, and inserting plugs.

Cabling Entry Options

Details on routing cables either through the wall or along the surface.

Grommet Sealing for Cables

Ensuring a watertight seal by piercing grommets and feeding cables correctly.

Securing the Unit to the Wall

Instructions on screwing the unit to the wall, warning against over-tightening.

Cable Connection

Guidance to connect cables as per diagrams in Section 3.

Unit Re-assembly

Final step to re-assemble the unit after wiring.

WIRING & CONNECTION

Important Safety and Compliance Notes

Crucial safety advice and compliance requirements for installation.

Auto; Off Wiring Configuration

Details on wiring for automatic and permanent off lighting control.

Auto; On Wiring Configuration

Details on wiring for automatic and permanent on lighting control.

Auto; Manual On and Off Wiring

Wiring for automatic, manual on, and manual off lighting control.

Wiring for Multiple Lamps

Guidance on wiring multiple light fittings in parallel to the detector.

OPERATION & TESTING

Walk Testing Procedure

Steps for testing the PIR detector's functionality after installation.

Initial Adjustment Controls for Walk Test

Setting TIME and LUX controls for the initial walk test.

Powering Up and Warm-up Period

Turning on power, system warm-up, and lamp behavior.

Movement Detection Zones Test

Testing lamp illumination as zones are crossed and standing still.

Establishing Detection Pattern

Repeating walk tests at various distances and angles to map coverage.

Adjusting Coverage Range

Tips on angling the sensor head to increase or decrease detection range.

Final Adjustments and Vehicle Testing

Carrying out final tests and specific adjustments for vehicle detection.

Setting up for automatic operation

TIME Control Setup

Setting the duration for which the lamp remains illuminated after motion ceases.

LUX Control Setup

Adjusting the darkness level required for the unit to start operating.

TROUBLESHOOTING GUIDE

Light Stays ON or Activates Randomly

Solutions for lights staying on continuously or false random activations.

Light Stays ON Day and Night

Troubleshooting continuous illumination during both day and night.

PIR Detector Not Operating

Steps to diagnose why the PIR detector is not functioning at all.

PIR Detector Not Operating at Night

Resolving issues where the PIR detector fails to operate during nighttime.

Unit Activates in Daytime

Diagnosing and fixing the unit activating unintentionally during daylight hours.

Poor or Sporadic PIR Coverage

Advice on improving or fixing inconsistent detection range and coverage.

Detection Range Changes Daily

Understanding and adjusting for daily variations in detection range due to temperature.

TECHNICAL SPECIFICATIONS

DISPOSAL AND GUARANTEE

Product Disposal

Instructions for environmentally responsible disposal of the product and packaging.

Product Guarantee

Details of the manufacturer's guarantee, terms, and conditions for claims.

Helpline Information

Contact details for customer support and troubleshooting assistance.

Overview

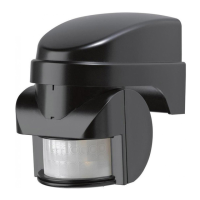
The Friedland SPECTRA 140 is a PIR (Passive Infra Red) Detector designed to activate lighting based on detected movement. It is suitable for outdoor use and operates by sensing body heat.

Function Description

The PIR Detector features multiple detection zones at various horizontal and vertical angles. When a moving human body crosses or enters one of these zones, the detector activates, typically illuminating a connected lamp. The unit requires connection to a 240Vac 50Hz mains electricity supply, ideally to the domestic lighting circuit using 3-core round flexible cable of at least 1mm² gauge. Alternatively, it can be connected to the domestic socket ring main with a 5 amp fused spur.

The detector incorporates false activation reduction technology, making it less prone to activation by environmental factors like wind, rain, or moving branches. However, careful siting is recommended to avoid heat sources such as central heating outlets, tumble dryer exhausts, and extractor fans. Under extreme conditions, reflective surfaces like pools of water or white painted walls can also cause interference. If an object repeatedly activates the detector, masking the lens with the provided blanking strip or electrical tape can help mitigate the issue. The top half of the lens corresponds to long-range detection, while the bottom half corresponds to short-range.

Important Technical Specifications

  • Detection Range: Up to 15 metres
  • Angle of Detection: 140°
  • Power Supply: 230Vac ~ 50Hz
  • Maximum Switchable Load:
    • 1200W Tungsten filament
    • 1200W Tungsten halogen
  • Time On Adjustment: 5 seconds - 15 minutes
  • Lux Level Adjustment: Day & night or night only operation
  • Environmental Protection: IP44 (Suitable for outdoor use)
  • Sensor Type: PIR (Passive Infra Red) - emits no radiation and is not harmful to people, animals, or plants.
  • Compliance: Complies with European Low Voltage Directive 73/23/EEC and EMC Directive 89/336/EEC.

Usage Features

Installation: The detector should be mounted at a height of 2.5m for optimal all-round coverage, though it can be positioned up to 4m high for a greater detection range, albeit with less effective detection. The unit is more sensitive to movement across its field of vision rather than movement directly toward it, so it's recommended to face the PIR across the approach to the property.

Installation involves removing the top cover, marking and drilling mounting holes, inserting wall plugs, and securing the back plate. Cabling can be routed directly behind the unit through the wall or along the surface from below via provided gaps. Grommets should be pierced to feed the cable, ensuring a watertight seal. Connections are made according to specific wiring diagrams.

Wiring Options: The SPECTRA 140 offers several wiring configurations to suit different lighting needs:

  • Auto / Off: Provides automatic operation (switch closed) or permanently off (switch open). An optional indoor switch can be used for permanent off override. In Auto mode, switching off and then back on will illuminate the lamp for the pre-set time, useful when leaving premises.
  • Auto / On: Provides automatic operation (switch open) or permanently on (switch closed). An optional indoor switch can be used for permanent on override.
  • Auto / Manual On and Off: Offers automatic operation (S1 closed, S2 open) or manual operation (S1 open, lamp controlled by S2). This requires a single pole 2-gang switch.

Multiple light fittings can be wired in parallel to the detector, provided the combined wattage does not exceed the 'Maximum Switchable Load'.

Walk Testing: After installation, the unit is ready for testing. This involves setting the TIME control fully anti-clockwise and the LUX control fully clockwise. In this mode, the unit operates during daytime and night, illuminating the floodlight for approximately 5 seconds each time movement is detected. Users walk across the detection area at various distances and angles to establish the detection pattern. If the detection area is too small, angling the sensor head upwards increases coverage; angling downwards reduces it. For very short-range requirements, masking part of the sensor lens may be necessary.

Setting up for Automatic Operation:

  • TIME Setting: Controls how long the lamp remains illuminated after activation and no further movement is detected. The minimum time is approx. 5 seconds (fully anti-clockwise), and the maximum is approx. 15 minutes (fully clockwise). The lamp remains illuminated for the duration of detected presence plus the set time after movement ceases.
  • LUX Setting: Determines the ambient light level at which the unit becomes operative each evening. To set, turn the LUX control fully anti-clockwise, wait until dusk, then slowly rotate clockwise until the lamp illuminates. Fine-tuning may be required over a few days to achieve desired operation (e.g., adjusting slightly anti-clockwise if it operates too early, or clockwise if too late).

Maintenance Features

Troubleshooting Guide: The manual provides a comprehensive troubleshooting guide for common issues:

  • Light stays ON all the time at night, or PIR activates randomly: Suggests covering the detector lens to check for external interference. Adjusting the tilt/swivel head or masking the lens area may resolve issues caused by strong winds, passers-by, road traffic, small animals, or pets.
  • Light stays ON all the time day and night: Requires checking wiring correctness and ensuring the warm-up period (max 5 minutes) is completed outside the detection area.
  • PIR Detector will not operate at all: Check if power is ON, then turn power OFF to inspect wiring and connections. Verify that lamps are not failed or improperly seated.
  • The PIR Detector will not operate at night: Indicates ambient light level may be too high. Adjust the LUX control slowly clockwise until the lamp illuminates.
  • Unit activates in daytime: Indicates ambient light level may be too low. Adjust the LUX control slightly anti-clockwise until the lamp extinguishes, then re-enter the detection area to confirm it no longer activates. Repeat until desired.
  • PIR coverage is poor/sporadic: Recommends checking the suitability of the location and repositioning the PIR if necessary.
  • Detection range changes from day to day: Notes that PIR detectors sense body heat more easily in cold weather and less so in warm weather. Small seasonal adjustments to the detector's head position may be needed for consistent year-round operation.

Disposal: At the end of its useful life, the product and packaging should be disposed of via a suitable Recycling Centre, not with normal household waste. Do not burn the unit.

Guarantee: Novar ED&S provides a 2-year guarantee against defects due to faulty materials and workmanship. The guarantee is invalidated if the product is not installed, operated, or maintained according to instructions, used inappropriately, or if any attempt has been made to rectify, dismantle, or alter it. It covers the product itself but not consequential loss, damage, or installation costs. For faults within the guarantee period, the item should be returned to the point of sale with proof of purchase and a full description of the fault.

FRIEDLAND SPECTRA 140 Specifications

General IconGeneral
BrandFRIEDLAND
ModelSPECTRA 140
CategorySecurity Sensors
LanguageEnglish

Related product manuals