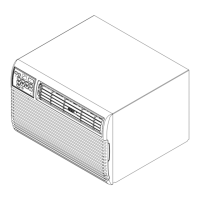
Front Installation
(continued)
Installing Dial Plate and Front Frame
Some models require installation of the dial plate and the front panel of the air
conditioner included in a decorative kit. To assemble, follow these steps.
STEP 1: INSTALL DIAL PLATE AND BUTTONS OR KNOBS:
..... __
_ --
"_._ ! ri :"lit !I'! i!'i!il
Side Air Discharge
o Remove control knobs from front kit
(some models).
• Carefully remove protective film
from the front of the dial plate
(some models).
• Line up holes on dial plate with the
correct control stems and push dial
plate to control panel surface.
• While holding dial plate in place
install control knobs on protruding
stems.
STEP 2:
INSTALL FRONT FRAME TO UNIT.
Decorative Front
• Position the top of the decorative front over the top flange of the case, and align the tabs with the
slots in the case.
• As you install the front frame to the unit be sure the vent handle is positioned through the front in the proper
location.
• Carefully pull down on the front to engage the top tabs, while pushing the front over the case to
ensure proper alignment.
• The side tabs will "click" when front is seated.
• Install front retaining screw(s) at the bottom of the front (Fig. 1), or behind the filter handle (Fig. 2).
FIG. 1
FIG 2
6
 Loading...