Operation
INSTALLATION
CHECK FOR DAMAGE - Open the package and ensure no parts were damaged
during delivery. Make sure all parts shown in the packing list are included.
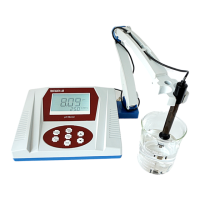
1. Place pH meter on a flat, stable working platform.
2. Connect the electrode arm to the base of the pH meter.
3. Remove the cap from the port on the rear of the pH meter, then plug the
electrode into the pH meter.
4. Attach the power cord and plug in the device.
5. The instrument accepts 110V. Confirm the voltage before using the meter.
6. Press the ON/OFF | CAL button to turn the instrument on.
CALIBRATION
NOTE: For high accuracy measurements (≤±0.02 pH), the pH meter should be
calibrated immediately before use. For general use (≤±0.1 pH) the instrument
can be used for one week after calibration.
NOTE: The pH meter needs to be recalibrated in the following situations:
● Using a new electrode.
● The meter has not been used for some time.
● After measuring a highly acidic or alkaline (pH <2.00, >12.00) solution.
● After using a sample that contains fluoride.
● After using a sample that contains a concentrated organic solution.
● The sample solution’s temperature is much different than the calibration
solution’s temperature.
Manual Temperature Control
● A solution’s pH will change based on the temperature. To account for this
you need to enter the temperature into the pH meter.
○ NOTE: The meter is capable of ATC (automatic temperature
control), but does not include a thermometer or a 3 in 1 electrode.
The meter will automatically use ATC if one of these is installed.
● To change the input temperature, adjust using the up and down arrows.
● The temperature can be switched between °F and °C by using holding
the pH | mV button.
6
 Loading...