Do you have a question about the Fromm P356 and is the answer not in the manual?
Wear safety glasses; ensure proper training, tool integrity, and keep fingers away from hazards.
Avoid using strap for pulling/lifting; be aware of strap breakage during tensioning and proper cutting procedures.
Maintain tidy workspace, good balance, and ensure load security with proper joints.
Details on tool size, weight, sound, and vibration information.
Information on recommended strap qualities, dimensions, tensioning force, speed, and joint strength.
Specifications for air pressure, air unit, air flow, air consumption, and air oil.
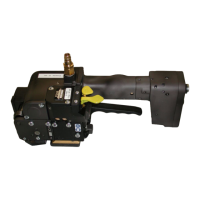
Connect tool to compressed air using a quick disconnecter and an air-unit with separator, regulator, and lubricator.
Use only recommended parts; wearing plate is an optional accessory for base protection.
Suspend the tool on a spring-loaded balancer using the provided suspension bracket for all working positions.
Preselect strap tension and speed at control head; adjust welding time at adjusting screw.
Feed the strapping around the package, ensuring it is clean and free from dirt.
Insert straps into the tool and apply tension using the appropriate valve lever.
Weld and cut the strap, then visually verify the seal quality after removing the tool.
Disassemble and reassemble tensioning wheel and grippers, ensuring proper lubrication and orientation.
Details on disassembling and assembling cutter, welding stop gripper, and welding gripper components.
Readjust the coupler after replacing components like the seesaw lever or lever body.