EasyManua.ls Logo

Front Runner Easy-Out User Manual

Default Icon
5 pages
To Next Page IconTo Next Page
Page #1 background imageLoading...
Page #1 background image
RRAC029_REV_C01
© COPYRIGHT 2016 FRONT RUNNER VEHICLE OUTFITTERS
Easy-Out Awning
Brackets
RRAC029
ENG
1
30 min
IMPORTANT WARNING!
Thank you for purchasing the Easy-Out Awning Bracket.
Before you start, take a moment to familiarize yourself with the Fitting Instructions and the components received.
Refer to Page 2 for a list of all the components, quantities and tools required.
READ ME !
IT IS CRITICAL THAT ALL FRONT RUNNER PRODUCTS BE PROPERLY AND SECURELY ASSEMBLED AND ATTACHED TO YOUR VEHICLE. IMPROPER ATTACHMENT COULD
RESULT IN AN AUTOMOBILE ACCIDENT, AND COULD CAUSE SERIOUS BODILY INJURY OR DEATH. YOU ARE RESPONSIBLE FOR ASSEMBLING AND SECURING ALL FRONT
RUNNER PRODUCTS TO YOUR VEHICLE. CHECKING THE ATTACHMENTS PRIOR TO USE, AND PERIODICALLY INSPECTING THE PRODUCTS FOR ADJUSTMENT, WEAR AND
DAMAGE. THEREFORE YOU MUST READ AND UNDERSTAND ALL OF THE INSTRUCTIONS AND PRECAUTIONS SUPPLIED WITH YOUR FRONT RUNNER PRODUCT PRIOR TO
INSTALLATION OR USE. IF YOU DO NOT UNDERSTAND ALL OF THE INSTRUCTIONS AND CAUTIONS, OR IF YOU HAVE NO MECHANICAL EXPERIENCE AND ARE NOT THOROUGHLY
FAMILIAR WITH THE INSTALLATION PROCEDURES, YOU SHOULD HAVE THE PRODUCT INSTALLED BY A PROFESSIONAL INSTALLER OR OTHER QUALIFIED PERSONNEL.
Question and Answer IconNeed help?

Do you have a question about the Front Runner Easy-Out and is the answer not in the manual?

Front Runner Easy-Out Specifications

General IconGeneral
BrandFront Runner
ModelEasy-Out
CategoryAutomobile Accessories
LanguageEnglish

Summary

Read Me and Important Warning

Introduction to Awning Bracket Installation

Familiarize yourself with fitting instructions and received components before starting installation.

Critical Safety Information for Vehicle Accessories

Understand safety warnings regarding improper attachment, injury, or death; read all instructions.

Awning Bracket Installation: Parts and Tools

Included Components List

Detailed list of all parts provided in the box for the awning bracket installation kit.

Required Tools for Assembly

List of tools necessary for the correct and safe assembly of the awning brackets.

Slimline II Rack Awning Bracket Installation

Step 2.1: Mounting Bracket Positioning on Slimline II Rack

Select installation side and insert M8 Nyloc Nuts into the T-slot channel of the Slimline II Tray.

Step 2.2: Attaching Brackets to Rack Extrusion

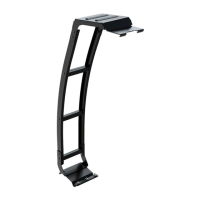
Slide bolts into extrusion slots, position brackets, and secure with washers and nuts.

Step 2.3: Securing Awning to Mounted Brackets

Position awning, secure center bracket, then others using M8 bolts; tighten all fasteners and add nut caps.

Slimline Rack Awning Bracket Installation

Step 3.1: Bracket Placement and Hole Marking

Place brackets between slats at ends and center, mark holes on side profile for drilling.

Step 3.2: Drilling and Securing Brackets to Rack

Drill 6.5mm holes on marked positions, align brackets, and fasten with M6 bolts, washers, and nuts.

Step 3.2 (cont.): Aligning Awning with Rack Brackets

Lift awning, align bolts with bracket holes, fit washers/nuts, tighten all fasteners, and place nut caps.

Awning Bracket Installation Completion

Final Steps and Congratulations

Admire your completed work; congratulations on the successful installation.

Important Disclaimer and Support Information

Front Runner not liable for installation damage; contact for any installation questions.

Explore Additional Accessories

Visit a Front Runner Dealer to view and install other vehicle and rack accessories.

Related product manuals