EasyManua.ls Logo

FUFU & GAGA WSD22028 - User Manual

FUFU & GAGA WSD22028
22 pages
Print Icon
To Next Page IconTo Next Page
Loading...
Version:09/21/2022
1/20
Display Cabinet
Question and Answer IconNeed help?

Do you have a question about the FUFU & GAGA WSD22028 and is the answer not in the manual?

Summary

General Information and Safety

Important Product Information and Usage Tips

Key information before assembly and use, including efficiency tips and screw maintenance.

Safety Precautions

Warnings about scratches, toppling, and general safety during assembly.

Tools and Parts Identification

Required Tools for Assembly

List of tools necessary for assembling the display cabinet.

Screw and Component Identification Guide

Guide to identify screws and parts by size and shape for correct assembly.

Parts Overview

Exploded View of Components

Visual representation of all cabinet parts with numbering for reference.

Initial Assembly Steps

Step 1-2: Prepare Plates

Attaching screws and connecting plates using dowels and cam locks.

Step 3-4: Assemble Base Structure

Connecting plates to form the base structure and covering screws.

Step 5-6: Add Top Panel

Attaching the top panel and covering screws.

Step 7-8: Form Main Body

Inserting screws and attaching plates to form the main cabinet body.

Step 9-10: Assemble Lower Section

Inserting screws and connecting plates for the lower section.

Step 11-14: Continue Assembly and Add Base

Connecting plates, covering screws, and inserting foot pegs.

Connecting Major Components

Step 15: Join Assembled Units

Connecting the two main assembled parts of the cabinet.

Back Panel and Shelving Installation

Step 16: Attach Back Panels

Securing back plates using screws and nails.

Step 17: Insert Shelf Supports

Placing shelf supports and inserting shelves into the unit.

Door Installation

Step 18-19: Prepare Doors with Hinges

Attaching hinges and handles to the cabinet doors.

Step 20-21: Attach Hinges to Doors

Fixing different types of hinges to door plates.

Step 22: Mount Doors to Cabinet

Attaching doors (No.8, No.22) to the main cabinet structure.

Step 23: Mount Doors to Cabinet

Attaching remaining doors (No.8, No.22) to the cabinet.

Final Adjustments and Safety

Step 24: Adjust Door Alignment

Instructions for adjusting door alignment for optimal fit.

Step 25: Secure Unit to Wall

Instructions for safely anchoring the cabinet to the wall.

Warranty Information

Warranty Claims Process

Guidelines for making a warranty claim and product usage requirements.

Warranty Coverage Details

Details on covered parts and duration of the warranty.

Returns Policy

Return Instructions for Changed Mind

Procedures for returning the item if the customer changes their mind.

Handling Defective or Damaged Items

Procedures for returning items that are defective or arrive damaged.

Overview

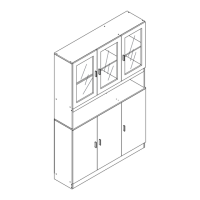
This document provides assembly instructions and important information for a display cabinet.

Function Description

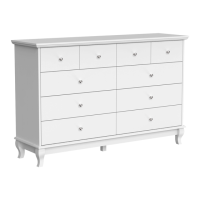
The display cabinet is a piece of furniture designed for storage and display. It features multiple shelves and compartments, some with glass doors, allowing for the organization and exhibition of various items. The cabinet is composed of several panels, including top, bottom, side, and back panels, as well as shelves and doors. The upper section appears to have glass doors, suitable for displaying items, while the lower section has solid doors for concealed storage.

Important Technical Specifications

The manual details various components and fasteners required for assembly, each with specific dimensions:

  • Screws:
    • Ax12(+1): Ø6x35mm
    • Cx32(+3): Ø6x30mm
    • Dx28(+2): Ø4x40mm
    • Ex72(+3): Ø4x14mm
    • Mx36(+3): Ø3x12mm
  • Cam Locks:
    • Bx3: Ø15x10mm
  • Wooden Dowels:
    • Fx8
  • Handles:
    • Gx6 (G-1, G-2)
  • Hinges:
    • Jx2 (J-1, J-2, J-3)
    • Lx4
  • Washers:
    • Kx2 (K-1, K-2, K-3)
  • Foot Pegs:
    • Ox6
  • Stickers:
    • Nx20(+2) for covering screws.
  • Back Plates:
    • Ix24(+2)

The cabinet is designed to be assembled using a screwdriver, hammer, and possibly a drill for wall attachment.

Usage Features

The display cabinet offers versatile storage solutions:

  • Display Area: The upper section with glass doors (parts 8 and 22) is ideal for showcasing decorative items, collectibles, or dishware, protecting them from dust while keeping them visible.
  • Concealed Storage: The lower section with solid doors (parts 22) provides discreet storage for items that do not need to be displayed, helping to maintain a tidy appearance.
  • Shelving: Multiple shelves (parts 15, 20) are integrated throughout the cabinet, offering ample space for organization.
  • Stability: The product includes an anti-topple warning, emphasizing the importance of using a wall attachment to prevent serious injuries. This feature ensures the safety and stability of the cabinet, especially in households with children or pets.
  • Adjustable Components: The manual indicates that hinges and other components can be adjusted to correct misalignment after installation, ensuring proper door closure and overall aesthetic.

Maintenance Features

The manual provides clear guidelines for maintaining the display cabinet:

  • Re-tightening Screws: It is crucial to re-tighten all screws 2 weeks after initial assembly and then every 3 months. This practice helps ensure the product's stability throughout its lifespan.
  • Regular Cleaning:
    • Frame: For the frame, use a rag dipped in neutral detergent to wipe it thoroughly, then dry with a clean rag.
    • Glass Materials: For glass parts, use a rag dampened with water glass cleaner, and then dry with a dry rag to avoid streaks.
  • Avoid Harsh Tools: Do not use an electric screwdriver or apply excessive force during installation, as the board material is susceptible to breakage.
  • Wall Attachment: If a wall attachment is not included, it must be purchased separately to prevent tipping, which is a critical safety measure. Professional advice should be sought if unsure about the appropriate wall attachment.
  • Sticker Usage: Stickers (N) are provided to cover screws, contributing to a cleaner aesthetic and potentially protecting the screw heads.

Warranty and Returns Information

The product comes with a warranty and specific return policies:

  • Warranty Claims: A 30-day warranty covers broken furniture or other functional issues, starting from the purchase date, verified by proof of purchase.
  • Replacement Parts: For replacement parts, customers are advised to call with their purchase order number and details of the problem. Replacements are typically arranged within 48 hours, with shipping dates provided if items are out of stock.
  • Product Usage: The product must be used in accordance with the provided instructions for health reasons.
  • Returns: If furniture needs to be returned for other reasons, it must be cleaned and dried and returned within 30 days of receipt.
  • Warranty Invalidation: Failure to follow assembly instructions will invalidate the warranty.
  • Coverage: The warranty covers damage during transportation but not during installation.
  • Scope of Responsibility: The manufacturer is not responsible for misuse, user damage, or loss of parts during installation. Damage and scratches after use are not covered.
  • Warranty Areas (US):
    • Sheet parts: 1 month from the date of purchase.
    • Electrical parts: 1 month from the date of purchase.
  • Returns Policy:
    • Changed Mind: Follow the retailer's instructions for returns.
    • Defective Items: Call for assistance if an item is defective and the cause is unclear.
    • Damaged Items: Refuse delivery if shipping damage is obvious. If accepted and damage is later found, follow retailer instructions. All packaging and paperwork should be saved. Disposing of packaging or attempting to return without contacting the fulfiller may jeopardize a claim and prevent credit.

FUFU & GAGA WSD22028 Specifications

General IconGeneral
BrandFUFU & GAGA
ModelWSD22028
CategoryIndoor Furnishing
LanguageEnglish

Related product manuals