6.3 Basic Operations
6.3.1 Operating mode
This controller is able to operate in two different modes:
Basic mode: It has 30 functions, in addition to defrost schedule and datalogger features.
Advanced mode: It has 76 functions and, in addition to the defrost schedule and datalogger features,
has a digital filter, function lock, control function switch off, economic setpoint, fast freezing, audible
alarm (buzzer), digital input, and configuration for use of a third sensor.
To select the controller's operating mode, access function F00 on menu[Func].
NOTE:The features of the advanced mode will be disabled when the controller is configured to
operate in the basic mode (F00=0).
NOTE 2: The features described in items 6.3.3, 6.3.4, 6.3.7, 6.3.8, and 6.3.9 will only be available
when the controller is configured to operate in advanced mode (F00=1).
6.3.2 Adjusting the desired temperature (setpoint)
Hold down the key or 2 seconds to enter the setpoint adjustment menu. The message [SP,,] will /
be shown in the display, followed by the value to adjust the normal setpoint. Use the keys to <or >
change the value and press to confirm. If the controller is configured to operate in advanced mode, /
the message [SP-E] will be displayed to indicate the adjustment of the economic setpoint. Use the
keys again to change the value and press to confirm. Finally the indication[----] is <or> /
signaled concluding the configuration. The setpoints may also be adjusted individually in the quick
access menu.
6.3.3 Fast Freezing
In fast freezing mode the refrigeration output is continuously switched on to speed up the cooling or
freezing process. This operating mode may be activated or deactivated on the quick access menu
through the option [Fast]or using an external switch connected to the digital input (F57 or F58). It can
also be automatically deactivated by temperature (F38) or time (F39). During the fast freezing period,
the indication of the operating compressor flashes rapidly and the defrost continues. When the fast
freezing mode is activated, if the controller identifies a defrost schedules to start by this time period, the
defrost will start in advance and then the fast freezing mode will be activated.
6.3.4 Economic setpoint (SPE)
The [SP-E] is more economical for the system as it uses more flexible parameters to control the
temperature (F32 - Economic setpoint and F33 - Control differential). When activated, the message
[ECO,]will be displayed alternatively with the temperature and other messages. Economic mode can
be activated or deactivated using the following commands:
F34
F35
F36
F37
F37
F57 / F58
F57 / F58
-
-
-
-
-
Activates
Stays activated
Deactivates
Deactivates
Stays deactivated
Stays deactivated
Activates / Deactivates
Activates / Deactivates
Stays deactivated
Deactivates
Activates
Deactivates
Door closed time to activate
Temperature difference S3-S1 to activate
Temperature difference S3-S1 to deactivate
Maximum time in the economy mode
Maximum time in the economy mode = 0 (no)
Door open indication (digital input)
External switch (digital input)
Action through the quick access menu ([ECO,])
Room temperature reading error (S1)
When the instrument is switched on
Light intensity below the value configured in [OFF,]
(menu [LUMI])
Light intensity above the value configured in [On,,]
(menu [LUMI])
Function
Command
Action
6.3.5 Manual defrost
The defrost process can be manually activated/deactivated through the quick access menu in the option
[defr]or by pressing the key < for 4 seconds, or using the external switch connected to the digital
input (F57 or F58). The activation or deactivation will be indicated by the message [defr][On,,]or
[defr][OFF,]respectively.
6.3.6 How to determine the end of defrost by temperature
a)Reconfigure the functions related to the end of defrost to the maximum value:
- Time in refrigeration (interval between defrosts) F08 = 999min.
- Evaporator temperature to end the defrost F13 = 105°C / 221°F
- Maximum defrost time F14 = 90min.
b)Wait some time until a layer of ice forms on the evaporator.
c)Perform a manual defrost (using the key ;browse to [dEFr]and press/ or press the key < for
4 seconds).
d)Visually monitor the melting.
e)Wait until all the ice on the evaporator melts and then consider the defrost finished.
f)When the defrost is finished, check the temperature on the evaporator (S2) using the key >(see item
6.3.9).
g) Adjust the end of defrost temperature using the value read in S2:
- Evaporator temperature to end the defrost F13 = Temp. S2.
h)As a safety measure, readjust the maximum defrost time according to the type of defrost configured.
Example:
- Electric defrost (by resistance) F14 = 45min.
- Defrost by hot gas F14 = 20min.
i) Finally, adjust the refrigeration time (F08) with the desired value.
6.3.7 Defrost with two evaporators
With S3 configured as the sensor for the 2nd evaporator (F57), the Fan output gives way to the control of
the second resistance. The defrost is always started with both outputs activated. The resistances are
individually switched off as the respective evaporators reach the temperature to end the defrost. The
draining process is initiated when both outputs are switched off or after the maximum defrost time has
elapsed.
NOTE: With these configurations, all the Fan features are disregarded, including the Fan Delay
process.
6.3.8 Functions Lock
The use of the functions lockdown adds greater security to the operation of the controller. When it is
active, the setpoint and other parameters are visible to the user, but are protected against undue
changes (F62=2) or you can block changes of control functions and leave the adjustment of the setpoint
enabled (F62=1). To activate the functions lock, access the [LOC,] option in the quick access menu.
6.3.9 Control Functions Shutdown
The shutdown of the control functions allows the controller to operate only as a temperature indicator,
keeping the control outputs and alarms off. The use of this feature is enabled or disabled by the
shutdown function of the control functions (F64). When enabled, the control functions and alarms are
switched off ([CTRL][OFF,]) or on ([Ctrl][ON,,]) in the quick access menu through the
[Ctrl] option. When the control functions are off, the message[OFF,]is displayed alternating with
the temperature and other messages. Also is possible turn on/ turn off the control functions by pressing
the key ;for 5 seconds.
Note: The time defined in the startup delay function begins counting once the control functions are
switched on again.
6.3.10 Process stage, elapsed time, and temperature on sensors S2
and S3
The controller's operating status can be viewed by pressing the key >(short touch). A sequence of
messages will be presented indicating the current process, time (hh: mm) elapsed in this stage,
evaporator temperature (S2), and S3 temperature. If the sensors are disabled the respective
measurements will not be displayed.
Process stages:
[dEL,]- Initial delay (delay in the instrument start-up)
[Fan,]- Fan-delay (delay for the fan to return)
[rEFr]- Cooling
[Pre,]- Pre-Defrost
[dEFr]- Defrost
[dRAi]- Drainage
[----]- Control functions off
6.3.11 Minimum and Maximum Temperature Record
The display of minimum and maximum temperature records can be checked through the quick access
menu or by pressing the key< while the temperature is being displayed. The minimum and maximum
temperatures recorded for each sensor will be sequentially displayed preceded by the identification
messages [rEg,][,t-1] for the room sensor (S1), [,t-2]for S2 (when active), and [,t-3]
for S3 (when active). To erase the minimum and maximum values recorded, keep the key< pressed
for 2 seconds while the records are being displayed or use the option [CrEg] in the quick access
menu. The message [rSET]indicates that the records were erased.
6.3.12 Hourmeter
The hourmeter indicates the number of working hours of the compressor. The hourmeter can be viewed
through the quick access menu (;) in the option [Hour] and the working time of the compressor is
displayed in hours. The maximum working time of the compressor can be configured through the
function F66. When the number of working hours of the compressor reaches the value set in this
function, the display will show a warning ([aMai]), indicating that the compressor must be serviced.
To turn the warning off or to reset the hourmeter counter, access the option [Hour] in the quick
access menu ;, press/ and then press < for 2 seconds while the compressor working time is
being displayed until the message [rStH]is displayed.
6.3.13 View current date and time
Quickly pressing the key /(short touch) makes it possible to view the current date and time set in the
controller. The current day ([,--d]), month ([,--m]), year ([,--y]), day of the week([day-]),
and hour and minute ([00:00]) will be shown in sequence on the display. It is also possible to view the
date and time through the quick access menu in the option [ClO,].
NOTE: The number beside the message day indicates the day of the week.
Example: [day1] is Sunday.
6.3.14 Manual datalogger activation
The manual activation of the internal record of temperature values and state of control outputs
(Datalogger) is performed through the quick access menu in the option [dtl,]. The message
[dtL,]will be displayed followed by the message [On,,]when the datalogger is activated or
[OFF,] when it is deactivated. It is also possible to activate the datalogger manually by pressing the
keys for 10 seconds.<and>
6.3.15 Selection of temperature measurament units
To select the temperature measurament units the system will use to operate,
press<and>simultaneously while the temperature is being displayed, enter the option
[Code]using the access code [,231] and then press/.Then select the desired unit [,=C,] or
[,=F,]using the keys<or>, and press / to confirm.
NOTE: Whenever the units are changed, the configuration of the functions assume the factory
default, so they need to be configured again.
6.4 Advanced Operations
6.4.1 Access to the main menu
The main menu can be accessed through the quick access menu, option [Func] or by pressing <
and >simultaneously (short touch) while the temperature is being displayed.
The following options will be displayed:
[Code]- Entry to the access code
[Func]- Change the parameters
[ClO,]- Adjust or visualization of the date and time
[Log,]- Datalogger configuration
[Prog]- Defrost schedule configuration by hour programming
[LUMI]- Configuration of the economic setpoint activation sensor
NOTE: The menu [Prog] is enabled only if function F01 - Defrost by hour programming is
configured with 1.
Then[no,,] message will be displayed (lock must be enabled and inactive). With that on the display,
press the>key for the time configured for the functions lock (F63), the activation is indicated by the
[LOC,][On,,]message. To enable the use of this function, F62 must be configured with 1 or 2.
When trying to change the parameters, the [LOC,]message indicates that the functions lock is
active, to deactivate it, turn the controller off and then turn it on again with the>key pressed.
Keep the key pressed until the [LOC,][OFF,]message indicates the unlocking (10 seconds).
NOTE: This feature is available only in the advanced mode (F00=1).
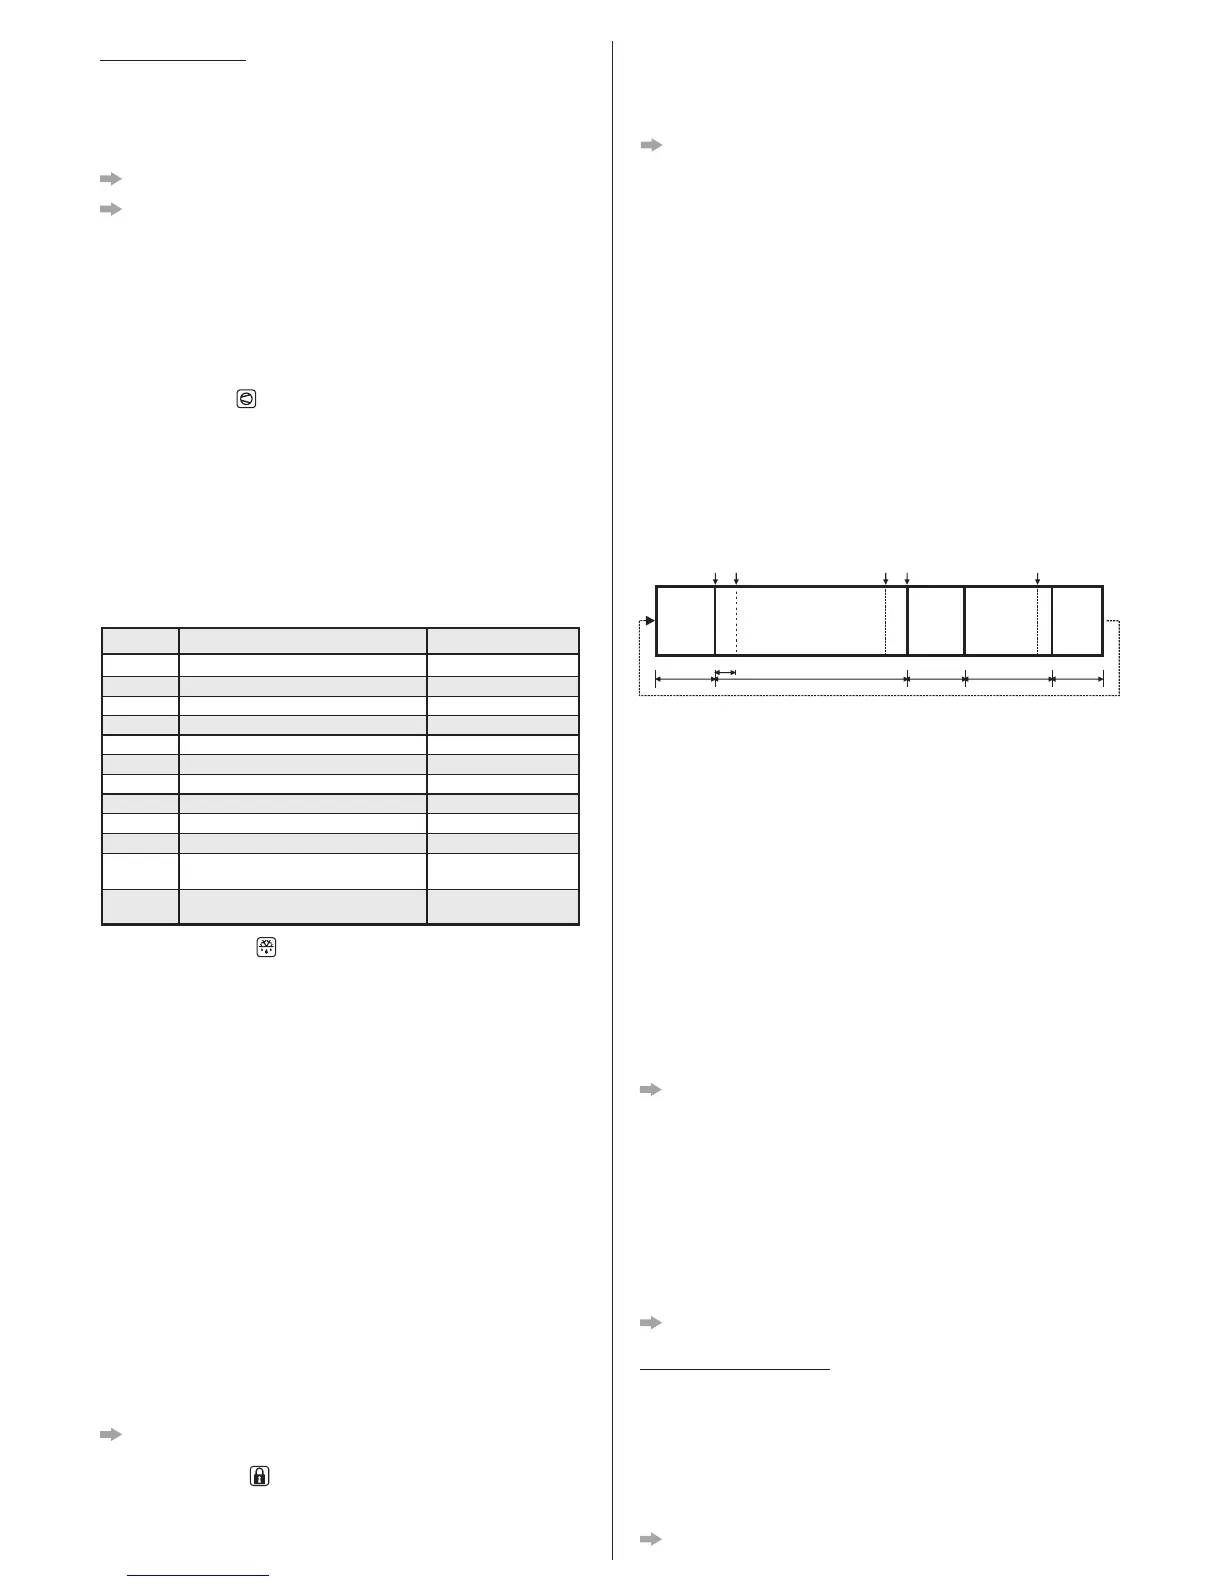
FAN-DELAY COOLING
PRE-DEFROST
MAX. F20 IF F45=0 F08 F44
F17
F19
Unlock
the indication
IF F45=1
F47
Lock the display
if enabled on F17
DEFROST DRAINAGE
MAX. F14 F18
F13
 Loading...