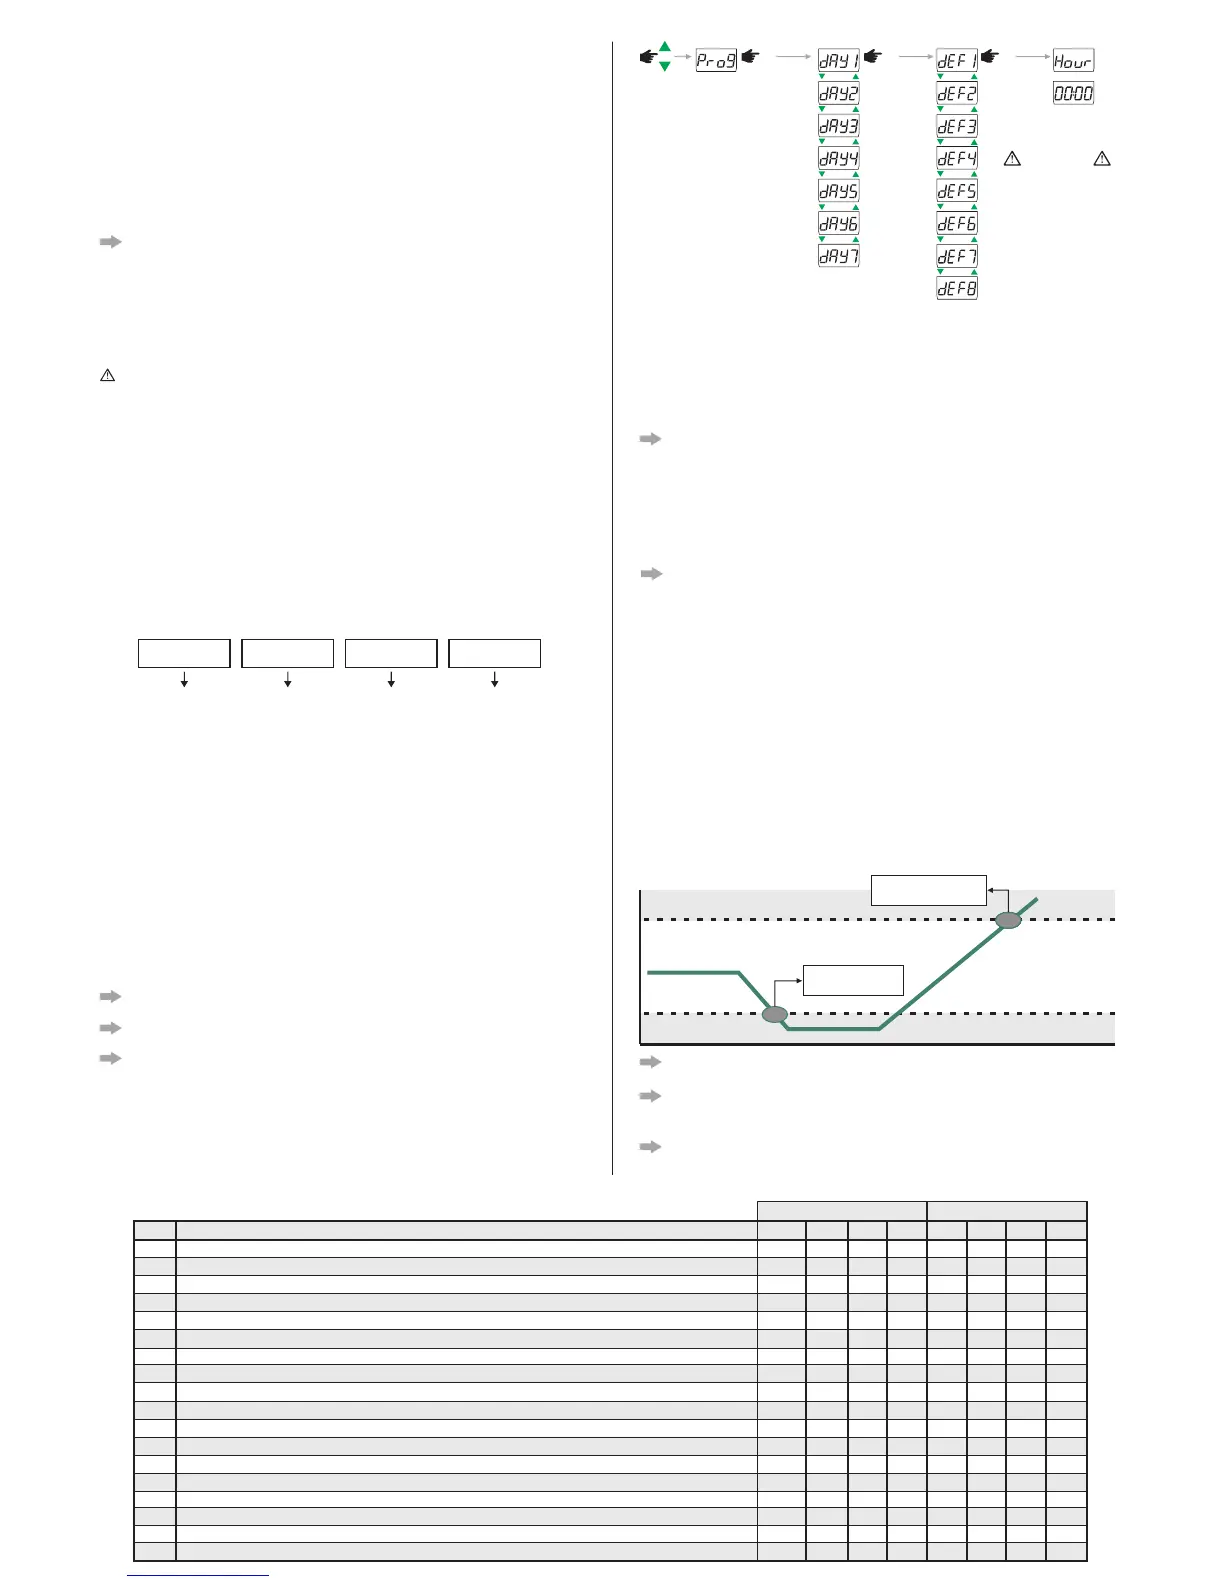
6.4.5 Defrost schedule
The function menu allows configuring the schedule of defrosts distributed among equal periods of time
according to the programmed number of defrosts per day. To do this, enable the defrost schedule by
configuring F01 with 2, and configure the number of defrosts per day and the preferred time using
functions F25 to F30.
In this case the defrost schedule allows creating a program for Monday to Friday, a program for
Saturday, and another program for Sunday.
Example: For the Monday to Friday program, if the preferred time is set to 1 PM (and the number of
defrost cycles is set to 4 and the interval is 6 hours), the defrost will be performed at 1 AM, 7 AM, 1 PM
and 7 PM of the same day.
01:00 07:00 13:00 19:00
MONDAY TO FRIDAY
DEFROST DEFROST DEFROST DEFROST
6.4.6 Internal datalogger (internal memory)
The configuration functions of the datalogger are available in menu [Log,].
When the datalogger is enabled (F68), it is possible to store records in the controller's internal memory.
It can be configured to store records by time interval (F69), by temperature variation (F70), and/or by
the variation of the state of the digital output or inputs (F71). The activation of alarms also performs the
storage of records. The information contained in a record are: Temperature of sensors S1, S2 (if
enabled), and S3 (if enabled), state of the control outputs, door state (if the digital input is configured as
door contact), active alarms and their respective timestamp.
NOTE: No records are stored in the datalogger if the clock is not programmed.
NOTE:To disable the programming of undesirable defrosts, displace the adjustment to the
maximum using the key<until the message [,OFF]is displayed.
NOTE2:The access code is not required to view the times programmed in the defrost schedule
(without changing them).
NOTE3:For the defrosts to be performed by the schedule (programmed times), at least one (1)
defrost must be programmed for each day of the week. Otherwise the defrosts will be performed by
the normal process (after the cooling time is over or by temperature, as configured in F45), and
function F01 will be automatically configured with "0".
TC-900e Log
TC-900e Log
TC-900e Log
TC-900e Log
TC-900e Log
TC-900e Log
TC-900e Log
TC-900e Log
TC-900e Log
TC-900e Log
TC-900e Log
TC-900e Log
TC-900e Log
TC-900e Log
TC-900e Log
TC-900e Log
or
/ / /
It is also possible to create a defrost schedule with different times (the defrosts do not need to be equally
spaced) for each day of the week with up to eight defrosts per day through the menu [Prog]. For this
menu to be available, function[,F01] must be configured with 1.
To configure the defrost schedule in menu [Prog]:
a)Press<and>(short touch) simultaneously, the option[Code]will be displayed to request the
access code.
b)Press/and enter the access code 123 using the keys<or>, confirming with/. The option
[Code]will appear again.
c)Browse the menu using the keys<or>until the option [Prog] appears, and then press/.
d)Use the keys <or>to select the day of the week to create the defrost schedule and press/.
e)Again use the keys<or>to select which of the eight available defrosts will be configured and
press/.
f)The time configured for the chosen defrost will be displayed. Use the keys<or>to change the time
and press/again to return to de defrost programming menu.
g)To leave the defrost programming menu and return to the previous menu, press /until the message
[----]is displayed.
Sunday
Monday
Tuesday
Wednesday
Thursday
Friday
Saturday
If the serial programming
accessory (EasyProg) is
being used, the defrost
schedule configured in the
menu [Prog]will not be
replicated to the other
c on t r ol l e rs , o n l y t he
parameters of the controller
( f u n c t i on t a b l e ) a r e
replicated.
IMPORTANT
6.4.2 Access code
To allow changing the parameters or adjusting the clock, enter the option [Code] pressing/(short
touch) and enter the access code 123 (one hundred and twenty-three) using the keys<or>and
confirm with/.
6.4.3 Changing the controller parameters
In the main menu select the option [Func] and then the desired function using the keys< or >.
Press/ (short touch) after selecting the function to view its value. Use<or> to change the value
and press/ when ready to save the configured value and return to the function menu. To leave the
menu and return to the normal operating mode (temperature indication), press/(long touch) until
[----]appears.
NOTE: If the function lock is active, the controller will show the message [LOC,] , in the display
upon pressing < or >and will not allow adjusting the parameters.
6.4.4 Date and time adjustment
Select the option [ClO,]in the main menu. The controller will enter the date and time adjustment
mode if the access code [,123] was correctly entered. Use<or>to change the value and
press/ when ready to save the configured value. If the date entered is invalid, the message [ECLO]
will be shown on the display.
IMPORTANT: The controller has an auxiliary internal power supply to keep the clock running for at
least 72 hours in case of power failure. If the controller remains off for a long period of time, the message
[ECLO] will be displayed to indicate that the clock is not programmed. In this case, the date and time
must be adjusted and the controller must be kept on for 10 hours to fully recharge the auxiliary power
supply.
6.4.7 Configuration of the economic setpoint activation sensor
The option [LUMI] in the main menu allows configuring the sensor to activate the economic setpoint
through the following functions:
[On,,]Light intensity for which the room is considered bright (deactivate the economic setpoint).
[OFF,]Light intensity for which the room is considered dark (activate the economic setpoint).
[TIME]Time for which the controller must be exposed to the luminosity levels configured to activate
and deactivate the economic setpoint.
NOTE: The sensor is disabled if the time configured in function [TIME]is equal to zero.
To configure it correctly perform the following steps:
a)In the main menu use the keys <or> until reaching option [LUMI] , then press/.
b) Keep the room where the controller will work with the light intensity for which the room is considered
to be bright, for which the economic setpoint must not be activated.
c)Browse to the option [On,,], press /and the message[++++] will keep flashing.
Make sure that the room is exposed to the desired light intensity to deactivate the economic setpoint
and press/again.
d)Now change the luminosity of the room where the controller will work to a level regarded as dark, for
which the economic setpoint must be activated.
e)Browse to the option[OFF,], press/and the message [____] will keep flashing.
Make sure that the room is exposed to the desired light intensity to activate the economic setpoint and
press/again.
f)Now that the light intensities are configured the luminosity sensor feature can be enabled through
option [TIME].
g)Browse to option [TIME], press/ then, using the keys< >change the value of the time in , or
minutes for which the luminosity must be above the [On,,] threshold for the room to be considered
bright, which will be the same time that the luminosity must be below the [OFF,]threshold for the
room to be considered dark.
LUMINOSITY
ECO
ECO
ACTIVATE ECONOMIC
SETPOINT
DEACTIVATE ECONOMIC
SETPOINT
NOTE:Even with the luminosity sensor enabled, the other forms of activating/deactivating the
economic setpoint still work, as described in item 6.3.4.
6.5 Table of parameters
[,F07]
[,F08]
[,F09]
[,F10]
[,F11]
[,F12]
[,F13]
[,F14]
Min
Max
Standard
Unit
Description
Fun
[,F00]
[,F01]
[,F02]
[,F03]
[,F04]
[,F05]
[,F06]
Min
Max
Unit
0
0
0.1
-50
-50
0(NO)
-50
-50
1
0(NO)
0(NO)
0
NO
-50
0(NO)
0(OFF)
0
-1(NO)
1
2
20
105
105
30
105
105
5999
999
999
2
YES
105
90
1(ON)
1
99
-
-
°C
°C
°C
min.
°C
°C
min.
sec.
sec.
-
-
°C
min.
-
-
min.
0
0
2
-50
105
0(NO)
-50
105
240
0
0
1
NO
30
30
0(OFF)
0
-1(NO)
0
0
1
-58
-58
0(NO)
-58
-58
1
0(NO)
0(NO)
0
NO
-58
0(NO)
0(OFF)
0
-1(NO)
1
2
36
221
221
30
221
221
5999
999
999
2
YES
221
90
1(ON)
1
99
Controller's operating mode
Defrost by hour programming
Control differential (normal hysteresis)
Minimum setpoint allowed to the end user
Maximum setpoint allowed to the end user
Startup delay (power up)
Low room temperature alarm (S1)
High room temperature alarm (S1)
Time in refrigeration (interval between defrosts)
Minimum compressor on time
Minimum compressor off time
Compressor state with a disconnected or faulty room sensor (S1)
Defrost at instrument startup
Evaporator temperature (S2 / S3) to determine the end of defrost
Maximum defrost time
Fan on during defrost
Defrost type
Temperature indication (S1) locked during defrost
[,F17]
[,F15]
[,F16]
-
-
°F
°F
°F
min.
°F
°F
min.
sec.
sec.
-
-
°F
min.
-
-
min.
NOTE: If the light intensity configured to deactivate the economic setpoint is lower than the light
intensity configured to activate the economic setpoint, or vice-versa, the luminosity sensor will be
deactivated.
NOTE: The conditions to activate/deactivate the economic setpoint are listed on the table in item
6.3.4.
TC-900e Log
TC-900e Log
TIME
OFF
ON
0
0
3
-58
221
0(NO)
-58
221
240
0
0
1
NO
86
30
0(OFF)
0
-1(NO)
CELSIUS (°C) FAHRENHEIT (°F)
Standard
 Loading...