This document describes the FulTyme RV Platform Bike Rack - 2 Bike, a bicycle carrier designed for vehicle attachment.
Function Description
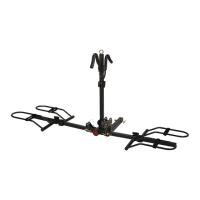
The FulTyme RV Platform Bike Rack is designed to transport two bicycles securely on the rear of a vehicle. It attaches to a 2-inch receiver hitch. The rack features a platform design where bicycle wheels rest in cradles, and the bike frames are secured by J-hooks. This design aims to provide stable transport and prevent bikes from rolling back and forth during transit.
Important Technical Specifications
- Capacity: The bike carrier has a weight capacity of 200 lbs. It is crucial not to exceed this rated capacity.
- Bike Capacity: Designed for transporting 2 bicycles.
- Receiver Size: Inserts into a 2-inch receiver.
- Tools for Assembly:
- Monkey Wrench (1pc), Size: 300mm
- Open Wrench (1pc), Size: 17mm
- Open Wrench (1pc), Size: 24mm
- Materials/Components (from Part List):
- Support Base assembly (1)
- Horizontal arm (2)
- L Pin (3)
- M10 CARRIAGE BOLT (3)
- M10 flat washer (3)
- M10 LOCKNUT (3)
- Vertical arm (1)
- Folding Shank (1)
- M16 BOLT (1)
- 5/8" pin (1)
- Clip (2)
- M16 LOCKNUT (1)
- Left cradle assembly (2)
- Right cradle assembly (2)
- Long J-hook assembly (1)
- Short J-hook assembly (1)
- Stabilizing Pin (1)
- 1/2" Spring Washer (1)
- VT Flat Washer (1)
- Snap pin (2)
- Eye bolt (1)
- Reflector (1)
Usage Features
The bike rack incorporates several features to enhance usability and convenience:
- Adjustable Cradles and J-hooks: Both the cradles (where wheels rest) and the J-hooks (which secure the bike frame) are fully adjustable. They slide along the horizontal and vertical arms, respectively. This adjustability allows for accommodating different bicycle sizes and frame geometries. To adjust, users twist the vertical knobs on the cradles and horizontal knobs on the J-hooks until they are loose, allowing movement along the tubes.
- Secure Bike Mounting:
- Once adjusted, bikes are placed into the cradles, ensuring the wheels fit properly and do not roll.
- The J-hook is brought down to fit securely over the middle part of the bike frame.
- Straps on the cradles are used to secure the wheels, ensuring all wheels are strapped.
- Tilt Down Feature: This feature allows the rack to tilt downward, providing access to the rear of the vehicle (e.g., for opening a tailgate or trunk) without removing the bikes or the entire rack. To activate, the 5/8" pin is removed. Users are cautioned to securely grasp the bike rack while the pin is out and not to place bikes on the wheel cradle when operating this feature.
- Storage Feature (Folding): The rack can be folded for more compact storage when not in use or when attached to the vehicle without bikes.
- Folding Main Vertical Arm: The L Pin is spun 90 degrees and pulled out from the center hole. The main vertical arm can then be folded to a horizontal position (down on the opposite side of the folding shank) and re-secured with the L pin.
- Folding Horizontal Arms: The horizontal arms can also be folded upward.
- Folded When Not In Use Feature: For a more compact profile when attached to the vehicle but not carrying bikes, the vertical arms can be folded to the horizontal position, and then the folding shank assembly can be folded to the vertical position.
- Reflector: A reflector is included and installed in a hole on the square tube, likely for increased visibility and safety.
Maintenance Features
The manual emphasizes several important safety and operational guidelines that contribute to the longevity and safe use of the bike rack:
- Thorough Manual Review: Users are instructed to read the manual thoroughly before installation and use to prevent serious injury or property damage.
- Capacity Adherence: Strictly adhere to the 200 lbs weight capacity and avoid exceeding it.
- Intended Use: The carrier is exclusively for transporting bicycles. It should not be used for towing, pulling, or carrying other items/materials.
- Regular Inspection: While not explicitly detailed as a "maintenance feature," the emphasis on proper assembly and secure fastening of components (bolts, nuts, pins, clips) implies that users should regularly check these connections to ensure they remain tight and secure, preventing wear or failure.
- Familiarization with Controls: Users should familiarize themselves with the location and function of all controls and features, which aids in correct operation and potentially in identifying issues early.
- Saving the Manual: Keeping the manual for future reference is advised, which is crucial for troubleshooting or re-assembly.
The design of the rack, with its various pins, bolts, and nuts, suggests that individual components can be replaced if damaged, though specific replacement instructions or parts are not detailed in this excerpt. The use of standard wrench sizes for assembly also indicates a degree of user-serviceability for tightening or re-assembling parts.