EasyManua.ls Logo

Furinno 99811 User Manual

Furinno 99811
2 pages
To Next Page IconTo Next Page
Page #1 background imageLoading...
Page #1 background image
Assembly Instruction
WARNING:
>This unit has been designed to support the
maximum loads shown. Exceeding these
load limits could cause sagging, instability,
product collapse, and/or serious injury.
>DO NOT allow children to climb on unit.
>Put heavier items on lower shelves.
its Space. its Budget
Customer Support
www.furinno.com
NEED HELP? For replacement requests or product inquiries,
please contact our Customer Service Team by emailing us at
support@furinno.com. Thank you for selecting Furinno!
4 1
In order to prevent product tip over, please follow the instruction below to secure the unit to the wall.
STEP 3
Recommended Maximum Weight
Furinno Turn-N-Tube 5 Tier Corner
Display Rack Multipurpose Shelving Unit
9981120180305
MODEL :
99811
*Unit in Pound(lbs)
CABLE TIE
WALL
10
10
10
10
10
1SET
Hardware List Qty
1/4”
DRILL BIT
No Tools Required
Recomm. 1 Person
Approx. 10 minutes
Question and Answer IconNeed help?

Do you have a question about the Furinno 99811 and is the answer not in the manual?

Furinno 99811 Specifications

General IconGeneral
BrandFurinno
Model99811
CategoryIndoor Furnishing
LanguageEnglish

Summary

Step 3: Securing the Unit to the Wall

Hardware for Wall Mounting

Lists components required for securing the shelving unit to the wall.

Maximum Load Warning and Safety

Advises on load limits to prevent instability, collapse, or injury, and child safety.

Assembly Overview and Support

Estimated Assembly Time and Requirements

Indicates the estimated time, number of people, and tools needed for assembly.

Customer Support and Contact Information

Provides contact details for product inquiries and replacement requests.

Assembly Instructions

Useful Hints Before Starting Assembly

Provides essential tips for a successful and safe furniture assembly process.

Step 1: Initial Assembly of Base and Poles

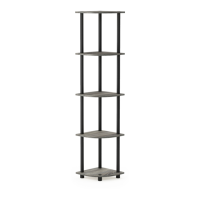
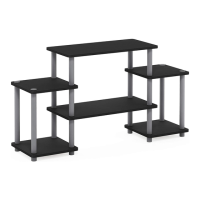
Details attaching poles, caps, legs to the bottom panel and adding shelf panels.

Step 2: Attaching the Top Panel

Describes the process of securing the top panel and cap to complete the unit.

Related product manuals