Do you have a question about the Furinno TWIN and is the answer not in the manual?
Guidance on preparing for assembly, including reading instructions, ordering steps, and proper hardware usage.
Crucial information on maximum load capacities and keeping hardware away from children for safety.
List of all components required for assembling the bed frame, with quantities specified.
Catalog of all screws, washers, and tools included for the assembly process.
Attaching initial components to the headboard, using specific hardware as illustrated.
Connecting side rails to the headboard assembly with designated hardware.
Assembling the remaining side rail and footboard connections.
Securing the footboard and side rails to the main bed frame structure.
Installing the center support rails and supporting legs.
Finalizing assembly by attaching the roll slats and confirming all connections.
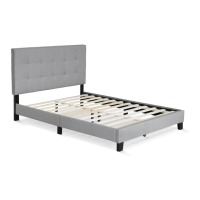
The Furinno Button Tufted Bed Frame is a stylish and functional piece of furniture designed to provide a comfortable and supportive sleeping surface. This bed frame is part of the "Fits Space. Fits Budget" product line, emphasizing its practicality and affordability. It is intended for indoor use and is suitable for various bedroom aesthetics due to its classic button-tufted design.
The primary function of the Furinno Button Tufted Bed Frame is to support a mattress, elevating it off the floor to create a comfortable and hygienic sleeping environment. The frame provides a stable foundation, preventing the mattress from sagging and ensuring proper spinal alignment during sleep. Its design incorporates a headboard and footboard, which not only contribute to the bed's aesthetic appeal but also offer practical benefits. The headboard provides a comfortable backrest for sitting up in bed, whether for reading, watching TV, or working on a laptop. The footboard helps to keep the mattress securely in place and adds a decorative touch to the bed's overall appearance. The integrated roll slats and center support rails are crucial for distributing weight evenly across the frame, enhancing the mattress's lifespan and preventing premature wear. The support legs with adjustable feet allow for minor height adjustments, ensuring stability on uneven floors and preventing wobbling.
The Furinno Button Tufted Bed Frame is designed with user convenience in mind, from assembly to daily use.
Easy Assembly: The manual emphasizes a straightforward assembly process, recommending careful reading of each step, performing steps in the correct order, and identifying/sorting parts before starting. This approach minimizes difficulties and ensures a smooth setup. The estimated assembly time is 30 minutes, and only a screwdriver (x2) is required, indicating a user-friendly design that doesn't demand specialized tools or extensive DIY experience. The instruction to assemble the product on packaging cardboard helps prevent scratches or damage during the process, highlighting a thoughtful consideration for the product's longevity and appearance. The advice not to fully tighten nuts until all are assembled is a common best practice in furniture assembly, allowing for minor adjustments and alignment before final securing, which is particularly helpful for ensuring the frame is square and stable.
Sturdy Construction: The bed frame is built to support significant weight, with different load limits for various mattress sizes: Twin & Twin XL (200 lbs), Full (400 lbs), Queen (500 lbs), and King & Cal. King (600 lbs). These specifications indicate a robust design capable of accommodating different users and mattress types. The inclusion of multiple support components, such as side rails, center support rails, roll slats, and support legs, ensures even weight distribution and prevents structural failure. The warning against exceeding these load limits underscores the importance of adhering to the product's design parameters to avoid sagging, instability, product collapse, or serious injury, emphasizing safety as a core usage feature.
Comfort and Support: The button-tufted headboard provides a soft and cushioned surface, enhancing comfort for those who enjoy sitting up in bed. The slat system eliminates the need for a box spring, offering direct support to the mattress and promoting better air circulation, which can contribute to a cooler and more hygienic sleep environment. The adjustable feet on the support legs are a practical feature, allowing users to fine-tune the bed's height and stability, ensuring it remains level and secure on various floor types.
Space-Saving Design: While not explicitly stated as a space-saving feature, the bed frame's integrated headboard and footboard offer a complete bed solution without requiring additional bulky furniture. The design aims to fit within various room sizes, aligning with the "Fits Space" motto. The zippered compartment at the back of the headboard, where some parts are packed, is an ingenious feature that not only aids in shipping and organization but also potentially offers a hidden storage space for small, flat items once the bed is assembled, though its primary purpose is for packaging.
Aesthetic Appeal: The button-tufted design of the headboard provides a classic and elegant look that can complement a wide range of interior décor styles, from traditional to contemporary. This aesthetic feature makes the bed frame a focal point in the bedroom, enhancing its overall ambiance.
The Furinno Button Tufted Bed Frame is designed for relatively low maintenance, focusing on durability and ease of care.
Durable Materials: The use of various screws (JCBB, JCBC, standard screws), wood dowels, spring washers, and flat washers in the assembly indicates a construction designed for stability and longevity. These components are chosen to securely fasten the different parts of the frame, ensuring it withstands daily use. The emphasis on "DO NOT FULLY-TIGHTEN the nut until all nuts are ready assembled" suggests that the frame's integrity relies on proper, balanced tightening, which contributes to its long-term stability and reduces the need for frequent adjustments.
Prevention of Damage: The recommendation to assemble the product on packaging cardboard is a simple yet effective maintenance tip. It prevents scratches and damage to the product's finish during the initial setup, preserving its aesthetic quality from day one. The warning about using incompatible hardware causing damage reinforces the importance of using the provided components, ensuring the structural integrity and preventing wear or breakage that would require repair.
Safety Considerations: The "IMPORTANT NOTES" section, particularly the advice to "Keep all hardware parts out of reach of children," is a crucial safety and maintenance feature. It prevents accidental ingestion or injury, ensuring that the bed frame remains safe for the household environment. This also implies that if parts are lost, they should be replaced with identical ones to maintain the bed's structural integrity.
Customer Support for Parts: The provision of customer service via email (support@furinno.com) for "replacement requests or product inquiries" is a significant maintenance feature. It ensures that users can easily obtain replacement parts if any are lost or damaged during assembly or use, extending the product's lifespan and reducing the need for a complete replacement. This commitment to after-sales support underscores the brand's dedication to product longevity and customer satisfaction.
In summary, the Furinno Button Tufted Bed Frame is a practical, aesthetically pleasing, and user-friendly piece of furniture. Its design prioritizes ease of assembly, robust support, and a comfortable sleeping experience, all while offering straightforward maintenance and reliable customer support.
| Product Name | Furinno TWIN |
|---|---|
| Category | Indoor Furnishing |
| Assembly Required | Yes |
| Material | Engineered Wood |
| Color Options | Black, White, Espresso, French Oak Grey |
| Shape | Rectangular |