Do you have a question about the Galaxy Aqua 9000 XP and is the answer not in the manual?
| Brand | Galaxy |
|---|---|
| Model | Aqua 9000 XP |
| Category | Plumbing Product |
| Language | English |
Information on contacting the service helpline for product breakdown assistance.
Details on necessary information to provide when calling the technical hotline for repairs.
Guidelines for service calls, including engineer visits and potential charges.
Details the two-year guarantee period and conditions for mechanical/electrical defects.
Outlines what is not covered by the guarantee, such as misuse or scaling.
Specifies the guarantee's validity within the UK and its relation to statutory rights.
Step-by-step instructions for cleaning the shower filter by a competent person.
Guidance on priming the unit after filter replacement and before restoring power.
Important safety advice regarding switching off the unit when not in use.
Essential safety information covering installation, use, and maintenance of the shower.
Regulations and advice for safe plumbing installation, including water and building standards.
Guidelines for safe electrical installation, compliance with regulations, and earthing.
Explains the manual's purpose and advises thorough reading before installation.
Stresses the need for competent persons with adequate experience for installation.
Explains how water flow rate affects shower temperature and seasonal adjustments.
Recommends supervision for users with difficulties operating the shower, like children.
Details how to select from six different spray patterns by turning the sprayhead bezel.
Recommends rubbing nipples daily to break away scale deposits while the shower is running.
Instructions for periodic cleaning to remove limescale and debris using descalent and a brush.
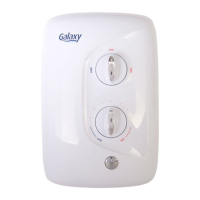
Describes the blue power neon indicator and the function of the start/stop button.
Explains low water pressure and overheat cut-out mechanisms that protect the unit.
Details the non-resettable over-temperature safety device and its function.
Advises on switching off if water stops, handling hot water slugs, and avoiding placing items on the unit.
Recommends RCD installation and specifies supply cable requirements for safety.
Emphasizes the need for a shower to be on its own independent electrical circuit.
Guidance on checking consumer unit capacity and contacting the electricity company for installation.
Explains how to adjust shower temperature by altering water flow rate via the temperature control.
Details the functions of the four power selector settings: Cold, Low, Medium, and Full power.
Instructions for initiating and safely stopping the shower operation, including phased shutdown.
Instructions for preparing pipework, flushing debris, and connecting to the shower inlet.
Importance of fitting an additional gate valve for independent water supply isolation.
Details on cable entry points, routing options (clipped, hidden, conduit), and connections.
Instructions for connecting the earth, neutral, and live cables to the terminal block.
Ensures cover is fitted and power selector is on 'Cold' before proceeding with commissioning.
Procedure for flushing the unit, operating controls, and completing the commissioning process.
Guidelines for positioning the shower unit vertically, avoiding freezing conditions and direct spray.
Details cold water supply requirements, including gravity feed from a cistern and head limitations.
Instructions for mounting the unit's backplate securely and squarely onto a flat wall surface.
Note on control knobs being integral to the cover and securing the cover correctly.
Explains the purpose of the PRD for pressure build-up and advises against operating with hose issues.
Details how to access and replace the PRD, emphasizing safety and competency.
Step-by-step guide for installing the riser rail, including bracket placement and adjustments.
Instructions for assembling the handset height adjuster using lettered components.
Guidance on firmly attaching the flexible hose and fitting the soap dish onto the rail.
Ensures commissioning is complete and explains the procedure for initial operation.
Procedure for flushing the unit with the hose attached to remove debris before element activation.
Setting the temperature control and power selector to the correct positions before first use.
Ensuring water supply is on and using the bleed screw to vent trapped air from the unit.
Guidance on re-attaching the cover, connecting the power lead, and securing with screws.
Details for top, bottom, and back water pipe entry, including aperture modifications.
Using the template to mark fixing holes and advice on drilling for various wall types.
Securing the backplate to the wall, allowing for adjustment before final tightening.
Steps for connecting the water supply pipework to the shower inlet elbow.
Instruction to switch off the electricity supply before making any connections.
Details on cable entry points and connecting live, neutral, and earth cables to the terminal block.
Ensures cover is fitted and power selector is on 'Cold' before proceeding with commissioning.
Procedure for flushing the unit, operating controls, and completing the commissioning process.