Do you have a question about the Game ready Med4 Elite and is the answer not in the manual?
Remove twelve screws securing the top panel and lift it off the crate.
Remove sixteen screws along vertical edges of side panels, avoiding interior/bottom screws.
Remove eight screws securing front and back panels, then lift them away.
Remove four screws securing top braces and four screws joining bottom braces.
Detach the Accessory Kit box from the unit's protective plastic.
Remove eight screws securing side panels and lift them away from the crate.
Remove and dispose of the plastic protective layer.
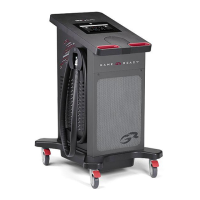
Carefully lift the Control Unit off the crate base, ideally with two people.
Use the Quick Start guide in the Accessory Kit for initial setup instructions.
Contact support via phone or local distributor for assistance.
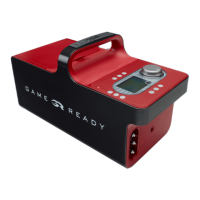
The Med4 Elite by Game Ready is a sophisticated medical device designed for advanced cold, heat, compression, and contrast therapy. It is intended to facilitate recovery and rehabilitation by providing precise control over therapeutic temperatures and compression levels. The device is typically used in clinical settings, athletic training facilities, and by individuals requiring intensive post-injury or post-operative care.
The Med4 Elite integrates four primary therapeutic modalities: cryotherapy (cold), thermotherapy (heat), intermittent pneumatic compression, and contrast therapy (alternating cold and heat). This multi-modality approach allows for comprehensive treatment of injuries, reduction of swelling, management of pain, and improvement of circulation.
The Med4 Elite is designed to treat multiple body parts simultaneously, or different areas sequentially, depending on the configuration and accessories used. It features multiple ports for connecting various anatomical wraps, allowing for targeted treatment of specific joints and muscle groups such as knees, shoulders, ankles, and hips.
While specific numerical values for temperature ranges, compression pressures, and flow rates are not provided in the uncrating guide, the device is implied to offer precise control over these parameters. The "Elite" designation suggests advanced capabilities beyond basic cold/compression units.
While the uncrating guide does not explicitly detail maintenance features, some aspects can be inferred:
In summary, the Med4 Elite is a comprehensive, multi-modal therapy system designed to provide precise and controlled cold, heat, compression, and contrast therapies for accelerated recovery and rehabilitation. Its advanced features, user-friendly design, and robust construction make it a valuable tool in various healthcare settings.
| Brand | Game ready |
|---|---|
| Model | Med4 Elite |
| Category | Medical Equipment |
| Language | English |