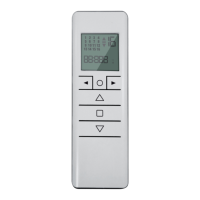
The QCTZ16Y is a 16-channel handheld display remote designed for wireless control of up to 16 motors or groups of motors. It features an LCD display for clear visual feedback and offers easy customization of groups, supporting up to 8 distinct groups. The remote also includes a pre-set ALL channel control for comprehensive operation and an easy recall function for previously configured groups. For convenience, it has a magnetic wall mount, and a "hide unused channel" function is planned for future implementation.
Technical Specifications:
- Radio Frequency: 434.15 MHz
- Protection Rating: IP 30
- Operating Temperature: 0°C to +60°C (+32°F to +140°F)
- Dimensions: 150 x 47 x 12 mm
- Power Supply: 1 x 3V 2450 Lithium battery
It is crucial to read the installer manual carefully before installation and use. Any use outside the defined application sphere by GAPOSA is prohibited, as it invalidates the warranty and discharges GAPOSA of all liability. Ensure product compatibility with associated equipment and accessories before installation.
To prevent damage to the product, avoid impacts, dropping it, or immersing it in liquids. Keep the device out of reach of children. Do not use abrasive products or solvents for cleaning; instead, use a soft, damp cloth.
Important Note on Radio Disturbances:
Do not use motors with remote controls in areas prone to radio disturbances (e.g., airports or radio repeaters). These units may also experience interference from telecommunication and/or transceiver systems operating on the same frequency.
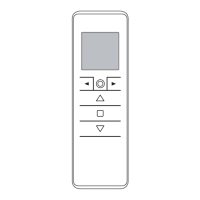
The remote features several buttons for various operations:
- Circle Button (◎): Used to switch between single channel/group control modes and to enter group control mode.
- Arrow Buttons (◄ or ►): Used to select channels, scroll through groups, and navigate menus.
- Up Button (△): Controls upward movement of the motor.
- Stop Button (☐): Stops motor movement and is used for confirming settings.
- Down Button (▽): Controls downward movement of the motor.
- SYNC Button (A): Used for programming and synchronization.
- LIMIT Button (B): Used for setting limit switches.
Usage Features:
Selecting a Channel/Group:
Pressing the circle button (◎) sequentially switches between single channel control mode and group control mode.
- Single Channel Mode: Briefly press the circle button (◎) to enter this mode. Use the arrow buttons (◄ or ►) to scroll through channels, each identified by a number.
- Group Control Mode: Briefly press the circle button (◎) to enter this mode. The "ALL channels" group appears first. Use the arrow buttons (◄ or ►) to scroll through pre-made groups, each identified by a number. Only previously created groups will appear.
Customization of Groups:
The remote allows for the creation of up to 8 custom groups.
- Enter group control mode by briefly pressing the circle button (◎).
- To create a group, press both arrow buttons (◄ and ►) for 2 seconds. The icon "SEL" will appear, and channel 1 will start flashing.
- Use the arrow buttons (◄ or ►) to select channels to be included in the group.
- Press both arrow buttons (◄ and ►) for 2 seconds to select each channel. Repeat for all desired channels.
- Confirm the group by pressing the UP (△), STOP (☐), or DOWN (▽) button. The group will be assigned the next available number from 1 to 8.
Deleting Groups:
- Enter the group screen by pressing the circle button (◎).
- Press and hold the circle button (◎) until "DEL" appears on the screen.
- Press the STOP button (☐) to enter the delete groups mode.
- Use the left and right arrow buttons to page through saved groups.
- Once the desired group is selected, press the STOP button (☐) to confirm deletion.
- Note: The delete groups mode can be exited at any time by pressing the circle button (◎) again.
Hiding Channels:
- Ensure the channel selection screen is visible (press the circle button (◎) if needed).
- Press and hold the circle button (◎) until "HIDE" appears on the screen.
- Press the STOP button (☐) to enter HIDE channels mode.
- Use the left and right arrow buttons to select the channels to be hidden.
- Press the STOP button (☐) to confirm the hidden channels. The numbers on the screen will blink quickly for confirmation.
- Note: Channels can be unhidden using the same process by deselecting them.
Programming Transmitter:
- Caution: When installing multiple motors with receivers, power up only one motor at a time during the initial programming to avoid interference.
- Power up the motor.
- Hold the SYNC button (A) until the motor starts moving.
- Check the motor's rotation, then release SYNC (A) (the motor stops).
- Within 5 seconds, press the corresponding UP (△) or DOWN (▽) button based on the desired rotation.
This programs the transmitter and synchronizes motor rotation.
Adding Transmitter:
- Hold the SYNC button (A) on an already paired transmitter until the motor starts moving.
- Check the motor's rotation, then release SYNC (A) (the motor stops).
- Within 5 seconds, press the corresponding UP (△) or DOWN (▽) button on the new transmitter being added.
Checking/Changing Direction:
- Important: Direction changes must be performed before setting limit switches; otherwise, limits must be reset.
- Pressing UP (△) or DOWN (▽) should move the motor accordingly. If not, to change direction:
- Press and hold the SYNC button (A) until the motor starts moving.
- Press the STOP button (☐). The motor will make a brief jog, indicating the direction has been reversed.
Erasing Transmitters:
Simultaneously push the SYNC (A) and STOP (☐) buttons on the transmitter until the motor makes a brief movement in both directions. Only the transmitter used for this procedure will be deleted from motor memory.
Reset Motor Memory:
- Option 1 (Using an already programmed transmitter):
Press and hold both SYNC (A) and STOP (☐) buttons until the motor makes a brief jog, followed by a second long jog. The motor's memory is now empty.
- Option 2 (Without an already programmed transmitter):
- Switch the motor power supply OFF, then ON.
- Within 8 seconds, use any Gaposa transmitter to press and hold both SYNC (A) and STOP (☐) buttons until the motor makes a long jog. The motor's memory is now empty.
Limit Switch Setup (for motors with electronic limit switch):
- Attention: Always set the UP limit switch first.
- Push the LIMIT button (B) until the motor makes a brief movement in both directions.
- Note: During "programming mode," operations are in "deadman control."
- Press and hold the UP button (△) to run the motor to the desired UP limit position.
- Press the STOP button (☐) to set the UP limit position. The motor will make a brief jog.
- Press and hold the DOWN button (▽) to run the motor to the desired DOWN limit position.
- Press the STOP button (☐) to set the DOWN limit position. The motor will make a brief jog.
- Note: For accurate limit setting, press the LIMIT button (B) a second time while moving UP (△) or DOWN (▽); the motor will then move slowly in steps. Always press the STOP button (☐) to set the limit position.
Automatic Setting of the Limits (for motors with electronic limit switch):
For limits set with a torque sensor (mechanical stop of shutters or cassette awnings/shades):
Press and hold the UP button (△) until the bottom bar hits the cassette or shutter box. A short jog will indicate that the UP position is memorized. The same procedure can be followed for the DOWN limit, but only for roller shutters.
Stop the shutter/awning at the desired intermediate position. Then, simultaneously press the UP (△) and DOWN (▽) buttons until the motor makes a brief movement in both directions.
Maintenance Features:
Transmitter Factory Reset:
A factory reset will un-hide any hidden channels and delete all custom groups.
- Remove the battery cover on the back of the transmitter.
- Remove the battery.
- Press and hold the circle button (◎) while reinserting the battery. Once the screen comes back on and displays "RESET," the circle button (◎) can be released.
- After approximately 3 seconds, the transmitter will start up, all channels will be un-hidden, and any groups deleted.