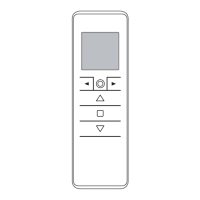
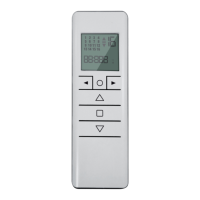
The GAPOSA EMITTO SMART 16 is a series of 868MHz handheld display remote transmitters designed for controlling various automated systems, such as shutters and awnings. The series includes the QCTX16Y, a 16-channel handheld display remote, and the QCTX16SY, a 16-channel handheld display remote with a timer function.
Technical Specifications:
- Battery: 3V, model CR2450
- Channels: 16
- Encoding: RC Gaposa
- Battery life: 2 years
- Frequency: 868.30 MHz
- Radiated power: 0.150 mW
- Protection rate: IP40
- Coverage (int/ext): 20 m / 200 m
- Working temperature: -5°C / +40°C
Users are advised to read the guide carefully before installation and use. Any use outside the defined application sphere is prohibited, as it invalidates the warranty and discharges GAPOSA of all liability. Installation should only proceed after checking product compatibility with associated equipment. To prevent damage, avoid impacts, dropping the device, spraying or immersing it in liquids. Keep out of reach of children. Do not use abrasive products or solvents for cleaning; instead, use a soft, damp cloth.
Important Note: Do not use motors with remote controls in areas with high radio disturbance risks (e.g., airports, radio repeaters). These units may also be affected by telecommunication and/or transceiver systems operating on the same frequency.
Usage Features:
The transmitter features several pushbuttons for control and programming:
- UP (▲): Moves the system upwards.
- STOP (■): Stops the system.
- DOWN (▼): Moves the system downwards.
- Select channel (◄►): Navigates through channels or groups.
- Single channel mode/Group control mode (○): Toggles between single channel and group control modes.
- PROG-TX (A): Programs the transmitter.
- PROG-FC (B): Sets the limit switch.
Programming and Control:
Selecting a Channel/Group:
- Press the circle button sequentially to switch between single channel control mode and group control mode.
- Single Channel Control Mode: Use the arrow buttons (◄►) to scroll through channels, each identified by a number.
- Group Control Mode: The first group displayed is "all channels." Scroll through pre-made groups using the arrow buttons (◄►). Each group is identified by a number. Only previously created groups will appear.
Customization of Groups:
- Briefly press the circle button to enter group control mode.
- To create a group, press both arrow buttons (◄ + ►) for 2 seconds. "SEL" will appear, and channel 1 will flash.
- Use the arrow buttons (◄►) to scroll to the desired channel to be added to the group.
- Press both arrow buttons (◄ + ►) for 2 seconds to select the channel. Repeat steps 3 and 4 to add more channels.
- Once all desired channels are set, press the UP, STOP, or DOWN button to confirm the group. The group will be assigned the first available number from 1 to 8. Up to 8 groups can be created.
Deleting Groups:
- Enter the group screen by pressing the circle button.
- Press and hold the circle button until "DEL G" appears, then press the STOP button to enter delete groups mode.
- Page through saved groups using the left and right arrow buttons.
- Once the group to be deleted is selected, press the STOP button to confirm.
Note: Delete groups mode can be exited at any time by pressing the circle button again.
Hiding Channels:
- Enter the channel screen by pressing the circle button.
- Press and hold the circle button until "HIDE" appears.
- Press the STOP button to enter hide channel mode.
- Once the required hidden channels are selected, press the STOP button to confirm. The numbers on the screen will blink quickly for confirmation.
Note: Channels can be unhidden using the same process; simply deselect the channels.
Programming Transmitter:
Caution: When installing multiple motors with receivers, power up only one motor at a time during the first programming session to avoid interference.
- Power up the motor to be programmed.
- Press and hold the PROG-TX button until the motor starts moving.
- Check the motor's rotation, then release PROG-TX (the motor stops).
- Within 5 seconds, press the corresponding button (UP if the motor rotates upwards, DOWN if downwards). The transmitter is programmed, and motor rotation is synchronized.
Adding Transmitter:
- Press and hold the PROG-TX button of an already paired transmitter until the motor starts moving.
- Check the motor's rotation, then release the PROG-TX button (the motor stops).
- Within 5 seconds, press the corresponding button (UP or DOWN) on the new transmitter being added. The new transmitter is programmed, and motor rotation is synchronized.
Checking/Changing Direction:
Important: Direction change must be performed before setting limits; otherwise, limits must be reset.
- Press and hold the PROG-TX button until the motor starts moving.
- Press STOP: The motor makes a brief jog, and its direction is reversed.
Erasing Transmitter:
Simultaneously push the PROG-TX button and STOP button until the motor makes a brief movement in both directions. Only the transmitter used for this procedure will be deleted from motor memory.
Reset Motor Memory:
- Option 1 - Using an already programmed transmitter: Press and hold both PROG-TX and STOP buttons until the motor makes a first brief jog, followed by a second, long jog. Memory is now empty.
- Option 2 - Without an already programmed transmitter:
- Switch the motor power supply OFF, then ON.
- Within 8 seconds, use any Gaposa transmitter to press and hold both PROG-TX and STOP buttons until the motor makes a long jog. Memory is now empty.
Transmitter Factory Reset:
A factory reset will un-hide all hidden channels and delete all custom groups.
- Remove the battery.
- Press and hold the circle button while reinserting the battery. Once the screen displays "rESET," release the circle button.
- After about 3 seconds, the transmitter will start up, all channels will be un-hidden, and all groups deleted.
Limit Switch Setup (for motors with electronic limit switch):
Attention: Always set the UP limit first.
- Push the PROG-FC button until the motor makes a brief jog. Note: During "programming mode," operations are in "deadman control."
- Press and hold the UP button and run the motor to the desired UP limit position.
- Press STOP to set the UP limit position. The motor makes a brief jog.
- Press and hold the DOWN button and run the motor to the desired DOWN limit position.
- Press STOP to set the DOWN limit position. The motor makes a brief jog.
Note: Accurate limit setting can be performed by pressing the PROG-FC button a second time while moving UPWARD or DOWNWARD. The motor will then move slowly in steps. Always press STOP to set the limit position.
Automatic Setting of the Limits (for limits set with torque sensor):
Press and hold the UP button until the bottom bar hits the cassette or shutter box. A short jog indicates that the UP position has been memorized. The same procedure can be followed for the DOWN limit, but only for roller shutters.
- Stop the shutter/awning in the desired intermediate position.
- Press simultaneously the UP and DOWN buttons until the motor makes a brief movement in both directions. The intermediate position is now set.
Keep the STOP button pressed for at least 3 seconds.
Press simultaneously both the UP and DOWN buttons until the motor makes a brief movement in both directions.
Timer Functions:
- From the channels or groups screen, press and hold the circle button until "HIDE" or "DEL G" appears. Press the circle button again, and the timer/clock screen will appear.
- Press the STOP button to enter the menu.
- Set the hour using the UP/DOWN buttons and press STOP to confirm.
- Set the minutes using the UP/DOWN buttons and press STOP to confirm.
- Select the day of the week using the arrow buttons (◄►) and press STOP to confirm. The clock is now set. "OFF" now appears on the screen. Use the arrow buttons (◄ + ►) to scroll between "OFF" and "ON" to choose between having the clock displayed or not in stand-by mode.
Note: During operation, the clock is shown only in Automatic Mode or Random Mode (see section: "Changing the operational mode").
Creating or Editing a Schedule:
- After setting the clock, from either the channels or groups screen, press and hold the circle button until "HIDE" or "DEL G" appears. Press the circle button again two times until the "PROG" screen is reached. Press the STOP button to enter the menu.
- The 6 schedules can now be chosen: "①②③④⑤⑥". Use the arrow buttons (◄►) to select the schedule to be created or edited. Once selected, press the STOP button to confirm.
- Use the arrow buttons (◄►) to select the day of the week (Su Mo Tu We Th Fr Sa).
- Press the UP/DOWN buttons to select or deselect one or multiple days of the week. Once the day or days of the week have been selected, press the STOP button to confirm.
Note: When the day of the week is blinking slowly, the day is not selected. When the day of the week is blinking fast, the day has been selected.
- Use the UP/DOWN buttons to select the hour. Press the STOP button to confirm.
- Use the UP/DOWN buttons to select the minutes. Press the STOP button to confirm.
- Choose the command to be sent (UP, DOWN, or INTERMEDIATE POSITION) using the UP/DOWN buttons. Press the STOP button to confirm.
- Choose the channels to add to the schedule. Use the arrow buttons (◄►) to move between channels, and the UP/DOWN buttons to select or deselect the channel. Press the STOP button to create the schedule.
Note: When the channel is blinking slowly, the channel is not selected. When the channel is blinking fast, the channel has been selected. The schedule is now created.
Schedule Deletion:
- From the channels or groups screen, press and hold the circle button until "HIDE" or "DEL G" appears. Press the circle button again three times until "DEL P" appears.
- Press the STOP button to enter the menu.
- Select the schedule to be deleted and press the STOP button to confirm. The schedule is now deleted.
Changing the Operational Mode:
The remote operational mode can be changed between Automatic Mode [AUT], Random Mode [ ] and Manual mode [no icon].
The operational mode can be changed by quickly pressing the arrow buttons (◄►) simultaneously. With each press, the transmitter will cycle through manual, automatic, random, and back to manual. In automatic and random modes, the clock will appear on the screen instead of the channel or group lettering.
- Manual Mode: The transmitter only sends UP, STOP, and DOWN commands to channels or groups by manually pressing its buttons.
- Automatic Mode: The transmitter operates with manual control and executes schedules automatically.
- Random Mode: The transmitter operates with manual control, and all schedules execute with a delay of 0-30 minutes. For example, if a schedule is set for 8:00, in random mode, it will activate anywhere between 8:00 and 8:30.
Maintenance Features:
Battery Substitution:
- Remove the back cover.
- Remove the exhausted battery.
- Insert the new battery, respecting the correct polarity.
Important: Batteries contain polluting substances. After removal, dispose of them at designated battery collection points.