EasyManua.ls Logo

Gavita Pro 1000e User Manual

Gavita Pro 1000e
16 pages
To Next Page IconTo Next Page
Page #1 background imageLoading...
Page #1 background image
1
Pro line
1 Introduction
Thank you for purchasing the Gavita Pro 1000e 380-400V DE EU. This manual describes the mounting and installing of the
product and also describes how to use the product. Please read and understand this manual completely before using the
product. Only use the product as specified in this manual.
1.1 Used Symbols
Warning! A warning indicates severe damage to the user and/or product may occur when a procedure is not carried
out as described.
Caution! A caution sign indicates problems may occur if a procedure is not carried out as described. It may also
serve as a reminder to the user.
Note: A note gives additional information, e.g. for a procedure.
This symbol indicates that the reflector and lamp can reach very high temperatures (>85 °Celsius). Observe a cool
down period before performing maintenance.
With this symbol Gavita declares that this product complies with European requirements.
The symbol on the material, accessories or packaging indicates that this product may not be discarded as
household waste. By disposing of the equipment in the proper way, you will be helping to prevent possible risks
to the environment and public health, which might otherwise be caused by improper handling of the discarded
equipment. Recycling of materials contributes tot the conservation of natural resources. Therefore, please do not
dispose of your old electronics and electrical appliances via household waste.
A
B
This symbol indicates the minimum distance (B) between the luminaire (A) and the lit surface.
2 Product description
The Gavita Pro 1000e 380-400V DE EU is an adjustable horticultural luminaire. The Gavita Pro 1000e 380-400V DE EU can
be used to drive a double ended 380-400V high frequency (electronic) high pressure sodium lamp.
The Gavita Pro 1000e 380-400V DE EU is an e-series product. It can be remotely switched and adjusted by a Gavita Master
controller. The controller can automatically switch the luminaire on and off during a 24 hour cycle.
The controller also offers a temperature safety feature: auto-dimming or switching off connected luminaires when the
temperature in a climate room becomes too high.
The product can also be controlled by conventional timers in combination with a contactor. Make sure the dummy RJ plug
sits in the IN port. If not, the luminaire will not operate.
In this manual, the Gavita Pro 1000e 380-400V DE EU will be referred to as: “the luminaire”.
Gavita Pro 1000e 380-400V
Question and Answer IconNeed help?

Do you have a question about the Gavita Pro 1000e and is the answer not in the manual?

Gavita Pro 1000e Specifications

General IconGeneral
BrandGavita
ModelPro 1000e
CategoryLighting Equipment
LanguageEnglish

Summary

Introduction

Used Symbols

Explains various warning, caution, and informational symbols used in the manual.

Product Information and Specifications

General Product Information

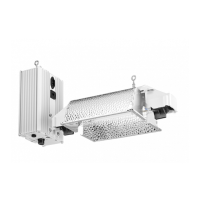
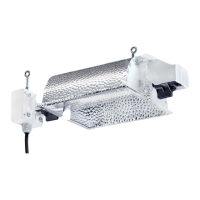
Provides general details about the Gavita Pro 1000e 380-400V DE EU, including manufacturer and part numbers.

Technical Specifications

Details the electrical and physical specifications of the luminaire, such as voltage, current, power, and dimensions.

Compatible Products and Accessories

Lists compatible controllers, reflectors, lamps, and cables for the luminaire.

Environment

Describes the intended environmental conditions for product use and optimal operating temperatures.

Legal

Cites relevant European approvals for LVD and EMC standards.

Safety Recommendations and Warnings

Contents

Controls, Connections and Indications

Installation

Preparing the Luminaire for Use

Outlines the initial steps before installing the luminaire, including switching off power and preparing the lamp.

Installing the Luminaire

Details how to mount the suspension bracket and hang the fixture securely.

Repeater Bus Connection Kit (Optional)

Lists the components included in the optional repeater bus connection kit.

Preparation for Use with a Controller

Guides on preparing cables and mounting ferrite cores for controller connections.

Connecting up to 100 Luminaires

Explains the daisy chain setup for connecting up to 100 luminaires to a controller.

Connecting up to 500 or 1000 Luminaires

Details the setup for connecting a larger number of luminaires using splitters and controllers.

Connecting the Luminaire to the Mains

Provides essential safety warnings and step-by-step instructions for connecting the luminaire to the main power supply.

Product Use

Troubleshooting Using the Status LED

Status Indications

Details the meaning of different status LED messages and corresponding luminaire states.

Error or Warning Indications

Lists specific error codes, warning indications, and recommended actions for troubleshooting.

Inspection, Maintenance and Repair

How to Disconnect the Wieland RST20i3 Plug

Provides a step-by-step guide on safely disconnecting the Wieland RST20i3 power connector.

Placement and Replacement of the Lamp

Details the correct procedure for safely installing and replacing the luminaire's lamp.

Placement and Replacement of the Reflector

Explains the steps for safely removing and installing a new reflector for the luminaire.

Storage and Disposal

Warranty

Related product manuals