EasyManua.ls Logo

Gazelle PACER - User Manual

Gazelle PACER
18 pages
Print Icon
To Next Page IconTo Next Page
Loading...
Occasionally our products contain components that are
pre-lubricated at the factory. We recommend that you
protect  ooring, or anything else the parts may contact,
with newspaper or cloth.
Tools Required for Assembly:
Phillips Screwdriver
Wrenches (provided)
spare
washers
wrenches
spare handle bolts
& spring washers
axle tube bolts
& spring washers
& at washers
axle tube assembly
hand grip
assemblies
right
frame
assembly
left
frame
assembly
right
swing arm
assembly
left
swing arm
assembly
cables
b
front
frame
rear frame
(curved)
fastener pack
ASSEMBLY INSTRUCTIONS
a. Lay the two frame assemblies & swing arm assemblies
on the oor as shown. Make sure the rear frame is on top
& that the cables pass freely above all the frame tubes.
Note: Be careful you do not allow the cable to get behind
the swing arms.
b. Remove all the bolts at the bottom of the frame assembly.
There are two on the rear frame & two on the underside
on the front frame.
Question and Answer IconNeed help?

Do you have a question about the Gazelle PACER and is the answer not in the manual?

Summary

ASSEMBLY INSTRUCTIONS

Tools Required for Assembly

Lists the tools needed for assembling the Gazelle Pacer.

Handlebar Assembly

Instructions for attaching the handlebars to the main unit.

ADDITIONAL ASSEMBLY INSTRUCTIONS

Cover Instructions for Swing Arm Limiter

Details on how to install the covers for the swing arm limiter.

FITNESS COMPUTER INSTALLATION

FUNCTIONS & OPERATIONS

How to Remove Batteries

Step-by-step guide for removing and replacing batteries in the computer.

IMPORTANT SAFETY TIPS

SPECIFICATIONS & PARTS

INTRODUCTION

Motivational Tips

Advice and tips to help users stay motivated during their fitness journey.

EXERCISE GUIDELINES

Cool Down & Stretching

Guidance on post-workout stretching for flexibility and muscle relief.

TARGET HEART RATE ZONE

Determining Your Estimated Heart Rate

Methods and charts to calculate and understand target heart rate zones for exercise.

GETTING STARTED

Foot Placement

Recommendations for proper foot positioning on the unit for beginners.

Hand Positions

Explanation of different hand grips and their effect on workout intensity.

WORKOUT GUIDELINES

General Workout Recommendations

Advice on setting up and performing basic Gazelle Pacer exercises for effective workouts.

CARE & STORAGE

Caring for Your Gazelle Pacer

Maintenance tips to keep the unit clean and in good working order.

Storing Your Gazelle Pacer

Instructions on how to fold and store the unit when not in use.

TOTAL FITNESS PROGRAM

WORKOUT PROGRESS CHART

EXERCISE DATA CHART

LIMITED WARRANTY

Overview

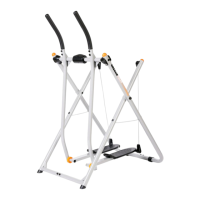
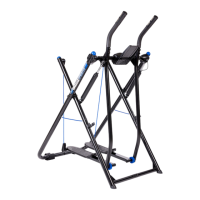
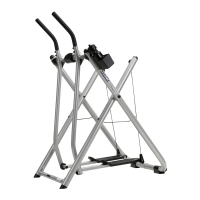
The Gazelle Pacer is a fitness machine designed for aerobic exercise and muscle toning, offering a low-impact gliding motion that engages both upper and lower body muscles. It is suitable for users looking to burn calories, firm muscles, and improve cardiovascular endurance. The product is pre-lubricated at the factory, and users are advised to protect flooring or other surfaces with newspaper or cloth during assembly.

Function Description:

The Gazelle Pacer provides a full-body workout through a gliding motion, allowing users to control intensity by varying leg and arm range of motion, hand position, and gliding speed. It features a fitness computer to track workout metrics such as speed, distance, time, and calories. The computer has an auto on/off function, activating when the machine is in motion and turning off after 4 minutes of inactivity. The machine is designed for easy storage, folding down to a compact size.

Important Technical Specifications:

  • Product Weight: Approximately 40 lbs.
  • Maximum User Weight: 250 lbs.
  • Dimensions (assembled):
    • Length: 43 inches
    • Width: 28 inches
    • Height: 53.75 inches
  • Fitness Computer: Requires two AAA batteries. Tracks Speed, Distance, Time, and Calories.
  • Materials: Components are designed for durability and smooth operation.

Usage Features:

  • Assembly: The manual provides detailed instructions for assembling the frame, swing arms, axle tube, handlebars, and fitness computer. Tools required include a Phillips screwdriver and wrenches (provided). Users are advised to hand-tighten bolts initially and fully tighten them later.
  • Getting Started:
    • Placement: Set up the unit on a solid, level, carpeted surface with ample clearance (minimum 3 feet) in front and behind the swinging foot platforms.
    • Getting On/Off: Instructions detail a safe method for mounting and dismounting the machine, emphasizing balance and stability.
    • Learning to Glide: Begin with a small, controlled glide, gradually increasing stride width. Keep knees "soft" or slightly flexed and maintain an upright posture.
  • Workout Intensity Control:
    • Range of Motion: A wider glide increases intensity; a smaller or narrower glide is less intense. Gliding with bent knees is harder than with straight knees.
    • Hand Position:
      • Front Bar Grip: Used for basic glide, warm-up, and cool-down. Hands on the front crossbar, inside handlebars.
      • Low Grip: Hands at the bottom of the handlebars, decreases upper body work.
      • Neutral Grip: Hands midway on handlebars, provides more equal upper and lower body work.
      • High Grip: Hands at the top of the handlebars, increases upper body work.
    • Speed: Faster tempos increase effort; slowing down reduces it.
  • Advanced Positions:
    • Hands Free: An advanced position where users release handlebars, bringing arms into a bent elbow position as if running or power walking. This poses a risk of losing balance and falling and should be done with care.
    • Forward Push/Backward Lean: Advanced exercises involving leaning forward or backward from the ankles, engaging different muscle groups. These also carry a risk of losing balance.
  • Workout Phases:
    • Warm-Up: 5-10 minutes of gradual exercise and stretching to increase heart rate and warm muscles.
    • Aerobic & Muscle Toning Workout: 15-20 minutes of gliding exercises, gradually increasing to 30 minutes. Recommended 2-3 times per week, increasing to 5-6 days for weight loss goals.
    • Cool Down & Stretching: 10-15 minutes of stretching exercises (quadriceps, calf & Achilles, overhead/triceps, back, standing hamstrings, buttocks/hips/abdominal, inner thigh, arm pullback) to improve flexibility and relieve muscle tightness.
  • Fitness Computer Functions:
    • SCAN: Automatically cycles between Speed, Distance, Time, and Calorie every 4 seconds.
    • SPEED: Displays current speed.
    • TRIP DISTANCE: Displays distance traveled during the workout.
    • TIME: Displays elapsed workout time.
    • CALORIE: Displays approximate calorie consumption.
    • RESET: Resets all functions to zero (hold for >3 seconds).
  • Heart Rate Monitoring: Users are advised to monitor their heart rate and stay within their target heart rate zone (50-80% of maximum heart rate). A chart is provided to determine age-adjusted target heart rates.
  • Workout Progress Chart: Includes charts to track weight, chest, biceps, waist, abdomen, hips, thighs, calves, and heart rates over time.

Maintenance Features:

  • Cleaning: Wipe sweat, dust, or residue off with a soft, clean cloth after each use. Clean handlebar grips frequently with a soft, damp cloth.
  • Lubrication: If squeaks or noises develop, lubricate all moving parts with white lithium grease or clear household grease (e.g., petroleum jelly) on the axle tube.
  • Cable Holders: Spray cable holders (top and bottom) with WD-40® or equivalent if needed.
  • Screws: Check and tighten screws on the bottom of the foot platforms.
  • Battery Replacement: Remove the upper case of the computer by pressing release tabs, replace two AAA batteries, and ensure correct fitting. If the display is illegible, remove batteries for 15 seconds before reinstalling.
  • Storage: The unit folds for easy storage. Fold foot platforms and lock them into place, then slide the front frame tube towards the user by grabbing the front swing arms. Store in an area away from children and high-traffic zones.

Gazelle PACER Specifications

General IconGeneral
BrandGazelle
ModelPACER
CategoryFitness Equipment
LanguageEnglish

Related product manuals