Do you have a question about the GCC Technologies puma iii series and is the answer not in the manual?
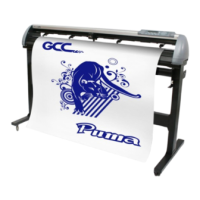
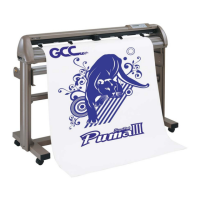
Introduces the Puma III series cutting plotters and their purpose.
Lists all items included in the Puma III cutting plotter package.
Highlights the key capabilities and advantages of the Puma III.
Identifies and describes the components visible on the front of the Puma III.
Identifies and describes the components visible on the back of the Puma III.
Provides an overall view of the Puma III, including its stand and accessories.
Identifies and describes the components on the left side of the Puma III.
Identifies and describes the components on the right side of the Puma III.
Safety precautions and installation guidelines to prevent injuries and damage.
Step-by-step instructions for assembling the stand for the P3-132 model.
Assembly guide for the media support system specific to the P3-132S.
Detailed instructions on how to install and replace the cutting blade.
Procedures for connecting the plotter via USB and installing the necessary drivers.
Steps to properly remove existing printer drivers from the system.
Guide for connecting the plotter using the serial RS-232 communication port.
Explains the options for sending data from the computer to the plotter.
Instructions for configuring the plotter as a shared printer on a network.
Description of the LCD screen and its functions for displaying information.
Flowcharts and explanations for navigating menus when the plotter is online.
Details the menu structure and options available in offline mode.
Comprehensive explanation of each menu option and its functionality.
Step-by-step guide for properly loading sheet media onto the plotter.
Instructions on how to load roll media onto the plotter.
Recommendations for ensuring accurate media tracking during plots.
Procedures for optimizing cutting force and blade offset.
Steps for safely removing the cut material after job completion.
Configuration of the 'Die Cut' and 'Kiss Cut' functions in the driver.
Recommended parameter settings for various materials.
Overview of the AAS II system for precise contour cutting.
Explains the process and necessity of media calibration for AAS.
Precautions and requirements for reading registration marks by the AAS.
Describes the three types of AAS II mark patterns: 4-Point, Segmental, and Multiple Copies.
Recommends test prints to verify AAS II cutting accuracy.
Guidelines for media loading to ensure successful mark detection.
Step-by-step guide to performing accurate contour cuts with AAS.
Practical advice for achieving better results with the AAS system.
General instructions for cleaning the plotter to maintain optimal performance.
Specific steps for cleaning the grid drum to ensure smooth media movement.
Procedures for cleaning the pinch rollers to maintain proper media grip.
Troubleshooting steps for when the cutting plotter fails to power on or operate.
Solutions for common mechanical and operational errors indicated by LCM messages.
Guides to resolve issues with data transfer and communication between devices.
Troubleshooting common issues related to software compatibility and drivers.
Solutions for common problems affecting the quality of the cut output.
Details model numbers, physical dimensions, and net weight.
Covers cutting width, length, speed, force, accuracy, and resolution.
Describes AAS, memory, interfaces, commands, and control panel features.
Outlines power supply, consumption, and operating environment requirements.
Lists different blade types, their part numbers, and recommended applications.
Specifies the blade offset and corresponding cap color for easy identification.
Explains how to determine and set the correct blade protrusion length.
Instructions for installing the AASII VBA plug-in for CorelDRAW.
Step-by-step guide on using the CorelDRAW plug-in for contour cutting.
How to automatically add registration marks based on page dimensions.
Method for adding registration marks to specific objects within a design.
Details the 4-point registration mark system and its settings.
Guide for using segmental positioning for enhanced accuracy on large designs.
Instructions for creating multiple copies of designs with registration marks.
Steps for performing contour cutting directly within CorelDRAW.
Step-by-step guide for installing the SignPal 10.5 software.
Instructions for configuring the GCC cutter within the Production Manager software.
A brief guide to initiating the AASII functionality in SignPal.
Introduction to using the AASII corpmark system within EasySIGN.
Steps for creating new designs or importing existing ones into EasySIGN.
How to define print and cut lines for jobs in EasySIGN.
Guide to enabling and configuring cropmarks for accurate cutting.
Best practices for positioning cropmarks around the artwork.
Instructions on how to export the design file for the printing process.
Steps for preparing the printout and performing the cutting operation.
Guide to image preparation and editing within CorelDRAW for GreatCut.
Steps for implementing the 4-point positioning system in GreatCut.
Setting contour line properties and offset values in GreatCut.
Accessing and utilizing the settings panel in GreatCut.
Adjusting registration mark parameters like size and margin in GreatCut.
Creating registration marks using the Set Jog Marks function in GreatCut.
Process of sending the final job data to the GCC Cutting Plotter.
Configuration of advanced settings like Segmental Positioning in GreatCut.
Instructions for creating multiple copies of designs using GreatCut.
Steps for installing the AASII plug-in for Adobe Illustrator.
Configuration of printer properties for use with Illustrator.
Guide on how to use the Illustrator plug-in for contour cutting.
Choosing the appropriate registration mark types in Illustrator.
Verifying the placement and type of registration marks in Illustrator.
Adjusting document setup for artwork in Illustrator.
Instructions for printing the final artwork with contour lines and marks.
Choosing the correct cutter model and initiating the print job.
Explanation of the 4-Point Positioning mark type for Illustrator.
Details on using Segmental Positioning within Illustrator for precise cuts.
Instructions for creating multiple copies of images using Illustrator.
General guide for using the DirectCut plug-in with Illustrator.
How to open and launch the DirectCut tool from Illustrator.
Steps for creating or importing text and image files for cutting.
Specific instructions for handling image files within DirectCut.
Applying AAS function and registration marks using DirectCut.
Instructions for outputting the job to the GCC Cutting Plotter via DirectCut.
| Brand | GCC Technologies |
|---|---|
| Model | puma iii series |
| Category | Printer |
| Language | English |