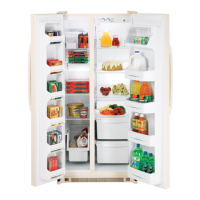
Howtoinstaflfeatures.(Not all features are on all models.)
(_ TOP FREEZER SHELF
Make sure the shelf front locks into
position.
Top Freezer Shelf
(_ FREEZER DOOR SHELF FRONTS
Make sure that the shelf front locks
into position.
NOTE: On dispenser models, the
longer shelf fronts go in the top
two positions.
To remove: Lift the shelf extender
straight up, then pull out.
To replace: Engage the shelf
extender in the molded supports of
the door and push in. It will lock in
place.
(2) FILTER CARTRIDGE
Remove Bypass Plug Install Filter Cartridge
@ LOWER FIXED DOOR BINS
Make sure the bin fronts lock into position.
=
I
Lower Door Bin
@ DAIRY COVER
@ BOTTLE RETAINER
@ ADJUSTABLE
DOOR BINS
DOOR BIN SNUGGERS
Toremove; Lift the front
of the bin up, then pull
out.
To replace or relocate:
Engage the bin in the
molded supports of the
door, and push in. Bin
will lock in place.
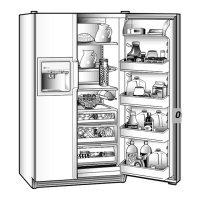
Abouttheshelvesandbbs.(Not allfeatures are on allmodels.)
Rearrangingthe Shelves
RefrigeratorShelves: FreezerPan:
ToRemove ToReplace ToRemove
O Tilt up
Lift up and out
y @ Insert
top hook
4
Lower re
lock i1_ _"
place
L
Remove the pan 1)ypulling it
t})rward,lifting up the front and
sliding it past the stop location.
FreezerShelves:
ToRemove