EasyManua.ls Logo

GE AK-2-50 - User Manual

GE AK-2-50
10 pages
Print Icon
To Next Page IconTo Next Page
Loading...
INSTRUCTIONS
GEK-73028
Super8edes
GEil-2021
D
LOW-VOLTAGE
POWER CIRCUIT BREAKERS
INST!'LLATION
AND
OPERATION
MANUAL
AK-2/3/2A/3A-15
AK-2/3/2A/3A-25.,"
'
AK-2/3/4/5/2A/3A/4A/5A-50/50S
AK-2/3/2A/3A-75/75S
AK-2/3/2A/3A-100/100S
TYPES
AKT-2/3/50/505
AKU-2/3/2A/3A-25
AKU-2/3/4/5/2A/3A/4A/5A-50/SOS
AKF-2/2A-25
AKF-2C/2D
/2E
GENERAL.
ELECTRIC
Courtesy of NationalSwitchgear.com

Other manuals for GE AK-2-50

Question and Answer IconNeed help?

Do you have a question about the GE AK-2-50 and is the answer not in the manual?

Overview

This document describes the General Electric Low-Voltage Power Circuit Breakers, including models AK-2/3/2A/3A-15, AK-2/3/2A/3A-25, AK-2/3/4/5/2A/3A/4A/5A-50/50S, AK-2/3/2A/3A-75/75S, AK-2/3/2A/3A-100/100S, AKT-2/3/50/50S, AKU-2/3/2A/3A-25, AKU-2/3/4/5/2A/3A/4A/5A-50/50S, AKF-2/2A-25, and AKF-2C/2D/2E. It serves as an installation and operation manual, providing essential information for proper handling, setup, and ongoing care of these circuit breakers.

The primary function of these devices is to protect electrical circuits from overcurrents, short circuits, and other faults. They are designed to safely interrupt the flow of electricity when abnormal conditions are detected, thereby preventing damage to equipment and ensuring the safety of personnel. The manual emphasizes the importance of reading relevant sections before installation or operation to ensure correct procedures are followed.

Upon receipt, it is crucial to immediately inspect the circuit breaker for any damage or loss sustained during shipment. Any injury, loss, or evidence of rough handling should prompt a damage claim with the transportation company and notification to the nearest General Electric Sales Office. Unpacking should be done with care to avoid damage to parts, and any loose parts or packaging material remaining on or in the breaker should be removed. If the breaker is not to be placed in service immediately, it should be stored in a clean, dry, upright position, supported to prevent bending of studs or damage. It should not be covered with moisture-absorbing materials, but rather with non-absorbent paper to prevent dust accumulation.

Installation and Operation:

The selection of a location for installation is critical, considering both the breaker's performance and maintenance convenience. A clean, dry, dust-free, and well-ventilated area is ideal for better performance and longer life. The breaker should be easily accessible for operation and maintenance, with sufficient space for necessary work.

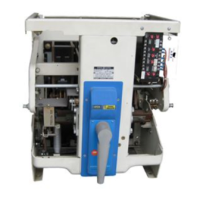
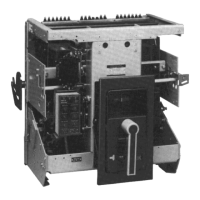
These AK Circuit Breakers are designed for three primary mounting methods: dead front mounting, individual mounting with an enclosure, and drawout mounting.

  • Dead front mounting involves bolting the breaker frame to a supporting structure within a switchboard or enclosure, connecting power buses or cables, and making control connections. The front cover of the enclosure should have a cutout for the breaker's front escutcheon.
  • Individually enclosed breakers are supplied with various types of enclosures, typically general purpose for indoor use or weather-resistant for outdoor or unfavorable indoor conditions. These enclosures are designed for mounting on walls or frameworks, with removable cover plates that can be drilled or machined for bus ducts, conduits, or cables.
  • Drawout mounting simplifies installation by placing the breaker into its enclosure, sliding it to a stop, and then racking it into position using a handle and mechanism.

The manual details specific insertion and withdrawal procedures for different AK breaker models (AK-15, AK-25, AK-50, AK-75, AK-100, AK-4A/5A). For drawout breakers, a "Test Position" is available where primary power contacts are disengaged, but secondary control contacts remain engaged. This allows for testing or operation without energizing the main power circuit. The use of D50H47 lubricant on disconnect terminals is recommended to reduce insertion force.

Drawout Mechanism Positions:

  1. Connected Position: Breaker is in operating position, with both primary and secondary contacts made. The door can be closed.
  2. Test Position: Primary contacts are not made, but secondary contacts are made. Testing not involving power can be done here, and the door can be closed.
  3. Disconnect Position: Neither primary nor secondary contacts are made. The door can be closed.
  4. Fully Withdrawn Position: Breaker is completely out of its compartment, ready for removal. The door must be open.

Closing Mechanisms:

  • Manual Closing:
    • AK-15/26 breakers are closed by turning a handle 90 degrees counterclockwise, then 90 degrees clockwise.
    • AK-2/3-50/75/100 manual breakers use a spring-charged mechanism, requiring four complete handle movements (counterclockwise then clockwise) to charge the springs and close the breaker. A charge indicator (1 to 4) shows progress.
    • AK-4/5-50 manual breakers are closed by a single stroke of the handle to charge a closing spring, which is then released by pushing the "close" button.
  • Electrical Closing:
    • AK-15 and AK-25 electrically operated breakers use a solenoid coil. A closing signal energizes an X relay, which in turn energizes the solenoid closing coil, closing the breaker. Mechanically operated switches (bb and aa) manage the circuit to prevent re-closing before the trip switch is released.
    • Large AK breakers (AK-50/75/100) are closed by a closing spring charged by a motor and gear reduction unit. The electrical control system involves an X relay, two double-contact mechanically operated switches (F and G), and a push-button or remote closing switch.
    • Quick Close Breakers (e.g., AK-4/5-50S) feature an extended pre-charge operation to fully charge the closing springs (approx. 5 seconds, or 2 seconds for AK-4/5-50). A latch plate prevents discharge until the prop roller is released manually or electrically.

Tripping:

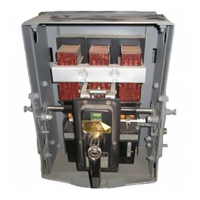
Breakers are tripped open by the displacement of a mechanism latch, causing toggle linkage to collapse. This latch is connected to a trip shaft, which rotates counterclockwise (from the right) to trip the breaker. Manual trip buttons, overload devices, shunt trips, undervoltage tripping devices, and reverse current trips all operate through this mechanism. Positive tripping is indicated by striker arm movement of 1/32 to 1/16 inch beyond the tripping point. Before adjusting trip device settings, the breaker must be in the open position with control power removed.

Overcurrent Trip Devices:

Most AK-2 and AK-4 air circuit breakers have dual magnetic (instantaneous and time delay) or instantaneous overcurrent trip devices. They are designed to carry up to 100% of their continuous current rating. AK-3 and AK-5 type breakers are equipped with Power Sensor overcurrent trip devices, which have adjustable time current bands and pickup settings via a single captive thumb screw. If nuisance tripping occurs, the Power Sensor settings should be checked and thumb screws tightened.

Open Fuse Lockout Device (for fuse-breaker combinations):

This device, available with certain breaker types, consists of three separately operated devices (one per pole) wired in parallel to corresponding breaker fuses. When a fuse blows, the device's coil is energized, causing its armature to engage the trip paddle and trip the breaker. The armature latches in a closed air gap position, extending a reset button to indicate the blown fuse and holding the breaker trip-free until the armature is released by the manual reset button.

Maintenance Features:

Regular maintenance is crucial for the longevity and reliable operation of these circuit breakers.

  • Inspection: Before any inspection or maintenance, ensure the breaker is in the open position, and all primary and control electrical power sources are disconnected. Periodic inspection is recommended at least once a year, or more frequently under severe load conditions, dust, moisture, or other unfavorable environments. The breaker should also be inspected after any short circuit current interruption.
    • Checks include manually operating the breaker several times for obstructions or excessive friction.
    • Electrically operating the breaker (if applicable) several times to verify proper functioning of electrical attachments.
    • Removing arc quenchers by detaching the retaining bar.
    • Inspecting arc quenchers and contacts for breakage or excessive burning. Barriers or contacts eroded to half their original thickness should be replaced.
  • Lubrication: The circuit breaker requires moderate lubrication. Bearing points and sliding surfaces should be lubricated with a thin film of GE Lubricant D50H15 during regular inspection periods. Before lubricating, hardened grease and dirt should be removed with kerosene. All excess lubricant must be wiped away with a clean cloth to prevent dust accumulation. For drawout breakers, the contact surface of the disconnect studs should be cleaned and lubricated with GE Grease D50H47.

The manual also provides references to specific maintenance manuals and renewal parts bulletins for various breaker types, ensuring comprehensive support for upkeep and repair.

GE AK-2-50 Specifications

General IconGeneral
Amperage50 A
Poles2
Rated Current50 A
Number of Poles2
Trip TypeThermal Magnetic
Interrupting Rating10kA
Voltage240V

Related product manuals