REQUIRED TOOLS AND ACCESSORIES
FOR INSTALLATION
2 Adjustable wrenches
Pipe cutter
Ruler or tape measure
Cordless drill
File
Emery paper
Screwdriver
Additional installation parts may be required:
ILWWLQJVWRFRQQHFWKRXVHKROGSOXPELQJWRµIHPDOH137)
WKUHDGVRQILOWHUKRXVLQJ
8/DSSURYHGJURXQGLQJFODPSVDQGJDXJHFRSSHUJURXQGLQJ
ZLUH
7HIORQWDSH
Optional accessories are available (Visa, MasterCard or Discover cards
accepted) by visiting our Website at GEAppliances.com or from Parts
and Accessories, call 800.626.2002 (U.S.) or 800.663.6060 (Canada).
CONTENTS INCLUDED WITH PRODUCT
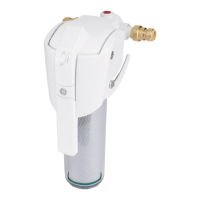
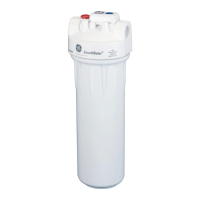
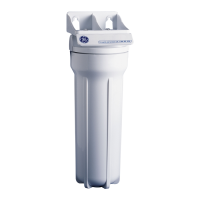
)LOWHUKRXVLQJDQGKHDG
Product literature
Canister wrench
7LPHUDQGEDWWHULHV
0RXQWLQJEUDFNHW
+H[KHDGVFUHZVDQG+H[ZDVKHUKHDGVFUHZV
SAFETY PRECAUTIONS
&KHFNZLWK\RXUVWDWHDQGORFDOSXEOLFZRUNVGHSDUWPHQWIRU
SOXPELQJDQGVDQLWDWLRQFRGHV<RXPXVWIROORZWKHVHJXLGHOLQHV
DV\RXLQVWDOOWKH+HDY\'XW\:DWHU)LOWUDWLRQ6\VWHP8VLQJD
TXDOLILHGLQVWDOOHULVUHFRPPHQGHG
%HVXUHWKHZDWHUVXSSO\FRQIRUPVZLWKWKH3HUIRUPDQFH'DWD
,IWKHZDWHUVXSSO\FRQGLWLRQVDUHXQNQRZQFRQWDFW\RXU
PXQLFLSDOZDWHUFRPSDQ\
WARNING: 'RQRWXVHZLWKZDWHUWKDWLV
PLFURELRORJLFDOO\XQVDIHRURIXQNQRZQTXDOLW\ZLWKRXWDGHTXDWH
GLVLQIHFWLRQEHIRUHRUDIWHUWKHV\VWHP
,WLVKLJKO\UHFRPPHQGHGWKDWDZDWHUVKXWRIIYDOYHEHSODFHG
GLUHFWO\XSVWUHDPRI\RXUKRXVHKROGILOWHU
Check with your local public works department for plumbing
codes. You must follow their guides as you install the Heavy-
Duty Water Filtration System.
Use the Heavy-Duty Water Filtration System on a potable, safe-
to-drink, home COLD water supply only. The filter cartridge will
not purify water or make unsafe water safe to drink.
Protect the Heavy-Duty Water Filtration System and piping
from freezing. Water freezing in the system will damage it.
Your Heavy-Duty Water Filtration System will withstand up to
125 psi water pressure. If your house water supply pressure is
higher than 80 psi during the day (it may reach higher levels
at night), install a pressure-reducing valve before the system is
installed.
'RQRWLQVWDOORQHOT WATER7KHWHPSHUDWXUHRIWKHZDWHU
VXSSO\WRWKH+HDY\'XW\:DWHU)LOWUDWLRQ6\VWHPPXVWEH
EHWZHHQWKHPLQLPXPRI)DQGWKHPD[LPXPRI)6HH
the Performance Data VHFWLRQ
Do notLQVWDOOWKH+HDY\'XW\:DWHU)LOWUDWLRQ6\VWHPXVLQJ
FRSSHUVROGHUILWWLQJV7KHKHDWIURPWKHVROGHULQJSURFHVVZLOO
GDPDJHWKHXQLW
WARNING: 'LVFDUGDOOXQXVHGSDUWVDQGSDFNDJLQJ
PDWHULDODIWHULQVWDOODWLRQ6PDOOSDUWVUHPDLQLQJDIWHULQVWDOODWLRQ
FRXOGEHDFKRNHKD]DUG
Do notLQVWDOOILOWHULQDQRXWVLGHORFDWLRQRUDQ\ZKHUHLWZLOOEH
H[SRVHGWRVXQOLJKW
PROPER INSTALLATION
This Heavy-Duty Water Filtration System must be properly installed and located in accordance with the Installation
Instructions before it is used.
*;:+)LV
7HVWHGDQG&HUWLILHGE\16),QWHUQDWLRQDO
DJDLQVW16)$16,
6WDQGDUGZLWKFDUWULGJH);+7&IRU
WKHUHGXFWLRQRI&KORULQH7DVWHDQG2GRU
*(
GEAppliances.com
*(1(5$/(/(&75,&&203$1<$SSOLDQFH3DUN/RXLVYLOOH.<
Installation Instructions Heavy-Duty Water Filtration System
GXWH35F (filters not included)