EasyManua.ls Logo

GE JX827 User Manual

GE JX827
4 pages
To Next Page IconTo Next Page
Page #1 background imageLoading...
Page #1 background image
Installation
Microwave Oven
Instructions
Built-In Trim Kits
1
BEFORE YOU BEGIN
Read these instructions completely and carefully.
IMPORTANT Save these instructions
for local inspector’s use.
IMPORTANT Observe all governing codes and
ordinances.
•
Note to Installer – Be sure to leave these instructions with
the Consumer.
• Note to Consumer – Keep these instructions for future
reference.
• Skill level – Installation of this appliance requires basic
mechanical and electrical skills.
• Completion time –
1 to 3 hours
• Properinstallationistheresponsibilityoftheinstaller.
• Productfailureduetoimproperinstallationisnotcovered
undertheWarranty.
• Thiskitisforuseonmodels:
PEM10SFC,PEM10BFC,PEM10WFCandCEM11SFC
• Donotalterormodifyanypartofthiskitortheoven.
• Foreasierinstallationandpersonalsafety,we
recommend that two people install this microwave oven.
• Unplugthemicrowaveovenbeforeattemptinginstallation
of this kit.
WARNING Thisovenmustbepluggedintoa
properlygrounded3-hole,120voltreceptacleasrequiredby
theNationalElectricalCode.
Questions? Call 1-800-561-3344 or Visit our Website at: GEAppliances.ca
PARTS INCLUDED
PART QUANTITY
BasePan 1
Rail 2
TrimKit 1
4mmx10mm 11required
Screw A 3 extra
4 mm x 16 mm 4 required
ScrewB 2extra
NOTE: Thiskithasextrascrewstopreventthetechnician
from spending extra time locating a replacement in case
theyloseoneduringinstallation.
FOR YOUR SAFETY:
WARNING Beforebeginningtheinstallation,
switch power off at service panel and lock the service
disconnecting means to prevent power from being switched
onaccidentally.Whentheservicedisconnectingmeans
cannotbelocked,securelyfastenaprominentwarning
device,suchasatag,totheservicepanel.
JX827 and JX830
1”2.5cm;1’=0.3m
Question and Answer IconNeed help?

Do you have a question about the GE JX827 and is the answer not in the manual?

GE JX827 Specifications

General IconGeneral
BrandGE
ModelJX827
CategoryRacks & Stands
LanguageEnglish

Summary

Before You Begin

Important Safety Instructions

Save instructions for inspector's use, observe codes, leave instructions with consumer.

Installation Requirements

Requires basic skills, 1-3 hours completion, installer responsibility, not covered by warranty.

Model Compatibility

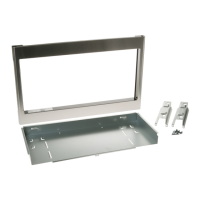
Kit is for use on models: PEM10SFC, PEM10BFC, PEM10WFC and CEM11SFC.

Safety Warning: Electrical Grounding

Oven must be plugged into a properly grounded 3-hole, 120 volt receptacle.

Safety Warning: Power Disconnection

Switch power off at service panel and lock disconnect to prevent accidental power restoration.

Installation Steps

Locate and Install the Base Pan

Set Base Pan into cabinet cutout, center it, push back, and mount using screws.

Install the Rails

Disconnect oven, remove contents, remove protective film, secure rails to oven Base Plate with screws.

Install the Microwave Oven

Plug in cord, slide oven assembly gently into cabinet, keeping it centered.

Check Leveling

Check leveling with a level and add wood shims if necessary for front-to-back or side-to-side balance.

Secure the Rails to the Cabinet

Ensure Base Pan and Bottom Bracket flanges are tight, align screw holes, and drive screws into cabinet.

Install the Trim Kit Frame

Position the assembled Trim Kit frame around the oven and secure with screws.

Replace Loose Items and Restore Power

Replace turntable/support, keep instructions, restore power by closing circuit breaker.

Related product manuals