Installing the water line.
Read these instructions completely and carefully.
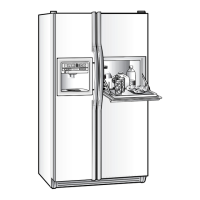
Connect the Tubingto the Refrigerator
Before making the connection to the refrigerator, be sure the
refrigerator power cord is not plugged into the waft outlet.
We recommend installing a water tilter il'your water supply has sand or pard(:les
that (ollld (log tile s(reen of the reh'igerator's water valve. Install it in tile water
line near tile relt'igerator.
Remove tile plastic tlexible (ap tt'()lll tile ",_ater xalve.
_Place tile compression nut and termle (sleeve) onto tile end oithe tubing as
sllo'an.
:Jlnsert tile end of tile (:opper tubing into tile ",,ater valve connection as far as
:::::::possible. _,_hile holding tile tubing, tighten tile fitting.
!41;asten the (:opper tubing into the clamp provided to hold it in a vertical
pt)smon. You ma, need to P_3'open the (:lamp.
1/4"CopperTubing TubingClampxx,,,._T---._
_""'_"_L--_Retligerator Connection
Turnthe Water On at the Shutoff Valve
Tighten any connet:tJons that leak.
iiliiiiiiH_l_l ""ii!lii:iii_
.?4
Plug In the Refrigerator
Arrange the (oil oi (opper tubing so that it does not xibrate against tile ba(k oi
the refl'igerator or against the ",_all.
Push the reh'igerator back to the wall.
Start the Icemaker
Set the icemaker teeler arm to tile ON (down) position. Tile icemaker will
not begin to operate until it reaches its operating temperature ot 15°lL (-q°C.)
or below. It will then begin operation automati(:ally it the icemaker leeler arm is
in the ON (down) position.
NOTE:Theicemakermaydoublecyclewhenit firststaffs,c;)usingsomew_terspillagefrom
theicems_kerintotheicebucket.Thisis normalandshouldnoths_ppenagain.
 Loading...