EasyManua.ls Logo

GE RAP02 User Manual

GE RAP02
8 pages
To Next Page IconTo Next Page
Page #1 background imageLoading...
Page #1 background image
1
Parts Included:
1. Dual Hose Conversion Baffles (2)
2. Intake Hose Adapter to AC
3. Intake Hose Adapter to Window Kit
4. Intake Hose
5. Exhaust Hose Insulation
6. Dual Hose Window Panel
31-5000578 Rev. 0 12-20 GEA
Installation Instructions
for your new
Before you begin - Read these instructions completely and carefully.
IMPORTANT – OBSERVE ALL GOVERNING CODES AND ORDINANCES.
Note to Installer – Be sure to leave these instructions with the Consumer.
Note to Consumer – Keep these instructions with your Owner’s Manual for future reference.
RAP02 Dual Hose
Conversion Kit
Tools Needed
Phillips head screwdriver Small hand saw - if trimming of the
window expansion panels is required
5.
1.
6.
4.
2.3.
Question and Answer IconNeed help?

Do you have a question about the GE RAP02 and is the answer not in the manual?

GE RAP02 Specifications

General IconGeneral
BrandGE
ModelRAP02
CategoryAir Conditioner
LanguageEnglish

Summary

RAP02 Dual Hose Conversion Kit Installation

Tools and Parts Needed

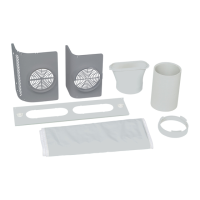
Lists necessary tools and all included parts for the installation process.

Important Safety Instructions

Crucial safety warnings and precautions to follow before and during installation and use.

Attach Baffle to Air Conditioner

Instructions for attaching the dual hose conversion baffle to the back of the air conditioner unit.

Step 1: Unplug or Disconnect Power

Safely disconnect electrical power before beginning installation procedures.

Step 1: Determine Location Requirements

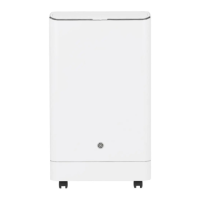
Guidelines for selecting an appropriate and safe location for the air conditioner.

Step 3: Remove Filter Panel

Details on removing the filter panel using a screwdriver to access the unit.

Step 4: Install Conversion Baffle by Model

Specific instructions for installing the correct size conversion baffle based on the AC model.

Step 5: Prepare Existing Window Kit

Steps to remove the previous window kit and prepare the hose for the new setup.

Step 6: Assemble Hose and Attach to AC

Instructions for assembling the exhaust hose and attaching it to the air conditioner unit.

Step 7: Assemble Intake Hose

Guide to assembling the intake hose and mounting it to the back of the unit.

Step 8: Secure Intake Hose Adapters

Instructions for extending and securing the intake hose adapters onto the hose ends and AC.

Step 9: Assemble Exhaust Hose (if AC not installed)

Instructions for assembling the exhaust hose if the portable AC hasn't been installed yet.

Step 11: Install Adapters to Window Panel

Guide to installing the intake and exhaust hose adapters onto the dual hose window panel.

Step 12: Install Exhaust Nozzle to Window Panel

Detailed steps for aligning and securing the exhaust nozzle to the main window panel.

Step 13: Continue Installation Guide

Directs users to the Use & Care manual for the remainder of the installation process.

Related product manuals