Dis.0534050
Istruzione / User’s Manual / Manuel d’utilisation Pag.3/6
GECA S.r.l. - Via Enrico Fermi, 98 25064 GUSSAGO (BS) ITALY Tel. +39 030 3730218 - Fax +39 030 3730228
AVVERTENZE
La centralina non ha bisogno di regolazioni dopo l'installazione.
Durante la fase di preriscaldo dei rilevatori, che è di circa 30 secondi, i relè di allarme rimangono inibiti, mentre i
Led Gialli e il relè FAULT vengono attivati.
In caso di cortocircuito tra i cavi di collegamento a un rilevatore, il circuito di protezione ne interrompe l'alimen-
tazione, il Led giallo e il relè FAULT vengono attivati. Per ripristinare le condizioni di funzionamento normale è ne-
cessario spegnere l'SE194K, rimuovere la causa del cortocircuito, e quindi riaccendere la centralina.
Se non viene collegato un sensore, è necessario montare ai corrispondenti morsetti + ed S una delle due resi-
stenze da 3K3Ω inserite nell'imballo. Questo serve per evitare l'intervento automatico del guasto.
VERIFICA FUNZIONAMENTO
Verifiche Periodiche: Si consiglia di eseguire la verifica di funzionamento ogni 6-12 mesi in base all’utilizzo.
IMPORTANTE: La prova, deve essere eseguita con estrema attenzione e da personale autorizzato e addestrato, in
quanto vengono attivate le uscite (relè) provocando l’attivazione dei dispositivi d’allarme collegati.
Verifica funzionamento elettrico della centralina, premere il pulsante TEST, si illumineranno le 3 barre Led e si
attiveranno i relè FAULT e ALARM1, poi dopo 30 secondi il relè ALARM 2 e accenderà il Led rosso ALARM. Alla fine per
ripristinare le condizioni di funzionamento normale premere il pulsante RESET.
EN
DESCRIPTION
The CTP21 is a central unit for heating plants, it can be connected up to 3 remote catalytic gas detectors for flam-
mable gas.
The central unit should be connected with different remote gas detectors, the models available are:
•
••
• The ST441KM and SE193KM or SE182KM should be used in plants using Methane.
•
••
• The ST441KG and Se193KG or SE182KG should be used in plants using LPG.
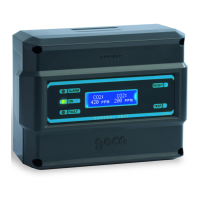
The CTP21 is for wall mounting and the protection code is IP65. It is normally mains powered at 230AC but can al-
so be connected either to an external power supply at 12VDC (e.g. 12VDC power supply with back-up batteries
model PS175 or PS180).
On the front plate three vertical LED bars shows both the working condition and the gas concentration detected by
each remote gas detector.
The control unit has two alarm levels with sealed relay outputs, normally activated with tension free changeover
contacts. Furthermore, it is also present another output relay in positive safety for fault situations.
Fig. 1 shows an example of connection with siren and normally closed solenoid valve.
OPERATIONAL DESCRIPTION
Preheating: when the central unit is supplied, start a preliminary heating. After 60 seconds, the green LED ON indi-
cates the normal working.
Normal operating: the central unit reads the gas concentration through the remote gas detectors.
1
st
Red LED: illuminates if the gas concentration exceeds 4% LEL.
2
nd
Red LED: illuminates if the gas concentration exceeds 8% LIE.
3
nd
Red LED (ALARM 1): illuminates if the gas concentration exceeds 10% LEL; and ALARM 1 relay will activate.
This relay is normally used as a prealarm using a siren (SE301A).
4
st
Red LED (ALARM 2): illuminates if the gas concentration exceeds 20% LIE; if the gas persists, after 30 sec-
onds, the red LED ALARM 2 illuminates and the ALARM 2 relay will activate. It is normally used to stop the gas
through the manual reset solenoid valve and/or the interruption of the electrical energy.
“RESET” Key: The alarm condition remains latched, the relay and the channel LED bar in alarm are activated,
even if the gas concentration decreases (because the mounted valve is closed, if installed). After having eliminated
the cause of the alarm, to restore the normal working conditions press the RESET key. For security, the key cannot
operate when the remote detector is detecting gas.
Faults: The control unit indicates a fault condition of a sensor, with the lighting of the corresponding yellow LED and
switch on the relay FAULT on the corresponding channel will activate. This relay is normally energized with voltage-
free changeover contacts, if necessary, it can be used both to signal remotely an occurred damage and to signal
the absence of power to the instrument.
INSTALLATION
The control unit and detectors should be installed according to the national disposition in force on the matter.
Positioning: The control unit must be installed in an accessible location and easily visible. The control unit cannot
be installed outdoors.
The remote Sensors: it has to be installed as described in the specific instructions attached with it. After the instal-
lation and referred to the gas indicated on the testing label of the remote sensor, apply on the SE194K, the self-
sticking label with the name of the calibration gas inserted in the housing.
Valve
: The manually resetting solenoid valve for the gas cut-off should be installed outside the room in a clearly in-
dicated position and should be protected from rain.
Mounting: The Fig.2 shows the instrument size. It has to be wall-mounted by four screw anchors.

 Loading...