Do you have a question about the Geevon W22126 and is the answer not in the manual?
Sets the default time to 12:00 (12H format) and date to 01/01 (M/D unchangeable format).
Sets the default day to Friday and language to English, with 8 selectable languages.
Sets the default temperature display unit to Fahrenheit (°F).
Used to enter time setting mode and confirm settings.
Increases setting values and provides fast adjustment.
Decreases setting values and provides fast adjustment.
Initiates the radio-controlled clock (RCC) signal reception.
Switches the temperature display between Celsius (°C) and Fahrenheit (°F).
Automatically searches for radio signal and sets time/date after power restoration.
Guides through manually setting DST, Hour, Minute, 12/24HR, Year, Month, and Day.
Allows switching between different time zones for accurate local time display.
Recommends high-quality alkaline batteries and advises against mixing battery types.
Alerts users to change batteries for the outdoor sensor or display unit promptly.
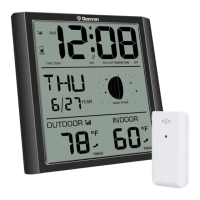
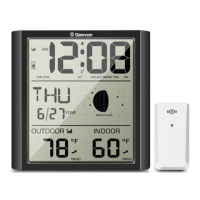
The GEEVON Wall Clock, item number W22126, is an atomic wall clock designed to provide accurate time, date, and temperature information. It is equipped with an LCD display that shows various data points and features several buttons for user interaction and settings adjustments.
The primary function of the GEEVON Wall Clock is to display the time, date, and temperature. It is an atomic clock, meaning it automatically receives radio signals to set and maintain accurate time. This feature ensures that the clock is always synchronized with the official time, eliminating the need for manual time adjustments in most cases. The clock supports both 12-hour and 24-hour time formats, and the date can be displayed in a month/day format. The weekday is also shown, and the language for the weekday display can be selected from eight different options, including English, German, Spanish, Holland, Italian, Finnish, Swedish, and French.
In addition to time and date, the clock displays the ambient temperature. Users can switch between Celsius and Fahrenheit units for temperature readings. The clock also includes a low battery indicator, which alerts the user when the batteries in either the display unit or an optional outdoor sensor are running low, prompting a replacement to ensure continuous operation.
The clock is designed for easy placement, featuring an integrated hang hole for wall mounting and a stand for tabletop use.
The GEEVON Wall Clock offers a range of user-friendly features for setup and daily use. Upon initial power-up or after replacing batteries, the LCD display will fully illuminate for one second. Subsequently, the clock will automatically detect temperature and humidity, enter standard mode, and begin searching for the RCC (Radio Controlled Clock) signal for approximately seven minutes.
The clock has five main buttons:
After power is restored, the unit automatically searches for the radio signal. This process typically takes 3-7 minutes. During this reception, pressing the ▲ button for two seconds will exit the RCC receiving state; otherwise, other buttons will have no function. If the radio signal is successfully received, the date and time are automatically set, and a reception symbol is displayed. Users can also manually turn the WWVB signal on or off by pressing and holding the and ▼ buttons simultaneously.
If the radio signal is not received or if manual adjustment is preferred, users can set the time manually.
The clock displays temperature within a range of -10°C to 50°C (14°F to 122°F). If the temperature falls below -10°C, "LL" will be displayed; if it exceeds 50°C, "HH" will be shown. The temperature resolution is 0.1°C, with an accuracy of ±1°C within the 0°C to +50°C range.
The GEEVON Wall Clock is designed for low maintenance, primarily requiring battery replacement when the low battery indicator appears.
The clock uses 4xAA batteries, which are not included. For optimal performance, especially in low-temperature conditions, high-quality alkaline batteries are recommended. Heavy-duty or rechargeable batteries are not advised as they may not provide consistent performance or may function improperly in cold environments. When the low battery indicator is displayed for either the main unit or an outdoor sensor (if applicable), it is crucial to replace the batteries promptly to prevent interruptions in communication and functionality.
The manual does not specify cleaning instructions, but generally, electronic devices like this clock should be kept dry and clean. Avoid mixing old and new batteries, and do not mix alkaline, standard, and rechargeable batteries to ensure proper operation and prevent damage to the device.
| Model | W22126 |
|---|---|
| Category | Clock |
| Type | Digital Alarm Clock |
| Power Source | Battery Powered |
| Display Type | LCD |
| Alarm | Yes |
| Backlight | Yes |
| Special Features | Temperature Display |