Do you have a question about the Geevon W22146 and is the answer not in the manual?
Controls the snooze function and backlight.
Manages alarm settings and activation.
Displays the date and day of the week.
Shows the current time.
Indicates when batteries need replacement.
Displays the current indoor temperature.
Displays the current indoor humidity level.
Shows temp/humidity from outdoor sensor channel 1.
Used for setting various parameters.
Activates or deactivates the alarm.
Recalls maximum and minimum recorded values.
Cycles through outdoor sensor channels.
Decreases values or navigates down.
Increases values or navigates up.
Shows the current barometric pressure.
Predicts future weather conditions based on measurements.
Indicates the signal strength from the outdoor sensor.
Describes the primary control buttons.
Allows selection of time display format.
Supports dual alarms and snooze functionality.
Monitors and indicates low battery status.
Displays data from three outdoor sensors simultaneously.
Shows comfort level based on temp and humidity.
Specifies the operational range for indoor temp.
Specifies the operational range for outdoor temp.
Defines the operating range for humidity measurements.
States the range for barometric pressure readings.
Details the six types of weather forecast icons.
Provides an alert for icy conditions.
Allows choosing between mb/hPa or inHg for pressure.
Controls the brightness and levels of the backlight.
Instructions for connecting the base station power.
Steps for installing batteries and setting channels.
Sequence for setting time and date parameters.
Procedure for setting dual alarms (AL1, AL2).
Activates snooze mode for 8 minutes.
Switches temperature display between Celsius and Fahrenheit.
Cycles through outdoor sensor channels and searches.
Adjusts backlight brightness levels.
Details the 6 kinds of dynamic weather forecast icons.
Checks and clears max/min temperature and humidity.
Guidelines for positioning the main display unit.
Tips for accurate measurement and wireless range.
Recommendations for sensor location and protection.
Details power, battery, and measurement ranges for the main unit.
Specifies battery requirements for the remote sensor.
Contact information for product assistance.
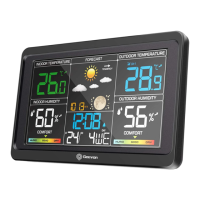
The Geevon Color Weather Station, Item No. W22146, is a comprehensive device designed to provide users with detailed indoor and outdoor weather information, along with timekeeping and alarm functions. This user manual outlines its features, setup, and operational guidelines to ensure accurate performance and longevity.
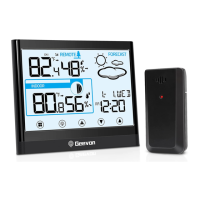
The weather station's primary function is to display various environmental parameters. It features a main display unit and an outdoor remote sensor. The display unit shows the time in either 12-hour or 24-hour format, with optional dual alarm and snooze functions. It also provides a calendar display, including the weekday, month, and day.
One of its core capabilities is monitoring temperature and humidity. The device displays indoor temperature and humidity, as well as outdoor temperature and humidity from up to three remote channels simultaneously on the same screen. This allows users to track conditions in different locations around their home or property. The weather station also includes a comfort display, which likely indicates the general comfort level based on the measured temperature and humidity.
A significant feature is its weather forecast capability. The station calculates and displays a 6-level weather forecast pattern, including sunny, slightly cloudy, cloudy, light rain, heavy rain, and snow. It also incorporates an "ICE Alert" function, which likely warns users of freezing temperatures. The device measures air pressure, with the option to display the unit in mb/hPa or inHg.
For user convenience, the display unit has a backlight function with five adjustable levels, ensuring readability in various lighting conditions. It also includes a low battery detection function, which alerts users when the batteries in either the main unit or the remote sensor need replacement.
Setting up the weather station involves connecting the main display unit to a power source. For permanent operation, mains power supply via an adapter is recommended. However, it can also be powered by batteries (3x AAA) to maintain time settings during power outages. The adapter connects to the external power supply socket on the display unit, and the mains plug is inserted into a power outlet. The device energizes directly upon connection.
The remote sensor requires 2x AAA batteries. Before use, the battery compartment cover must be removed, batteries inserted with correct polarity, and the channel selector switch set to the desired channel. The display unit and the remote sensor must be on the same channel to communicate effectively. The weather station can operate with one or more remote sensors, each requiring a different channel. If only one sensor is used, it should be set to channel 1.
Time setting is initiated by pressing and holding the "SET" button for approximately 3 seconds. This enters the time setting mode, where items like 12/24HR format, hour, minute, date format, year, month, day, week language, weather forecast, barometric pressure unit, and barometric value can be adjusted. The "UP" and "DOWN" buttons are used to select values, with a quick press for single increments/decrements and a press-and-hold for rapid adjustment. If no operation occurs for 20 seconds during setting, the device automatically exits the setting mode and saves the current values.
Alarm setting is similar. A short press of the "ALARM" button checks the alarm time, cycling through AL1, AL2, and back to standard mode. Pressing and holding the "ALARM" button for 2 seconds enters the alarm setting mode, allowing adjustment of AL1 and AL2 hour and minute. The "UP" and "DOWN" buttons are used for adjustment. In standard mode, the "ALARM" button can also be used to turn alarms on or off, with an alarm symbol displayed when active.
The snooze function is activated when an alarm is ringing by pressing the "SNZ/LIGHT" button. This pauses the alarm for 8 minutes, with the "ZZ" symbol and alarm clock symbol flashing.
Users can switch between Celsius (°C) and Fahrenheit (°F) temperature units by pressing the "DOWN" button in normal mode. The "CH" button allows selection of Channel 1, 2, or 3 for outdoor sensor data. Holding the "CH" button for 3 seconds resets values and searches for an RF signal from the outdoor sensor.
The backlight brightness is adjustable. When connected to the adapter, pressing the "SNZ/LIGHT" button cycles through 5 levels of brightness. When operating on batteries, pressing the "SNZ/LIGHT" button adjusts the brightness in a sequence of high light, then off.
The weather forecast is based on measured values and predicts conditions for the next 12 hours. The display will show one of six icons: sunny, slightly cloudy, cloudy, rainy, heavy rainy, or snowy. The snowy icon appears when the temperature is below 25°F (-4°C) and the forecast is rainy or heavy rainy.
The device also records maximum and minimum indoor and outdoor temperature and humidity. In standard mode, pressing the "MAX/MIN" button displays these records. Holding the "MAX/MIN" button for approximately 3 seconds clears the recorded data.
Proper placement is crucial for accuracy. The display unit should be in a dry, dust-free area, typically on a tabletop or countertop. It should be kept away from direct sunlight, heat sources, or vents. Both the display unit and outdoor sensor must be within 200 feet (60m) of each other. To maximize wireless range and prevent interference, units should be placed away from large metallic items, thick walls, metal surfaces, and other electronic devices (TV, computer, microwave, radio, etc.), maintaining at least 3 feet (1m) separation.
The outdoor sensor must be placed outside to observe conditions. While water-resistant, it should be in an area protected from direct weather elements and direct sunshine. An ideal location is 4 to 8 feet above the ground, with permanent shade and good air circulation.
The manual emphasizes the importance of using the mains power supply for permanent operation, with batteries serving as a backup for time settings during power failures. This suggests that while battery operation is possible, it's not the primary intended mode for continuous use.
Battery replacement is a key maintenance task. For the display unit, the battery compartment cover needs to be removed, 3x AAA batteries inserted with correct polarity, and the cover replaced. For the remote sensor, the process is similar: remove the cover, insert 2x AAA batteries with correct polarity, set the channel, and replace the cover. The low battery detection function helps users identify when batteries need to be changed, preventing interruptions in data collection.
The device is designed for general outdoor use, but users are advised to protect the outdoor sensor from direct weather elements and sunshine to prevent damage and ensure longevity. This implies that while robust, it is not impervious to extreme conditions and benefits from thoughtful placement.
In case of operational issues, users are directed to contact the seller on their order page or email support@geevon.com for technical assistance. This provides a clear channel for troubleshooting and support, ensuring that users can maintain their device effectively.
| Brand | Geevon |
|---|---|
| Model | W22146 |
| Category | Weather Station |
| Display Type | LCD |
| Power Source | Battery |
| Humidity Range | 20% to 95% |
| Features | Weather Forecast |
| Indoor Temperature Range | 0°C to 50°C |
| Outdoor Temperature Range | -20°C to 60°C |
| Battery Requirements | 2 x AA (Sensor) |
| Transmission Range | 100 meters |
| Update Interval | 60 seconds |