Press button to confirm your setting, the month display starts to
flash, use or buttons to set the correct month.
Press button to confirm your setting, the date display starts to
flash, use or buttons to set the correct date.
Press button to confirm your setting, the language start to flash,
use or buttons set the correct language. The language order
is: ENG, GER, FRE, ITA, DUT, SPA, DAN.
Press button to confirm your setting and to end the setting
procedures, enter the normal mode.
NOTE: You will automatically exit settings mode if no buttons are
pressed for 20 seconds. Enter settings mode again at any time by
pressing and holding button for 2 seconds.
Under normal mode, press button to enter alarm mode.
Setting the Alarm:
a. Press button to enter alarm mode, press and hold button
for about 2 seconds to set the alarm time. The alarm hour will begin
blinking on the display where the clock time is usually shown.
b. To adjust the alarm hour, press the or buttons (press and
hold to fast adjust). When alarm hour is set to your satisfaction,
press button to proceed to the alarm minute preference. Press
the or buttons (press and hold to fast adjust), press
button again to exit alarm settings. When you setting the alarm, the
alarm is default turn on.
c. To turn the alarm ON or OFF, press button to enter alarm mode,
press the or button to ON or OFF the alarm. The “ ” symbol
should show next to the clock display when alarm is set to ON. Press
the or button again to turn off the alarm, when the alarm is set
to OFF, the “ ” symbol should not display.
d. When the alarm is in operation it will begin beeping with one short
beep and continue with many short beeps if the alarm rings longer
than 20 seconds. You can snooze the alarm for 5 minutes by pressing
the SNZ/LIGHT button.
Indoor / outdoor temperature and humidity
1. Indoor temperature -9.9°C ~ 50°C (13.9°F ~ 122°F), display LL.L
when below -9.9°C and display HH.H when higher than 50°C.
2. Outdoor temperature -40°C ~ 70°C (-40°F ~ 155°F), display LL.L
when below -40°C and display HH.H when higher than 70°C.
3. Temperature resolution: 0.1°C
4. Indoor and outdoor humidity range: 20%-95%, display 20% when
below 20% and display 95% when higher than 95%.
6. Humidity resolution: 1 %RH
7. When alarm ringing, temperature and humidity test will be stopped.
Accuracy
1. Temperature accuracy:
-40°C ~ -20°C: ± 4°C
-20°C ~ 0°C: ± 2°C
0°C ~ +50°C: ±1°C
Note: when the temperature in 50°C ~ 70°C range, the temperature is
only for reference.
2. Humidity accuracy: +/- 5 % RH (@25°C , 30%RH to 50%RH);
+/- 10 % RH (@25°C , 20%RH to 29%RH, 51%RH to 95%RH)
Temperature alert set
1. In standard mode, press to enter alert mode, use or to
open or close temperature alert function.
2. In standard mode, press and hold to set temperature alert
function.
3. Press to set and order is: outdoor temperature upper limit→
outdoor temperature lower limit→ outdoor humidity upper limit→
outdoor humidity lower limit→ indoor temperature upper limit→ indoor
temperature lower limit→ indoor humidity upper limit→ indoor
humidity lower limit→ exit.
4. In set, press to go ahead by once. Hold to go ahead at 8
steps per second.
5. In set, press to back by once. Hold to go back at 8 steps
per second.
6. Press or no handling in 10s will exit.
Temperature alert
1. Temperature and alert icon will flash when alert.
GEEVON Touch Screen Weather Station
User Manual
Model No: W2186113
Package Contents:
1. Display Unit
2. Outdoor Sensor
3. Instructions Manual
Installing or Replacing Batteries:
We recommend using high quality batteries for the best product
performance. Heavy duty or rechargeable batteries are not
recommended. The outdoor sensor requires lithium batteries in low
temperature conditions. Cold temperatures can cause alkaline
batteries to function improperly.
Do not mix old and new batteries. Do not mix alkaline,
standard, and/or rechargeable batteries.
Default settings
1. Default time: 12:00 (Time form: 12H)
2. Default date: 01/01 (Year: 2020, date form: M/D)
3. Default week: WED (Language: ENG, 7 languages can be
selected)
4. Weather forecast: Partly Sunny
5. Default temperature: ℉
6. Default alarm: AM 12:00, default snooze time: 5min.
The LCD display fully for 10 seconds when changing new battery or
resetting, then with a sound BI into the normal state, after testing
temperature, receiving RF for 3 minutes.
Display / Keys Details:
There are totally 6 keys for the alarm clock, they are included: ,
, , , , , SNZ/LIGHT
1. buttons:
a. Press and hold for 3 seconds during normal mode to enter setting
mode.
b. Press button during normal mode to enter alarm mode.
2. button:
a. Press button to select the channel.
c. In normal display mode, press and hold to search RF.
3. button
a. Press the button to enter alert mode, use or to open
or close alert.
b. Press and hold the button to enter alert setting.
4. button:
a. Press to decrease the setting value during setting.
b. Press and hold 2 seconds button for fast adjust during setting mode.
c. In normal display mode, press button to display max/min
temperature/humidity.
d. Press and hold the button 2 seconds to clear the record of
MAX/MIN temperature and humidity when display shows MAX or
MIN temperature and humidity.
5. buttons:
a. Press to increase the setting value during setting.
b. Press and hold 2 seconds button for fast adjust during setting mode.
c. In normal display mode, press button to display heat
index/dew point.
6. SNZ/LIGHT button:
a. Press this button to open backlight for 10 seconds
b. Press to activate the snooze function when alarming
c. Press this button to open backlight.
Manually Setting the Time, Date & Units:
Press and hold down the button for 2 seconds the 12/24 hour
mode starts to flash, use and buttons to set the correct 12/24
hour mode.
Press button to confirm your setting, the hour display starts to
flash, use or buttons to set the correct hour.
Press button to confirm your setting, the minute display starts to
flash, use or buttons to set the correct minute.
Press button to confirm your setting, the Month and Date icon
display starts to flash, use or buttons to set the date display
on Month/Date or Date/Month
Press button to confirm your setting, the year display starts to
flash, use or buttons to set the correct year.
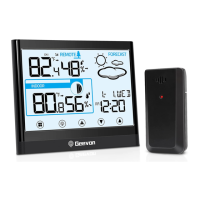
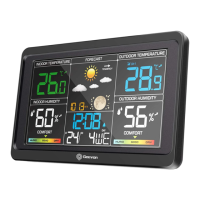
Features & Benefits:
DISPLAY UNIT & OUTDOOR SENSOR
1.Heat index/dew point
2.Channel external sensor
3.Outdoor temperature max/min record
4.Outdoor sensor signal strength
5.Outdoor temperature alert
6.Outdoor humidity
7.Tendency of outdoor temperature
8.Low battery indicator
9.Indoor humidity
10.Icons of weather forecast
11.Outdoor temperature
12.Indoor humidity alert
13.Indoor temperature alert
14.Indoor temperature
15.Tendency of indoor temperature
16.Calendar
17.Weekday
18.Alarm and snooze icons
19.Time display
20. :MODE button
21. :RF button
22. :ALERT button
23. :DOWN button
24. :UP button
25.Wall mount hole
26.SNZ/LIGHT button
27.Battery Compartment
28.Wireless signal indicator (Flashes when data is being sent to the
display unit)
29.Integrated hang hole
30.Compartment 2xAAA batteries (batteries not included)
31.TX channel selector, select external sensor channel (Maximum 3
channels available)