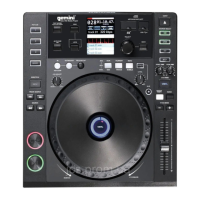
pitch down to -16% from the existing pitch setting. Releasing the buttons will return the pitch to the original pitch
setting. You can use this function to match the beat when mixing from one song to another.
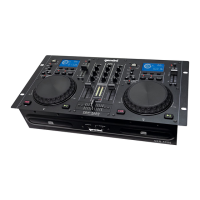
19. LOOP SECTION: A LOOP repeats the section between the entry point (IN) and the exit point (OUT).
A. To set a loop while the unit is playing. start by pressing the IN BUTTON (it will light up)
B. When you reach the desired end loop point press the OUT BUTTON (it will also light up). The loop will
continue playing until you press the OUT BUTTON again allowing the music to continue from that point on.
C. To re-engage the loop you must press the RE-LOOP BUTTON.
D. When you have released your loop the OUT BUTTON will turn OFF and the IN BUTTON will remain lit to
indicate that your loop is stored in the CDM-4000 memory.
E. Pressing the IN BUTTON again while the unit is playing will erase the previously saved loop while Saving
your new loop entry point.
F. Press OUT to exit the loop and save a new cornplete !cop.
G. Press RELOOP to return to the beginning of the previously saved loop from normal play. Press RE-LOOP
repeatedly to cause the loop to stutter.
NOTE: THE FIRST LOOP WILL HAVE A PAUSE AT THE EXIT POINT, WHILE ALL OTHERS WILL BE
SEAMLESS.
20. PLAY / PAUSE Each press of the PLAY / PAUSE BUTTON causes the operation to change from PLAY to
PAUSE or from PAUSE back to PLAY. The PLAY/PAUSE BUTTON remains lit when in PLAY while it blinks in
PAUSE mode.
21. CUE: While the unit is playing and after the cue point has been programmed. pressing CUE will cause the CD
player to enter the PAUSE mode (PLAY/PAUSE BUTTON blinks) at the programmed cue point (the CUE LED
is lit). Holding down the CVE button changes the function to and allows yOu to stutter start or play from the
programmed CUE POINT. Releasing the CUE button will return the CD to the preset CUE point.
22. TRACK SELECTION: The TRACK SELECTION buttons let you select the track to play. +10 allows you to scan
through the track selection in increments of 10. TRACK SKIP allows you to scan through each track one at a
Select the track desired by pressing the TRACK SELECTION BUTTON. NOTE: ONCE YOU HAVE SKIPPED
TO ANOTHER TRACK. YOU MAY NOT GO BACK TO YOUR PROGRAMMED CUE POINT. YOU MUST
BEGIN YOUR CUE SELECTION OVER AGAIN. THE CUE WILL BE PRESENT TO THE BEGINNING OF
THE NEWLY SELECTED TRACK.
MIXER SECTION:
23. CHANNEL INPUT SELECTOR: The CHANNEL INPUT SELECTOR switches allow you to choose which input
will be controlled by that channels corresponding volume FADER. For example CHANNEL (I) INPUT SELEC‐
TOR allows you to choose between line (1) (That sides internal CD player), line (2) which is line input RCA (1).
The same applies for channel 2.
24. CHANNEL ROTARY GAIN: The CHANNEL ROTARY GAIN allows you to boost the signal of the BOCK
individual channel depending on how low or high its input level is.
25. 2-BAND EQUALIZER: The 2-BAND EQUALIZER ad-lusts the tone of each CHANNEL by giving you a choice 2
frequencies (BANDS) to adjust, from LOW and highs. you can use the adjustment knobs to raise Or lower the 2
separate frequencies until the sound of the music program is appropriate for your listening en
26. CHANNEL VOLUME FADER: After you have chosen which input you will use with the INPUT SELECTOR the
corresponding CHANNEL FADER will allow you to adjust the volume for that particular CHANNEL.
27. CHANNEL CUE SELECTOR: The CHANNEL CUE SELECTOR allows you to choose which channel you wish
to monitor in your headphones. to the left is CHANNEL (I) to the right is CHANNEL (2) and the middle position
is BOTH (I & 2).
28. CUE VOLUME ROTARY KNOB: The CUE VOLUME ROTARY KNOB adjusts your HEADPHONE MONITOR
OUTPUTS volume.
29. MICROPHONE VOLUME ROTARY KNOB: This allows you to adjust the volume of the microphone signal.
30. MASTER VOLUME ROTARY KNOB: The MASTER VOLUME rotary knob adjusts the volume of the MAIN
MASTER
31. VU METER: The CDM-4000 has a stereo VU METER that allows you to monitor the decibel levels of the LEFT
and RIGHT MASTER output.
32. FADER START BUTTON: The Fader Start function allows you to start CD playback simply by moving the
CROSSFADER from side to side.
A. Cue up the CD player you wish to start using the Fader Start function
B. Move the CROSSFADER all the way to the opposite side of the CD you have just cued.
C. Press the FADER START SELECTOR button so that the button becomes illuminated.
D. At the point in which you wish to start the audio from the Cued CD, simply move the CROSSFADER in the
direction of the Cued CD player, and playback will begin.
E. When the CROSSFADER is moved all the way to the opposite side of the currently playing disc, the unit will
 Loading...