8. Do not use chemical solvents to clean the unit.
9. Keep the laser pickup clean by keeping the tray closed.
10. Keep this manual in a safe place for future reference.
CONNECTIONS:
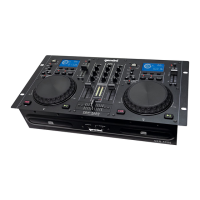
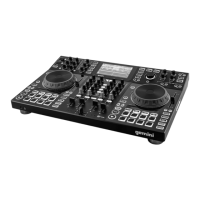
1. POWER: Plug in the pourer cord of the COM-4000.
2. LINE INPUTS: The CDM-4000 has 2 LINE RCA INPUTS. You may connect any line-level device as described
before (MP3. CO. Tape etc). Now you may plug the RCA’s from your playable medium into each input to be
connected to its respective CHANNELS.
3. MASTER RECORD RCA OUTPUT (UNBALANCED): The MASTER RCA output connects the mixer to your
main amplifier using standard audio cables with RCA-type connectors. The RECORD RCA OUTPUT jacks can
be used to connect the mixer to the record input of your recording unit. thus enabling you to record your mix
with RCA cables.
4. MASTER XLR OUTPUT (BALANCED): This allows you to connect balanced XLR cables to MASTER OUTPUT
of the COM-4000 both the RCA and XLR outputs can be used at the same time but both are controlled via the
same MASTER OUTPUT.
5. MIC (MICROPHONE) INPUTS: The main MIC or Microphone inputs are located at the back right-hand corner
and front panel of the CDM-4000 and will accept a 1/4″ connector. You can control the volume for the mic (See
CONTROLS ) below.
6. HEADPHONE OUTPUTS: The HEADPHONE OUTPUT located front center of the CDM-4000 will accept any
headphones with a standard 1/4′ connector and/or adaptor and will allow you to CUE your music program
before you play it. you can adjust the volume and PGM mix of the HEADPHONE (see CONTROLS) below.
FUNCTIONS:
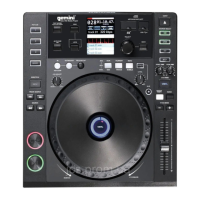
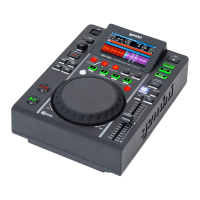
7. POWER: Once you have connected all your cables, you can turn the CDM-4000’s POWER on by pressing the
POWER button, pressing the button a second time will turn off the unit.
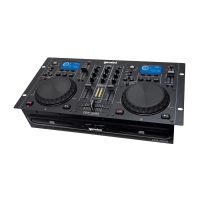
8. DISC TRAY: The DISC TRAY is where the CD is held during loading, unloading and playback, and holds both
12 cm and 8 cm CDs. (DO NOT FORCE THE CD TRAY TO EXCESSIVE FORCE WILL DAMAGE THE CD
MECHANISM, USE THE OPEN AND CLOSE BUTTONS)
9. EJECT BUTTON: Pressing the EJECT BUTTON will open or close the DISC TRAY. The DISC TRAY will not
eject in PLAY mode.
10. JOG WHEEL: In SEARCH MODE the JOG WHEEL can be used to search forward or backward in the music
as well as for fine adjustments to a CUE point in PAUSE mode. In PITCH BEND mode the JOG WHEEL will
function the same as the PITCH BEND allowing you to speed up (FORWARD) or slow down (REWIND) the
music CIOCkwise being (FORWARD) and counter-clockwise being (REWIND).
11. JOG MODE SUTTON: When the JOG MODE BUTTON is illuminated it indicates the JOG WHEEL is in
SEARCH MODE, and when not illuminated it indicates that the JOG WHEEL is in PITCH BEND MODE.
12. DISPLAY: The DISPLAY shows the tracking number. pitch bend, single, continue (for continuous Play),
play/pause modes, fast forward/reverse modes. loop mode. reloop mode. PGM, repeat modes. the playback
display bar, and three different time displays. These times displays are TIME ELAPSED on the track. TIME
REMAINING on the disc and TIME REMAINING on the track. Time is measured in minutes. seconds and
frames.
13. PGM: This allows you to create a set playlist. To program a setlist into the CDM-4000 memory. begin by
stopping the unit from play and pressing PGM to begin the set Select a track by using the track selection button
to scan to the first track to be placed in the set list. When you have selected the proper track press PGM and
the COM-4000 will be ready to set your next selection. Repeat the previous steps until you have completed your
Playlist. then press play to begin the setlist.
14. SINGLE Pressing the SINGLE button engages SINGLE mode, in this mode, the CDM-4000 will play one song
and then Pressing the SINGLE button again will then activate CONTINUOUS mode causing the unit to play
continuously (after the last track. the unit will re• turn to the first track of the disc and continue to play).
15. TIME: The TIME button switches the time display between three available sources. these three are TIME
ELAPSED on the track. TOTAL REMAIN on the disc and REMAIN on the track. TIME ELAPSED indicates how
much time has currently gone by since the play button was pressed. TOTAL REMAIN will count down the time
remaining on the entire disc and REMAIN counts down the time that is left before the end of the track.
16. PITCH: Hold the PITCH button to activate the PITCH CONTROL SLIDE. Pitch ranges can be controlled
through the use of the PITCH CONTROL SLIDER. Hold the PITCH button again to deactivate this mode.
17. PITCH CONTROL SLIDE: Moving the PITCH CONTROL SLIDE up or down will change the pitch percentage –
12%.
18. PITCH BEND: Pushing the PITCH BEND BUTTONS will automatically raise the pitch up to +16% or lower the
 Loading...