hook it up
Okay, let’s get connected!
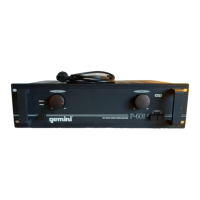
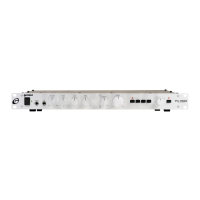
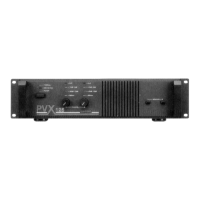
REAR PANEL
Input Section:
Input Jacks
(1)
Your amplifier has unbalanced
stereo RCA type jacks, with the tip of the jack
being positive (+) and the sleeve part being
negative (-)/ground.
Connect the output of your mixer here.
Output Section:
Disconnect unit from the AC power source before
making any connections. Pay close attention to
polarity when connecting your speakers.
(Connect the positive wire to the red terminal and
the negative wire to the black terminal).
Connecting your speakers using the wrong
polarity will not damage your speakers, but
will impact the quality of the sound (lack of bass
and incorrect stereo image).
Speaker Outputs
(3):
the speaker output
connectors are terminals that will accept a
standard banana plug, or bare wire.
Make sure that all the connections are clean
when using bare wire connections. If any strands
of wire from one connector touch the connector
next to it, the sound will distort, and your amplifier
will overheat.
✰
NOTE:
Total speaker impedance must not
be lower than 4
Ω
(Ohm) per channel
AC Power Section:
•
Fuse
(4):
replace with proper type and rating.
•
AC Inlet
(6)
is used to attach the power cord to
the unit.
•
AC line voltage switch
(5)
allows reconfiguring
amplifier for either 110-120 V or 220-240 V AC
lines.
•
Ground Lift Switch
(2)
is used to lift the ground
from the chassis. (See the Ground Lift Switch
Instructions for more detail.)
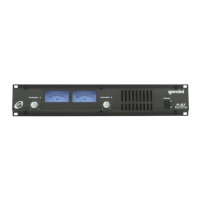
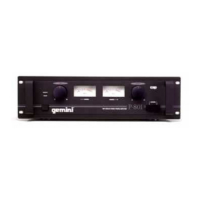
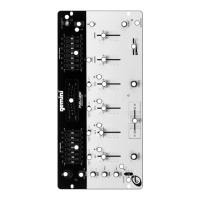
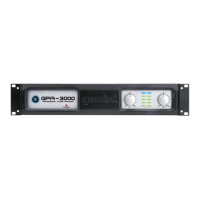
FRONT PANEL
•
Power Switch
(10):
turns the unit on and off.
•
Power LED
(9):
the power LED lights when the
power is on. If the power LED does not light, refer
to the trouble-shooting guide.
•
Level Controls
(7):
control the input levels for
each channel.
•
Large blue-light illuminated VU meters
(8)
display the output level of each channel.
operation
Stereo Operation
The unit has two channels for stereo operation.
Each channel provides a separate signal at the
speaker outputs. The following instructions are
for use with 4
Ω
or 8
Ω
speakers of matched
power ratings.
1. With the power OFF, connect your input
cables to the Channel A and Channel B inputs
using the RCA INPUT JACKS
(1)
2. Connect your speakers to the Channel A and
Channel B SPEAKER OUTPUTS
(3).
(The total
speaker load must be at least 4
Ω
per channel.)
3. With the LEVEL CONTROLS
(7)
of both
channels set to zero (fully counterclockwise), turn
the POWER SWITCH
(10)
ON. Okay, now try
playing some music and/or talking into your
microphone, and set the level of your input as
high as you think you’ll need it. This way it will be
as high above the amplifier’s noise floor as
possible so you’ll get the best possible sound
with the least amount of noise.
4. Now adjust your LEVEL CONTROLS for each
channel to your desired listening level. You also
have the choice of keeping the volume of both
speakers equal, or for certain situations you can
adjust the volume so one side will be louder than
the other.
 Loading...