3-1
AIR CLEANER
SERVICING:
The engine will not run properly and may be damaged if it
is run with a dirty air cleaner.
Clean or replace the paper filter every 25 hours of operation
or once annually, whichever occurs first. Clean or replace the
paper filter more often if operating in extremely dusty or dirty
conditions.
Clean or replace the foam pre-cleaner every 25 hours of
operation; more frequently under dirty or dusty conditions.
FOAM PRE-CLEANER:
To clean or replace the foam pre-cleaner:
1. Remove the air cleaner cover, then remove the foam pre-
cleaner.
2. Wash the foam pre-cleaner in soapy water.
3. Squeeze the pre-cleaner dry with a clean cloth. DO NOT
TWIST.
NOTE: If the pre-cleaner is still dirty after washing and
drying it, replace it with a new filter
4. Apply enough clean engine oil to saturate the pre-
cleaner.
5. Wrap the pre-cleaner in a clean dry cloth and squeeze out
excess oil. DO NOT TWIST. Set the pre-cleaner aside.
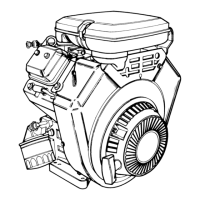
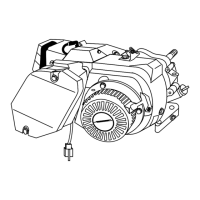
Figure 3-1. Typical Air Cleaner
PAPER FILTER:
1. Remove the air cleaner cover.
2. Remove the foam pre-cleaner and service it, if necessary.
3. Remove the paper filter.
4. Clean the paper filter by tapping gently on a flat surface.
If it is very dirty, replace it.
5. Clean the air cleaner cover. Then, install the foam pre-
cleaner into the cover.
6. Insert the paper filter into the cover so it holds the pre-
cleaner in place.
7. Assemble the pre-cleaner, paper filter and cover to the air
cleaner base.
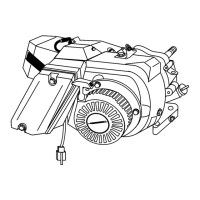
AIR CLEANER BOX REMOVAL (LARGE FRAME):
If the air cleaner box must be removed for further engine
disassembly, do the following (see Figure 3-2):
1. Remove the air cleaner cover.
2. Remove the foam pre-cleaner and paper filter.
3. Remove the choke knob.
4. Remove the breather hose.
5. Remove the two nuts and corresponding washers from
the carburetor mounting bolts.
6. Remove the two capscrews and corresponding washers
from the lower part of the air cleaner box.
NOTE: The carburetor will be loose after removal of the
air cleaner box. Do not allow the carburetor to drop.
Note: Be careful not to stretch or bind the wires con-
nected to the Low Oil Indicator and Start/Stop switch.
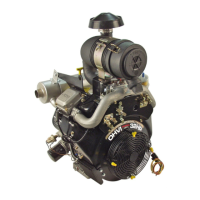
BREATHER HOSE
AIR CLEANER BOX
GASKET
CHOKE KNOB
PAPER FILTER
FOAM
PRE-CLEANER
NUT, WASHER
AND LOCK WASHER
NUT AND WASHER
CAPSCREW
AND WASHERS
Figure 3-2. Exploded View of Air Cleaner Box
SECTION 3: AIR INTAKE SYSTEM AND CARBURETION
3
0C1103Arev0.indd 1 6/22/2006 10:49:42 AM

 Loading...