11-4
SECTION 11: CRANKSHAFT & CAMSHAFT
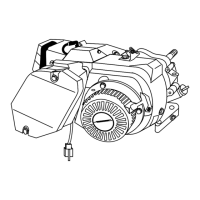
Figure 11-10. Timing Mark on Crankshaft Gear
NOTE: If the crankshaft gear is spun on the crankshaft,
the timing will be off. If this happens, the crankshaft
must be replaced. On a fully assembled engine, the
keyway on the end of the crankshaft should be in line
with the center of the ignition coil when the piston is at
top dead center (TDC). See Figure 11-10.
CAMSHAFT INSTALLATION
Apply oil to camshaft bearing and to bearing bore in crank-
case. Install the camshaft into the crankcase camshaft bore.
Hold the valve tappets out of the way during installation.
NOTE
: Some models may have been equipped with
a camshaft spring washer. Be sure to use this washer
during reassembly, and that it is properly seated between
the camshaft and crankcase (see Figure 11-13).
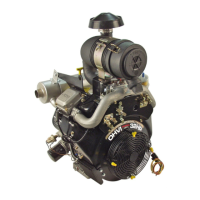
Align the timing mark on the camshaft gear with the timing
mark on the crankshaft gear (Figure 11-11). The piston must
be at top dead center (TDC).
CRANKSHAFT GEARS
TIMING MARKS
BALANCER
GEAR
CAMSHAFT
GEAR
Figure 11-11. Alignment of Timing Marks
(Large Frame Engine)
After installing the crankshaft, the piston and connecting
rod can be installed. (See Section 12)
BALANCER INSTALLATION
(LARGE FRAME ENGINES)
Apply oil to balancer bearing surfaces and to bearing bore
surfaces. Install the balancer into the balancer bearing bore
of the crankcase.
The balancer gear must mate with the crankshaft large gear
and timing marks must be aligned as shown in Figure 11-11
NOTE: For installation of the oil pump, oil pickup and
crankcase cover, see Section 9; "LUBRICATION."
Figure 11-12. Alignment of Timing Marks
(Small Frame Engine)
Figure 11-13. Location of Camshaft Spring Washer on
Some Models
0C1103Arev0.indd 4 6/22/2006 10:51:44 AM

 Loading...