4 5| |
PROGRAMMING PEDALS AND PADDLES AS THE Y AXIS
• Press simultaneously and hold for 3 seconds SHARE and OPTION buttons.
• When green LED is lit in center of wheel, release buttons.
• Press LEFT on wheel D-PAD. After green LED is o - pedals are programmed as Y-axis.
• Press RIGHT on wheel D-PAD. After green LED is o - gear paddles are programmed as Y-axis.
CLEAR SINGLE BUTTON ASSIGNMENT
• Press simultaneously and hold for 3 seconds SHARE and OPTION buttons.
• When green LED is lit in center of wheel, release buttons.
• Press programmed button once, after LED starts blinking press same button again.
• Default function is restored.
CLEAR ALL BUTTONS ASSIGNMENT
• Press simultaneously and hold for 3 seconds SHARE and OPTION buttons.
• When green LED is lit in center of wheel, release buttons.
• Press and hold for 4 seconds OPTION button. When LED is o, default functions are restored.
• Note: After device restart, all functions revert to default settings.
FR - MANUEL DE L’UTILISATEUR
INSTALLATION
PC
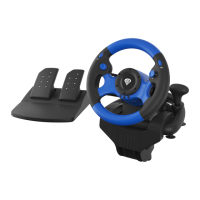
• Branchez la che du câble des pédales (1) à la prise du volant (2).
• Connectez le câble USB du volant (4) à un port USB libre de l’ordinateur.
• Le volant est prêt.
SWITCH
IMPORTANT! Avant de connecter le volant, activez la fonction de prise en charge du contrôleur PRO dans le menu de la console.
• Connectez le câble USB du volant à un port USB libre de la station d’accueil (la console doit être placée dans la station
d’accueil). Alternativement, utilisez un adaptateur TYPE-C (non fourni) pour connecter le volant directement à la console.
• Allumez la console.
• Le volant démarre la conguration automatique de la connexion. Une fois terminée, le voyant LED s’allume.
• Le volant est prêt.
PS3
• Connectez le câble USB du volant à un port USB libre de la console.
• Allumez la console.
• Le volant démarre la conguration automatique de la connexion. Une fois terminée, le voyant LED du joueur s’allume.
• Le volant est prêt.
PS4
• Connectez le câble USB du volant à un port USB libre de la console.
• Allumez la console.
• Connectez le volant via un câble USB* avec le contrôleur** PS4. Le contrôleur doit être éteint. La connexion du contrôleur est
essentielle pour que le volant fonctionne.
• Lorsque la connexion est établie, le voyant LED s’allume.
• Le volant est prêt.
XBOX SERIES X/S/XBOX1/360
• Connectez le câble USB du volant à un port USB libre de la console.
• Allumez la console.
• Connectez le volant via un câble USB* avec le contrôleur ** XSX/S/X1/X360. Le contrôleur doit être éteint. La connexion du
contrôleur est essentielle pour que le volant fonctionne***.
• Lorsque la connexion est établie, le voyant LED s’allume.
• Le volant est prêt.
* Câble non inclus.
** Le contrôleur d’origine – bien que recommandé – n’est pas requis. Cependant, le fabricant ne garantit pas que tout
remplacement du contrôleur d’origine fonctionnera et/ou qu’il fonctionnera correctement.
*** Pour le contrôle de X360, un contrôleur laire est nécessaire.
EN - USER MANUAL
INSTALLATION
PC
• Connect foot pedals connector (1) to socket in wheel base (2).
• Connect USB cable from wheel (4) to free USB port in PC.
• Wheel is ready.
SWITCH
IMPORTANT! Before connecting wheel, please enable PRO controller support function in console settings.
• Plug wheel USB cable into switch docking station free USB port (with console docked in). Alternatively, using TYPE-C adapter
(not included) connect wheel and console directly.
• Power-on console.
• Wheel will start the automatic conguration of the connection. When it nishes, LED will turn to solid red.
• Wheel is ready.
PS3
• Plug wheel USB cable into free console USB port.
• Power-on console.
• Wheel will start the automatic conguration of the connection. When it nishes, LED will turn to solid red.
• Wheel is ready.
PS4
• Plug wheel USB cable into free console USB port.
• Power-on console.
• Connect wheel via USB cable* with PS4 controller**. Controller must be turned o. Controller connection is mandatory for
wheel to work.
• After connection is established, LED indicator will turn to solid red.
• Wheel is ready.
XBOX SERIES X/S/XBOX1/360
• Plug wheel USB cable into free console USB port.
• Power-on console.
• Connect wheel via USB cable* with XSX/S/X1/X360 controller**. Controller must be turned o. Controller connection is
mandatory for wheel to work***.
• After connection is established, LED indicator will turn to solid red.
• Wheel is ready.
* Cable is not included.
** Original controller - although recommended - is not required. However, the producer does not guarantee that every 3rd party
replacement will work and/or work correctly.
*** A wired controller is required for X360 console.
SWITCHING BETWEEN XINPUT AND DINPUT MODES
• To switch between X-Input and D-Input modes while wheel is connected to PC, press and hold HOME button for 3 seconds.
• Red LED will solid lit after change is done.
WHEEL SENSITIVITY SETUP
• Press simultaneously and hold for 3 seconds SHARE and OPTION buttons.
• When green LED is lit in center of wheel, release buttons.
• Press SHARE again to show current sensitivity level. There are 3 levels: LED is slowly blinking: lowest sensitivity; LED is blinking
faster: medium sensitivity; LED is blinking very fast: highest sensitivity.
• Press SHARE button again to toggle between sensitivity levels signaled with green LED as described above. When desired
sensitivity is chosen, press D-PAD UP to conrm.
BUTTON PROGRAMMING
• Buttons YAXB, LB, LT, RB and RT (BASE buttons) - can be assigned to L-paddle, R-paddle, throttle pedal, brake pedal, gear up,
gear down (FUNCTION buttons).
• Press simultaneously and hold for 3 seconds SHARE and OPTION buttons.
• When green LED is lit in center of wheel, release buttons.
• Press desired FUNCTION button, to which other BASE button function will be assigned. Green LED will start blinking.
• Press desired BASE button. It’s default function will be now assigned to previously pressed FUNCTION button. Green LED will
shut o.
 Loading...