6 - INSTRUCTIONS FOR USE
0878_GB_99 - ELECTRIC OVEN
8 · 16
01/2012
6.1 Safety, cleaning and repair rulese
• This booklet contains all information necessary for using
your appliances correctly and safely.
• Keep this booklet in a safe place for future reference.
• This appliance is designed for collective use, and must the-
refore be used only by sufficiently qualified and trained staff.
• It is essential for the appliance to be supervised while in use.
• Certain functional faults can be due to user error, and it is
therefore very important that staff should be correctly trai-
ned.
• Keep to the maintenance intervals recommended with the
appointed technical support company.
• In the event of a malfunction in the appliance, disconnect
all power supplies and call technical support.
• If a fault occurs repeatedly, technical support must be called.
• Before switching on and using the appliance for the first
time, it is essential to carefully clean the oven interior and any
accessories that come into contact with food.
WARNING
Caution! The manufacturer cannot accept liability for any
injury or damage to property resulting from failure to observe
the safety regulations, or from inappropriate use of the
appliance by the operator.
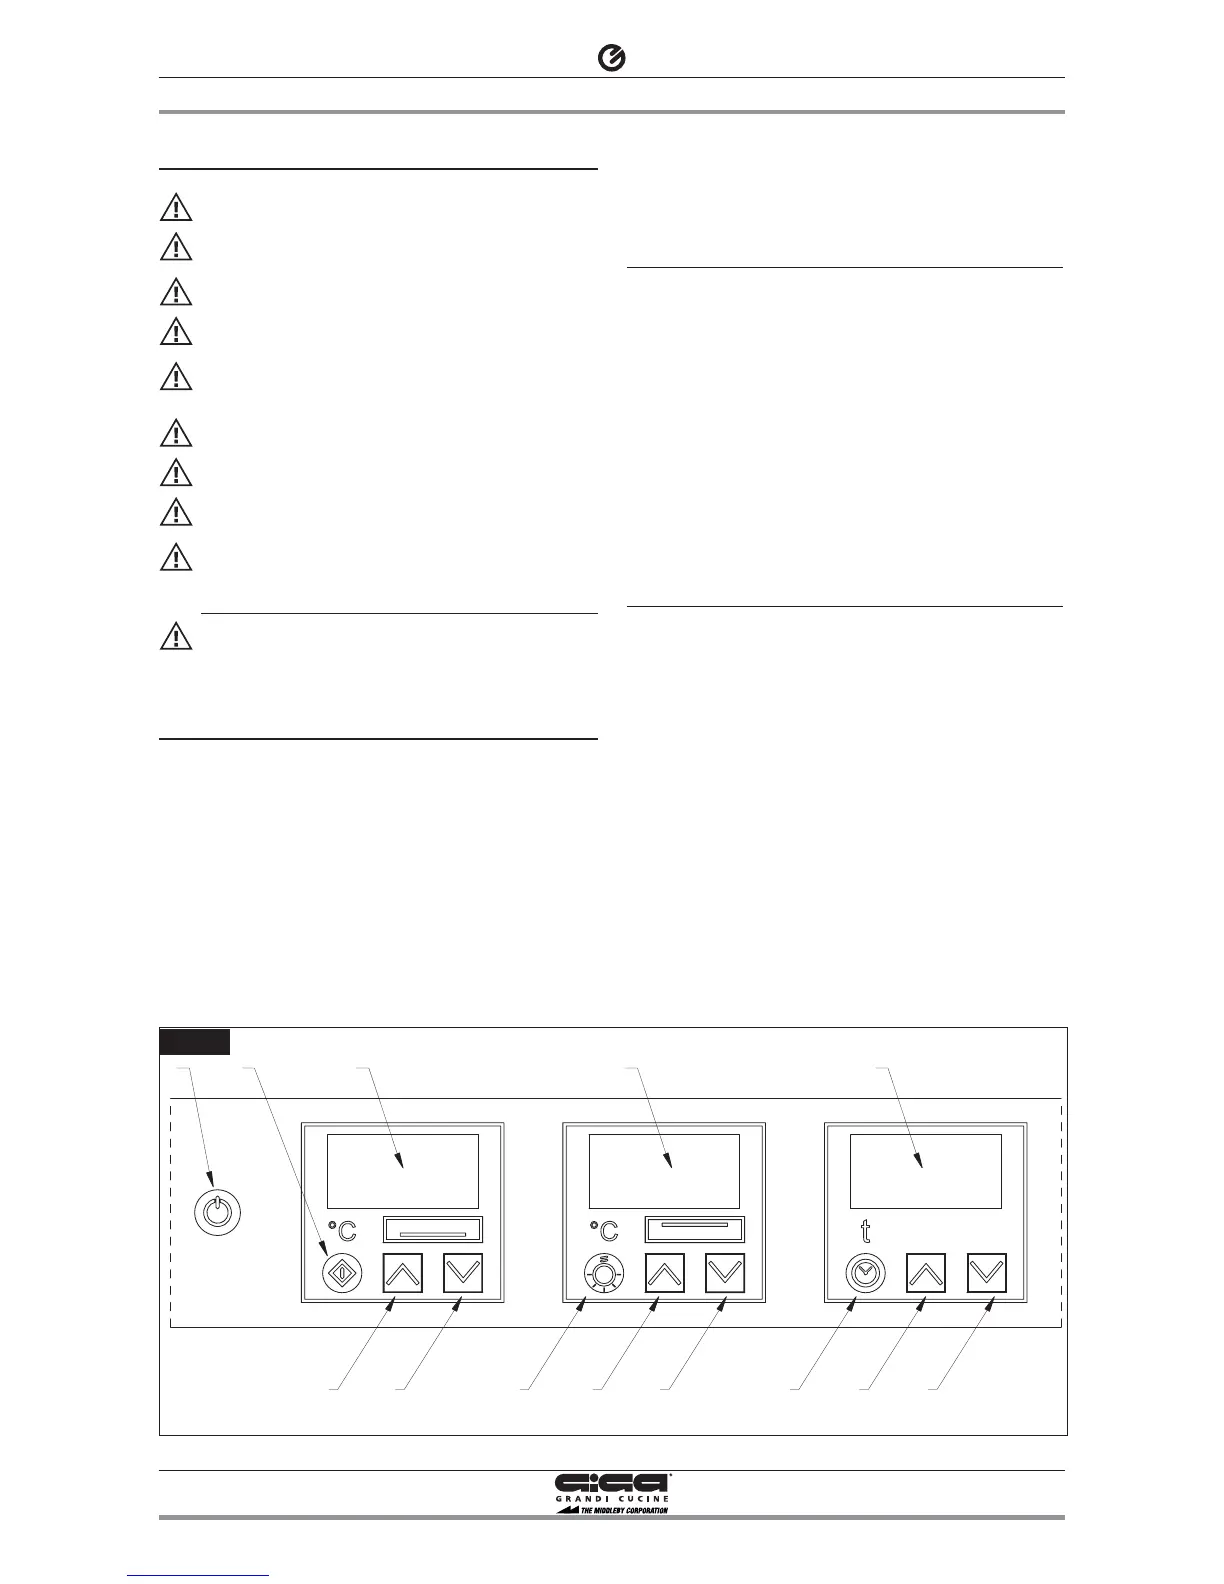
6.2 Start-up and shutting down
Operate the main switch upstream of the appliance.
When the board is OFF the three red led are on display 11,12 and
13.
Push the button 1 to switch the unit on or off. The appliance is now
ready for you to set the temperatures and the timer (see the para-
graph 6.2.1 “Setting the temperature” and 6.2.2 “Setting and using
the timer”)
At every ignition the previous settings temperature and timer
remain memorized.
Attention! When the oven is operating, in addition to the 2 fans
that heat the cooking chamber with the elements, a third fan comes
on to cool the internal components. Together with the 2 fans loca-
ted in the chamber it will remains on for 30’, even after the swit-
ching off (press button 1). After that the two fans will switch off
automatically, this guarantees a long life to all the internal compo-
nents and avoid the block of the safety thermostat
The three turned on led (2 green and 1 orange) on the display 13
indicates the fans in function.
6.2.1 Setting the temperature
Attention! Heating/cooking without cylinders cannot exceed
300°C.
Switch on the oven (see chapter 6.2 “Start-up and shutting down”).
To start heating press button 2.
Two different temperatures can be set: one of the upper zone and
one for the lower zone, from 0°C (heating element off) up to 450°C.
Operating on buttons 6 (increasing) and 7 (decreasing)the tempera-
ture of the upper zone is set, and it is visualized on display 12. With
buttons 3 (increasing) and 4 (decreasing) the temperature of the
lower zone is set and can be visualized on display 11. During the
modification of the display value it remains turn on and the icon °C
or °F continues to flash.
Once reached the temperature set the led remains on.
To interrupt operation see chapter 6.2 “Start-up and shutting
down”.
6.2.2 Setting and using the timer
Switch on the oven (see chapter 6.2 “Start-up and shutting down”).
The time is visualized on display 13 at four figures.
The four figures are the seconds, the reach a maximum of 1999
seconds (33 minutes).
Operating on buttons 9 (increasing) and 10 (decreasing) the cooking
time is set. The value set increase or decrease of a unity at every
pressure.
To start the time press button 8. Once pressed the button the
countdown starts.
During the countdown it’s possible to stop (pause) the time by
pressing button 8. Display 13 flashes to inform about the pause sta-
tus. If the timer is stopped and afterwards restarted, the time starts
again from the time you had at the moment of the interruption.
To reset the countdown press on button 8 for three seconds.
Display 13 will visualized a flashing 0 and an acoustic signal will be
activated. To stop the acoustic signal press on any buttons, the
display will visualized the last time set.
The same result will be obtained if the countdown reaches zero.
Any actions will be made on the temperature control, in fact the
operator will have to take out the food from the oven in order to
avoid its deterioration.
 Loading...