- 24 -
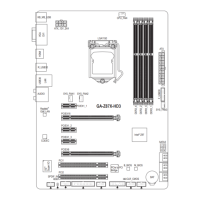
6) SATA3 0/1/2/3/4/5 (SATA 6Gb/s Connectors)
The SATA connectors conform to SATA 6Gb/s standard and are compatible with SATA 3Gb/s and SATA
1.5Gb/s standard.
Each SATA connector supports a single SATA device. The Intel
®
Z87j/H87k Chipset
supportsRAID0,RAID1,RAID5,andRAID10.RefertoChapter3,"ConguringSATAharddrives,"for
instructionsonconguringaRAIDarray.
• ARAID0orRAID1congurationrequiresatleasttwoharddrives.Ifmorethantwoharddrives
are to be used, the total number of hard drives must be an even number.
• ARAID5congurationrequiresatleastthreeharddrives.(Thetotalnumberofharddrivesdoes
nothavetobeanevennumber.)
• ARAID10congurationrequiresfourharddrives.
SATA3
PinNo. Denition
1 GND
2 TXP
3 TXN
4 GND
5 RXN
6 RXP
7 GND
1 0
3 2
5 4
7
7
7
1
1
1
7) CLR_CMOS (Clear CMOS Jumper)
UsethisjumpertocleartheBIOScongurationandresettheCMOSvaluestofactorydefaults.Toclear
the CMOS values, use a metal object like a screwdriver to touch the two pins for a few seconds.
• Always turn off your computer and unplug the power cord from the power outlet before clearing
the CMOS values.
• Aftersystemrestart,gotoBIOSSetuptoloadfactorydefaults(selectLoadOptimizedDefaults)or
manuallyconguretheBIOSsettings(refertoChapter2,"BIOSSetup,"forBIOScongurations).
Open:Normal
Short: Clear CMOS Values
 Loading...