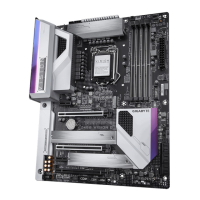
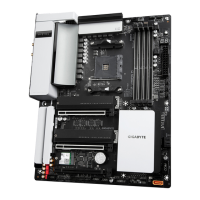
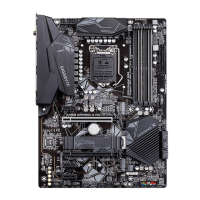
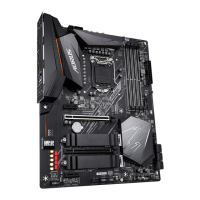
EasyManua.ls Logo

Gigabyte Z490 VISION D - Page 30

Gigabyte Z490 VISION D
120 pages
To Next Page IconTo Next Page
To Previous Page IconTo Previous Page
Loading...
- 30 -
Hardware Installation
12) M2A_CPU/M2M_SB/M2P_SB(M.2Socket3Connectors)
TheM.2connectorssupportM.2SATASSDsorM.2PCIeSSDsandsupportRAIDconguration.Please
notethatanM.2PCIeSSDcannotbeusedtocreateaRAIDseteitherwithanM.2SATASSDoraSATA
harddrive.TocreateaRAIDarraywithanM.2PCIeSSD,youmustsetupthecongurationinUEFIBIOS
mode.RefertoChapter3,"ConguringaRAIDSet,"forinstructionsonconguringaRAIDarray.
F_USB30
F_U
B_
F_  F_ 

_
B
BS_
B
SB_
B
_S

S_
_
B
_U
_
B



S  

123

123

123

123
1
1
1
1
BSS
S
_S 
SSU

1 2 3
S3
BSSS

U
 __ 3
F_USB3F
S  _
S  _
S  _
SF


B_
B_
F
_0
S
S
_0F
_F
_
_
__B


U
S  _S
_
SF_
B
USB0_B
B_
B_
F_USB3

F_USB303

_

_3U
S_
80110 60
M2A_CPU
M2M_SB
M2P_SB
Follow the steps below to correctly install an M.2 SSD in the M.2 connector.
Step 1:
Locate the M.2 connector where you will install the M.2 SSD, use a screwdriver to unfasten the screw on
the heatsink and then remove the heatsink.
Step 2:
Locate the proper mounting hole based on the length of your M.2 SSD drive. If needed, move the standoff
to the desired mounting hole. Insert the M.2 SSD into the M.2 connector at an angle.
Step 3:
PresstheM.2SSDdownandthensecureitwiththescrew.Replacetheheatsinkandsecureittotheoriginal
hole.Makesuretoremovetheprotectivelmfromthebottomoftheheatsinkbeforereplacingtheheatsink.

Related product manuals