Do you have a question about the Gigaset DESK 400 and is the answer not in the manual?
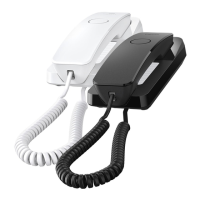
Connect the handset cable to the handset and the base station.
Connect the telephone to the telephone line via the base station.
Warning about electric shocks and gas explosions when wall mounting.
Instructions for drilling holes and fitting the phone to the wall.
Procedure to save numbers to direct dial keys.
Procedure to save numbers to speed dial keys.
Procedure to follow if the device comes into contact with liquid.
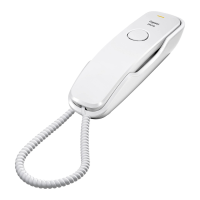
This document provides an overview and operational guide for the Gigaset DESK 400 telephone, a device designed for making calls within a phone network, primarily for private use in enclosed indoor areas.
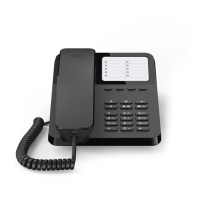
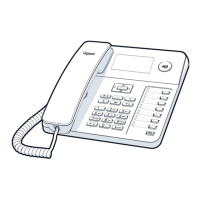
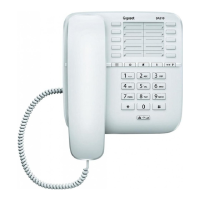
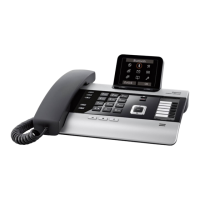
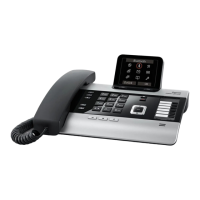
The Gigaset DESK 400 features a clear layout for ease of use. Key components include:
Connecting the Telephone: To set up the Gigaset DESK 400, first connect the short end of the handset cable to the handset and the other end to the base station (3). Next, connect the connection cable to the base station (2) and then to your telephone socket. The connection cable should be guided through the cable duct on the standfoot to keep it tidy. The stand can be mounted on the back of the telephone in the upper position (1) to enhance the legibility of the keys and the insert strip. Ensure the stand clicks into place.
Wall Mounting: For wall mounting, drill two holes approximately 65 mm apart horizontally and insert suitable screws (not included). The stand should be mounted on the back of the telephone in the lower position (5) for wall mounting. Before mounting, if necessary, set the dialling mode using the sliding switch (4). Finally, fit the phone onto the projecting screws. It's crucial to avoid damaging power cables or gas pipes during installation and to ensure the device is mounted at a maximum height of 2 meters.
Setting Up for Use: The telephone should be placed away from direct sunlight, heat sources, and operated within a temperature range of +5°C to +40°C. Maintain at least one meter distance from other radio equipment to prevent communication impairment. Avoid installing the telephone in dusty rooms, as this can shorten its service life.
Dialling and Saving Numbers: To dial a number, simply lift the handset and dial. The last number dialled is automatically saved and can be redialled by lifting the handset and pressing the redial key (P). The phone can store a total of 14 phone numbers (max. 21 digits each): 10 as speed dials via number keys (0-9) and 4 via direct dial keys.
Adjusting the Telephone:
Changing Dialling Mode/Flash Time: The Gigaset DESK 400 supports T1 (Tone dialling, 100 ms flash time), T2 (Tone dialling, 270/600 ms flash time), and P (Pulse dialling) modes. The sliding switch on the back of the base station (9) is used to select the appropriate mode and flash time, depending on your PABX requirements. For temporary tone dialling while in "Pulse" mode (e.g., to control an answering machine), establish the connection, then press the star key (*). The setting will revert to pulse dialling once the call is disconnected.
Operation on PABX and Public Telephone Systems: The recall key (R) is essential for utilizing special functions on a PABX, such as making enquiries or forwarding calls. The telephone's flash time must be set to match your PABX settings. Public telephone systems may offer additional services like call divert or call back on busy, which can be accessed using specific key combinations provided by your network provider. These combinations, including fixed call divert destinations, can be saved to speed dial keys.
Care: To clean the device, use a slightly moistened cloth or an antistatic cloth. Avoid using solvents, microfibre cloths, or dry cloths, as these can cause static. Be aware that contact with certain chemical substances can alter the device's exterior. Any impairments to high-gloss finishes can often be carefully removed using display polishes designed for mobile phones.
Contact with Liquid: If the device comes into contact with liquid, immediately unplug all cables. Allow the liquid to drain, pat all parts dry, and place the device in a dry, warm place for at least 72 hours (not in a microwave or oven), with the keypad facing down if applicable. Do not switch on the device until it is completely dry. Once fully dried, it should normally be usable again.
Safety Precautions: Only connect the connector cable to the designated phone socket. Do not use the device in environments with a potential explosion hazard (e.g., paint shops). The device is not splash-proof, so avoid installing it in damp areas like bathrooms or shower rooms. Faulty devices should be removed from use and repaired by a service team, as they could interfere with other wireless services. Do not perform any modifications or conversions to the device.
Environmental Management and Disposal: Gigaset Communications GmbH is certified to international standards ISO 14001 (Environment) and ISO 9001 (Quality). All electrical and electronic products, including this device, should be disposed of separately from municipal waste streams via designated collection facilities. The crossed-out wheeled bin symbol on the product indicates compliance with European Directive 2012/19/EU, promoting correct disposal for reuse and recycling and preventing negative environmental and health consequences.
| Type | Analog telephone |
|---|---|
| Handset type | Wired handset |
| Answering machine | No |
| Number of melodies | 3 |
| Number of handset volume levels | 2 |
| Elderly phone | - |
| Mounting type | Desk/Wall |
| Product color | Black |
| Phonebook capacity | 10 entries |
| Redialing | Yes |
| Number of handsets included | 1 |
| Base weight | 423 g |
|---|---|
| Base dimensions | 146 x 208 x 73 mm |
| Handset dimensions (WxDxH) | 50 x 191 x 43 mm |