Do you have a question about the GiiNii Digital Photo Frame and is the answer not in the manual?
Enables you to display photos stored on internal memory, memory card, or USB flash drive.
Highlights power-saving software, album management, OSD menus, and clock/calendar functions.
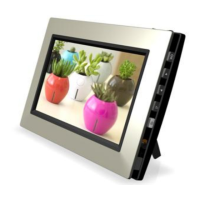
Identifies and describes components visible from the right side of the frame.
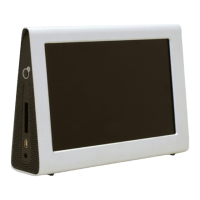
Identifies and describes components visible from the rear side of the frame.
Explains the function of each control button on the picture frame.
Details how to use the remote control for operation and storage.
Lists and describes the functions of each button on the remote control.
Instructions on how to set up and adjust the back stand for viewing.
Guides on connecting the power adapter and turning on the device.
Details the initial setup for selecting language and setting date/time.
Explains the process of copying photos from external storage to internal memory.
Describes the "Smart Copy" feature for resizing photos and managing storage.
Lists supported memory card types and their maximum capacities.
Instructions on connecting the frame to a computer via USB for file management.
Provides a description of each option available in the main menu.
Details the manual process of copying photos from external storage to albums.
Guides on how to tag photos to specific albums for organization.
Explains available file sources and pre-installed albums.
Describes how to select photos from memory cards or internal storage.
Instructions on how to remove photos from albums without deleting them.
Explains how to search and manage photos based on time using the TIMELINE album.
Guides on creating new custom albums for photo organization.
Details how to rename existing albums.
Instructions on how to delete custom albums.
Explains how to select and delete individual photos from albums.
Guides on rotating photos by 90 degrees clockwise.
Describes how to apply effects like Sepia or Black & White to photos.
Instructions on how to initiate a photo slideshow.
Explains how to adjust slideshow settings like transition effects and interval.
Details how to run a slideshow using photos from a specific time span.
Explains the different power-saving modes available in EnerGiiNii™.
Guides on how to choose and set different clock skins.
Explains how to toggle between the clock display and slideshow modes.
Details how to use SCRAPBOOK feature for slideshows with templates.
Explains how to adjust the date, time, and time format settings.
Covers brightness, smart copy, cropping, language, reset, and firmware upgrade.
Displays firmware version, total memory, and free memory status.
Addresses memory card formats and factors affecting photo loading speed.
Explains auto-rotation and supported image file formats.
Covers connecting to a computer and responding to frame freezes or unresponsiveness.
Explains TIMELINE feature limitations and SD card tagging issues.
Provides FCC compliance information and warnings for Class B digital devices.
Details specifications for different models, including screen size, memory, and connectivity.
Outlines what the 90-day limited warranty covers regarding defects and company options.
Lists what is not covered by the warranty, including damage and misuse.
Details specific items and conditions not covered by the limited warranty.
Provides contact information and procedures for seeking warranty assistance.
| Aspect Ratio | 4:3 or 16:9 (depending on the model) |
|---|---|
| Image Formats | JPEG |
| Supported Media Formats | JPEG |
| Connectivity | USB |
| Power Source | AC adapter |
| Screen Size | 8 inches |
| Resolution | 800 x 600 pixels |
| Memory Card Support | SD, MMC, MS |
| Display Size | 8 inches |
| Display Resolution | 800 x 600 pixels |