Attention
1. Before turning on the power, please ensure that all wiring is correct and secure. Do not operate while the power is on.
2. Use the product under the rated voltage. Overvoltage or undervoltage may cause damage.
3. Do not disassemble the product, as it may cause fire and electric shock.
4. Do not use the product in direct sunlight, damp, high-temperature, or other harsh environments.
5. Do not use the product in metal shielded areas or near strong magnetic fields, as it will severely affect the wireless
signal transmission of the product.
DISCLAIMERS
Our company will update the content of this manual according to product functionality improvements. The updates will be reflected in the latest
version of this manual without further notice.
Due to our continuous adoption of new technologies, the product specifications may change without prior notice.
This manual is for reference and guidance purposes only. It does not guarantee complete consistency with the actual product. Please refer to the
actual product for practical applications.
The components and accessories described in this manual do not represent the standard configuration of the product. The specific configuration
is subject to the package contents.
All text, tables, and images in this manual are protected by relevant national laws and may not be used without our company's permission.
*
*
*
*
*
This product is compatible with third-party products (such as apps, hubs, etc.) as stated in the gateway compatibility chart. However, our
company takes no responsibility for any issues that may arise from changes made by third-party products, resulting in incompatibility or
the partial loss of functionality.
*
(Flash 3 times)
Wiring diagram
POWER-ON STATUS & FREQUENCY SETTINGS
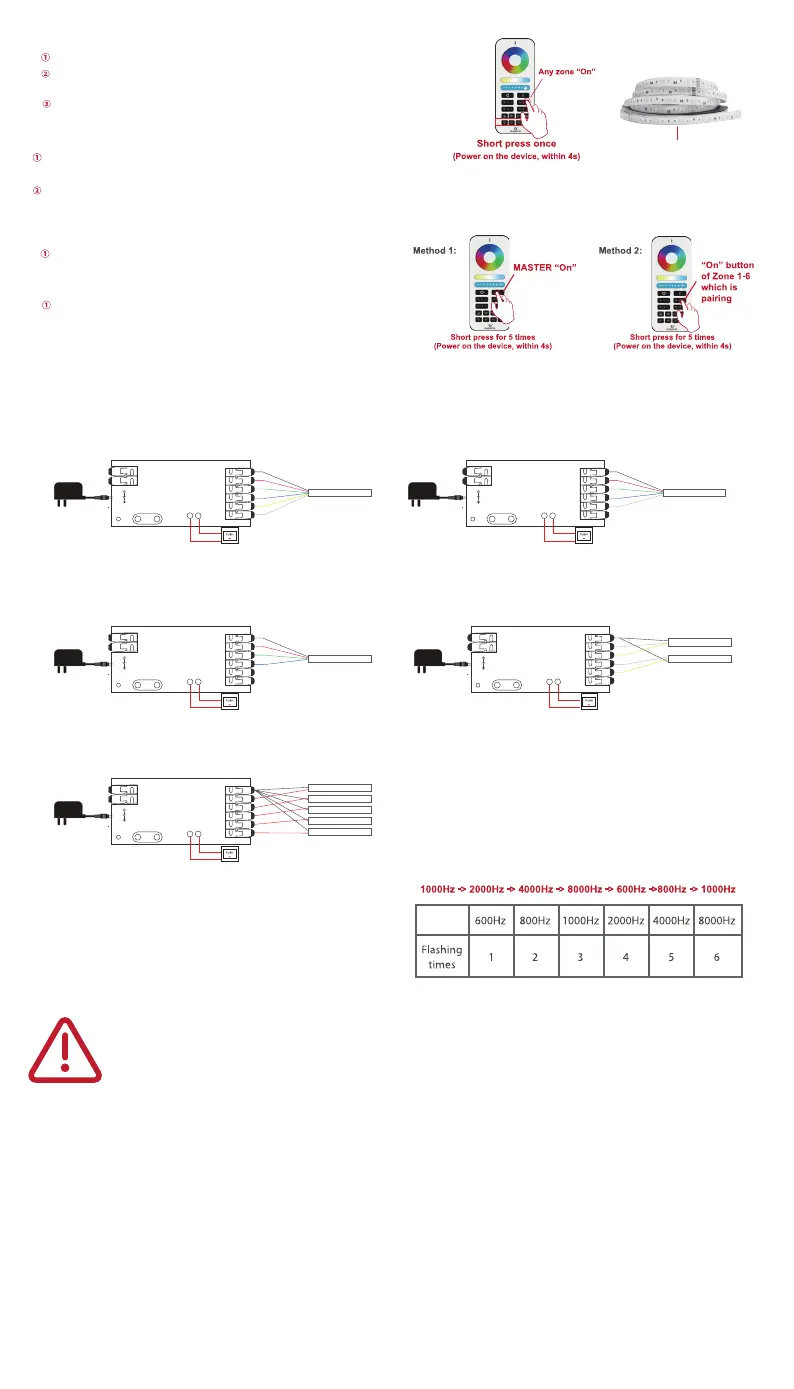
RGBCCT:
Under RGBCCT function, the RGBCCT strip can be connected to the device.
RGB:
Under RGB function, the RGB strip can be connected, without any connection
to “N” terminal.
CCT:
Under CCT function, two pieces of CCT strips can be connected, without
any connection to “N” terminal.
RGBW:
Under RGBW function, the RGBW strip can be connected, without any
connection to “N” terminal.
DC
Power Supply
RGBCCT LED Strip
Optional connection
V+RGBW C
INPUT
V+ V-
Pairing with 2.4GHz RF Remote Control
2.4GHz Remote Control Scene Memory Function
RESET the 2.4GHz RF Network
The pairing will be timeout after 4 seconds when the device powered on.
Method 1: Short press the Master “On” Key 5 times within 4 seconds
after the device powered on, the device will blink 3 times.
Method 2: Short press continuously 5 times the Zone “On” key the
device being paired within 4 seconds after the device powered on,
the device will blinks 3 times.
The pairing will be done successfully by pressing any zone “On”key of the
2.4G RF Remote or touch panel.
The indications from the device will blink 3 times.
DC
Power Supply
RGB LED Strip
Optional connection
V+RGBN N
INPUT
V+ V-
DIMMER:
Under dimmer function, five pieces of single color strips can be connected.
DC
Power Supply
Single Color LED Strip
Single Color LED Strip
Single Color LED Strip
Single Color LED Strip
Single Color LED Strip
Optional connection
V+V1-V2-V3-V5- V4-
INPUT
V+ V-
DC
Power Supply
Dual Color LED Strip
Dual Color LED Strip
Optional connection
V+CWCN W
INPUT
V+ V-
DC
Power Supply
RGBW LED Strip
Optional connection
V+RGBN W
INPUT
V+ V-
1.Power-on Status Settings
2.Frequency Settings
Long press“opt”key for more than 5 seconds, the indicator flashes blue for 3
times, the device will remember the on-off state before the last power failure
and return to the previous state when powered on. Repeat the operation again
to cancel this function, the device will be on by default when powered on.
In order to be applicable to different power supplies, the frequency of device
is selectable as 600Hz、800Hz、1000Hz、2000Hz、4000Hz、8000Hz with
default frequency 1000Hz. Once short pressing “Reset” key, the frequency
will switch into the next one. The indicator will flash in Pink color and resume
to previous color after “off” for 2 seconds. The rule of indicator flashing times
for different frequency please refer to table.
Long press to save the scene; Short press to activate the scene.
Click on the button (S1, S2, S3, S4) of the remote control to enter the scene
memory function.
 Loading...