Do you have a question about the Gledopto GL-C-201P and is the answer not in the manual?
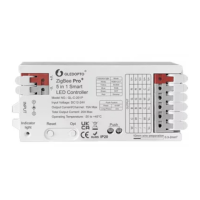
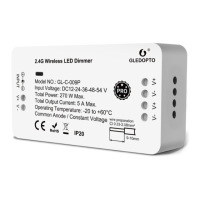
Details model numbers, voltage, current ratings, wireless communication, and environmental ratings like IP20.
Explains the meaning of indicator light colors for RGBCCT, RGBW, RGB, CCT, and Dimmer functions.
Provides instructions for resetting the controller using the button or power cycling.
Guides on connecting the controller to a gateway and initiating device search via the gateway's app.
Details methods for pairing with remotes/panels, including distance and success indicators.
Explains the process for pairing with a 2.4GHz RF remote control and scene memory function.
Describes how to reset the 2.4GHz RF network connection for the controller.
Covers setting the power-on memory state and selecting operating frequencies (600Hz-8000Hz).
Highlights essential safety precautions: correct wiring, voltage limits, avoiding disassembly, and environmental factors.
Provides details on manual updates, specification changes, and third-party product compatibility.
This document describes the GLEDOPTO ZigBee 3-in-1 and 5-in-1 LED Smart Controllers Pro+, designed for controlling various types of LED strips through ZigBee and 2.4GHz RF communication. These controllers offer versatile lighting control, including color, color temperature, and brightness adjustments, and are compatible with a range of smart home gateways.
The GLEDOPTO LED Smart Controller Pro+ serves as a central hub for managing LED lighting. It supports multiple lighting configurations:
The device integrates both ZigBee and 2.4GHz RF wireless communication, providing flexibility in control methods. ZigBee connectivity enables integration with various smart home ecosystems, while 2.4GHz RF allows for direct control via compatible remote controls.
The controller offers several user-friendly features for setup, control, and customization:
The device can be reset in two ways:
The device features three main control buttons:
The controller includes an indicator light that changes color to reflect its current function:
Connecting the controller to a ZigBee gateway involves a simple process:
Touch Link pairing allows direct connection between the controller and a remote control or touch panel:
Note on Touch Link:
The controller can also be paired with a 2.4GHz RF remote control.
The controller supports scene memory when used with a 2.4GHz remote control:
The 2.4GHz RF network can be reset using two methods:
The device's operating frequency is selectable to ensure compatibility with different power supplies. Available frequencies include 600Hz, 800Hz, 1000Hz (default), 2000Hz, 4000Hz, and 8000Hz.
To ensure optimal performance and longevity of the device, users should adhere to the following guidelines:
The company reserves the right to update the manual's content based on product functionality improvements. Specifications may change without prior notice due to continuous adoption of new technologies. This manual serves as a reference and guidance; it does not guarantee complete consistency with the actual product. The specific configuration is subject to the package contents. All text, tables, and images are protected by national laws. While the product is compatible with third-party products as stated in the gateway compatibility chart, the company assumes no responsibility for issues arising from changes made by third-party products that result in incompatibility or partial loss of functionality.
| Brand | Gledopto |
|---|---|
| Model | GL-C-201P |
| Category | Controller |
| Wireless Protocol | Zigbee |
| Control Method | App Control, Voice Control |
| Input Voltage | 100-240V AC |
| Total Output Current | 6A |
| Channels | 2 |
| Weight | 150 g |
| Compatibility | Zigbee Hub |
| Output Voltage | DC 12-24V |
| Working Temperature | -20 to 60°C |
| Working Humidity | 5-95%RH |