This document is a user's manual for the GoPlus Motorized Treadmill, model SP35498.
Function Description
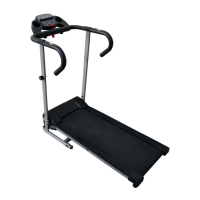
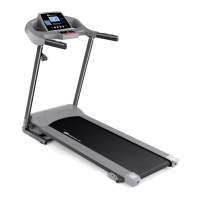
The GoPlus Motorized Treadmill is designed for home use, providing a platform for indoor exercise. It allows users to engage in walking, jogging, and running workouts with adjustable speed and various pre-set programs. The treadmill features a console that displays key workout metrics such as speed, time, distance, calories burned, and pulse. It also includes a body fat test function and supports USB and MP3 connectivity for entertainment during workouts. For safety, it incorporates a safety key mechanism that immediately stops the machine when disengaged.
Important Technical Specifications
- Built-Up Size: 62" x 26.5" x 49"
- Foldable Size: 32.5" x 26.5" x 56"
- Running Board Size: 16" x 47"
- Net Weight: 95 lbs
- Max User Weight: 220.5 lbs
- Speed Range: 0.5 - 7.5 mph
- Power: As per the rating label (nominal 220-240V / 100-120V circuit with grounding plug).
- Maximum Output Power: As per the rating label.
- LCD Window: 1 LCD window with blue background, displaying Speed, Time, Distance, Calories, Pulse.
Usage Features
Assembly:
The manual provides a step-by-step guide for assembly. Key steps include:
- Unpacking the main frame and spare parts.
- Attaching the computer frame and uprights using M8*16 bolts and lock washers, ensuring wires are connected and not pressed.
- Pulling up the uprights, supporting them to prevent falling.
- Locking the right and left uprights onto the base using M845 and M816 bolts with lock washers.
- Attaching the right and left end caps with screws (71) using a wrench with a screwdriver (74).
- Placing the safety key (72) on the computer to start exercise.
Folding and Unfolding:
- Pulling Up (Folding): Lift the base frame at position A until the air pressure bar B locks into the round tube, indicated by a sound.
- Pulling Down (Unfolding): Support position A with one hand and kick the air pressure bar. The main frame will automatically fall down. Users are advised to keep people and pets away during this process.
Operation Guide:
- Display: The console displays Speed, Time, Distance, Calories, and Pulse.
- Button Functions:
- PROGRAM: Selects programs from manual mode (P1-P12) or FAT mode.
- MODE: In ready state, selects mode (time countdown, distance countdown, calories countdown). In FAT state, selects parameters (SEX, AGE, HEIGHT, WEIGHT).
- START: Starts the machine at the lowest speed or default program after a 3-second countdown.
- STOP: Stops the machine smoothly.
- SPEED ▲/▼: Adjusts speed during running and data during stop.
- Quick Speed Buttons (2, 3, 4, 5, 6, 7): Quickly adjust speed.
- Main Function:
- Quick Start (Manual): After powering on and attaching the safety lock, the treadmill starts after a 3-second countdown. Speed can be adjusted with SPEED buttons. Stop by pressing STOP or removing the safety lock.
- Countdown Mode: Press MODE to choose time, distance, or calories countdown. Set data with SPEED ▲/▼. Press START to begin. The machine stops smoothly when the countdown reaches 0 or by pressing STOP/removing the safety key.
- Preset Programs (P1-P12): Press PROG to select a program. Set running time with SPEED buttons. Each program has 20 sections. The machine runs at the first section's speed and automatically adjusts for subsequent sections. Speed and incline can be adjusted during running.
- Heart Rate: Hold hand pulse sensors for 5 seconds to display heart rate. For accuracy, hold for over 30 seconds when the machine is stopped. Data is for reference only, not medical use.
- Body Fat Test (FAT): In ready condition, press PROGRAM until 'FAT' appears. Press MODE to select SEX, AGE, HEIGHT, WEIGHT. Adjust data with SPEED ▲/▼. Press MODE to finish. Hold hand pulse sensors for 5 seconds to display BMI.
- USB Function (Option): Insert a USB memory stick with audio files to play music directly.
- MP3 Function (Option): Connect an external MP3 device to play music. Adjust volume on the MP3 device to protect the computer loudhailer.
- Sleep Function: The system enters sleep mode after 10 minutes of inactivity. Press any key to wake the console.
- Safety Key Function: Removing the safety key stops the machine, resets all data to 0, and displays "---". All operations are workable when the safety key is on.
Learning Guide:
- Preparation: Consult a physician if over 35, not healthy, or new to exercise. Learn controls (start, stop, speed adjustment) before use. Start on anti-slip pads, holding handlebars at low speed (1.0-2.0 mph). Gradually increase speed (1.9-3.1 mph) for 10 minutes, then stop.
- Exercise: Gradually increase speed and incline. For a good workout, maintain a comfortable speed and incline for 30 minutes.
- Exercise Intensity: Warm up at 3.0 mph for 2 minutes, then gradually increase speed by 0.2 mph every 2 minutes until breathing becomes rapid but comfortable. Slowly decrease speed for 4 minutes. Increase incline slowly to intensify exercise.
- Calorie Burning: Warm up at 2.5-3.0 mph for 5 minutes, then increase speed by 0.2 mph every 2 minutes for 45 minutes. Maintain speed during TV programs, increasing by 0.2 mph during advertisement breaks for higher intensity. Slowly decrease speed for 4 minutes.
- Cycle Time: 3-5 times/week, 15-60 minutes/session.
- Consultation: Consult a physician or health professional for a suitable exercise time-chart based on age and health. Stop immediately if experiencing chest tightness, chest pain, irregular heartbeat, breath difficulty, dizziness, or other discomfort.
- Walking/Running Speeds:
- 0.6-1.9 mph: Not well physical
- 1.9-2.8 mph: Less movement and workout
- 2.8-3.8 mph: Normal walking (velocity ≤3.8 MPH)
- 3.8-4.7 mph: Fast walking
- 4.7-5.6 mph: Jogging
- 5.6-7.5 mph: Intermediate speed running
- 7.5-9.1 mph: Experienced runner
- 9.1-10 mph: Excellent runner (velocity ≥5.0 mph)
- Warm-up Instruction: Perform stretching exercises for 5-10 minutes before and after workouts. Examples include down stretch, hamstring stretch, legs and feet tendon stretch, quadriceps stretch, and sartorius muscle stretch, each held for 10-15 seconds and repeated three times.
Maintenance Features
General Cleaning:
- Regular dusting prolongs treadmill life.
- Clean exposed parts of the deck and side rails to prevent foreign material build-up.
- Unplug the treadmill before cleaning or servicing.
- At least once a year, remove the motor cover and vacuum underneath.
Running Belt and Deck Lubrication:
- The treadmill has a pre-lubricated, low-maintenance deck system.
- Periodic lubrication is required due to belt/deck friction.
- Lubrication Schedule:
- Light user (less than 3 hours/week): Annually
- Medium user (3-5 hours/week): Every six months
- Heavy user (more than 5 hours/week): Every three months
- Lubrication should be purchased from the distributor or company.
- Any repairs should be performed by a professional technician.
Running Belt Adjustment:
- Switch off power for 10 minutes after 2 hours of continuous running for maintenance.
- The belt should not be too loose (to prevent slipping) or too tight (to prevent abrasion).
- The belt should be 50-75mm away from the deck on both sides.
- Centering the Running Belt:
- Place the treadmill on a level surface and run it at 2.4-3.1 mph.
- If the belt drifts right, turn the right adjusting bolt 1/4 turn clockwise. Run until centered.
- If the belt drifts left, turn the left adjusting bolt 1/4 turn clockwise. Run until centered.
- To adjust tightness, turn both left and right adjusting bolts 1/4 turn clockwise. Restart and confirm tightness.
Troubleshooting (Fault Codes):
- E01 (Computer to control board wire not connected): Check connection, ensure IC on control board is inserted, or replace control board if power supply is abnormal.
- E02 (Protect the exploding): Check for bad contact with motor open circuit (replace motor or check connector) or punctured power tube (replace power tube or control board).
- E03 (Motor light sensor fault): Check if light sensor wire is connected or if the sensor is faulty.
- E05 (Over current Protection): Indicates overload, heavy resistance on running board (needs oiling), or motor damage (replace motor).
- E06 (Motor wire not connected): Check motor wire and circuit control board wire connections. If the control board has a peculiar smell, replace it.