6. How to Ride your Electric Scooter
1. Before riding make sure, that the steering system is correctly adjusted and that all connecon
elements (such as the folding mechanism) are correctly ghtened and not damaged and that the brakes
and wheels are in good condion.
2. Make sure to fully charge your new GPad® Joyride before your first ride.
3. Fold your scooter into its riding posion following the instrucons in chapter 4. Aer that, unfold the
handlebars by liing them up unl they lock into place. To fold them back down again simply pull back
the handlebar folding sleeve.
4. Turn the scooter on following the instrucons in chapter 3.
5. Make sure that the kickstand is folded up into the riding posion.
6. Grab the handlebar with both hands and with one foot placed on the plaorm, push off with the other
to start moving.
7. Once moving, use your right thumb to press the throle to accelerate.
8. To decelerate use your le hand to pull the brake lever towards yourself.
WARNING! When braking hard, you risk losing tracon which can cause serious injury. Always look
ahead for potenal hazards and ride at moderate speed. Braking distances increase with wet weather.
9. Use the handlebar to to turn by turning it slightly and shiing your body towards the direcon you
want to turn
10. To turn the scooter off again hold down the power buon for about 3 seconds.
11. When parking the scooter use your foot to fold down the kickstand located at the rear of the
scooter, then lt the scooter towards the side with the kickstand.
When riding the scooter wear a helmet and other protecve gear (knee, wrist and elbow protecon) to
reduce the risk of injury.
Always ware shoes (high heels not recommended) when riding your scooter. Never ride barefoot.
!
7. Maintenance
7 (ENG) 8
Regularly check the ghtening of the various bolted elements, in parcular the
wheel axles, the folding system, the steering system and the brakes.
Cleaning - To clean the scooter use a damp so cloth. A brush can be used to
clean off dirt that is harder to remove. DO NOT use alcohol or other solvents to
clean the scooter. DO NOT clean the scooter with a pressure washer, hose or
with splashing water. The scooter is not waterproof. Any water damage voids the
warranty.
Tire Pressure - inflate both res to 3 bar (40psi). Check for re pressure aer
receiving the scooter from the dealer, and regularly aerwards. If one of the res
is damaged or won’t hold air then stop riding the scooter.
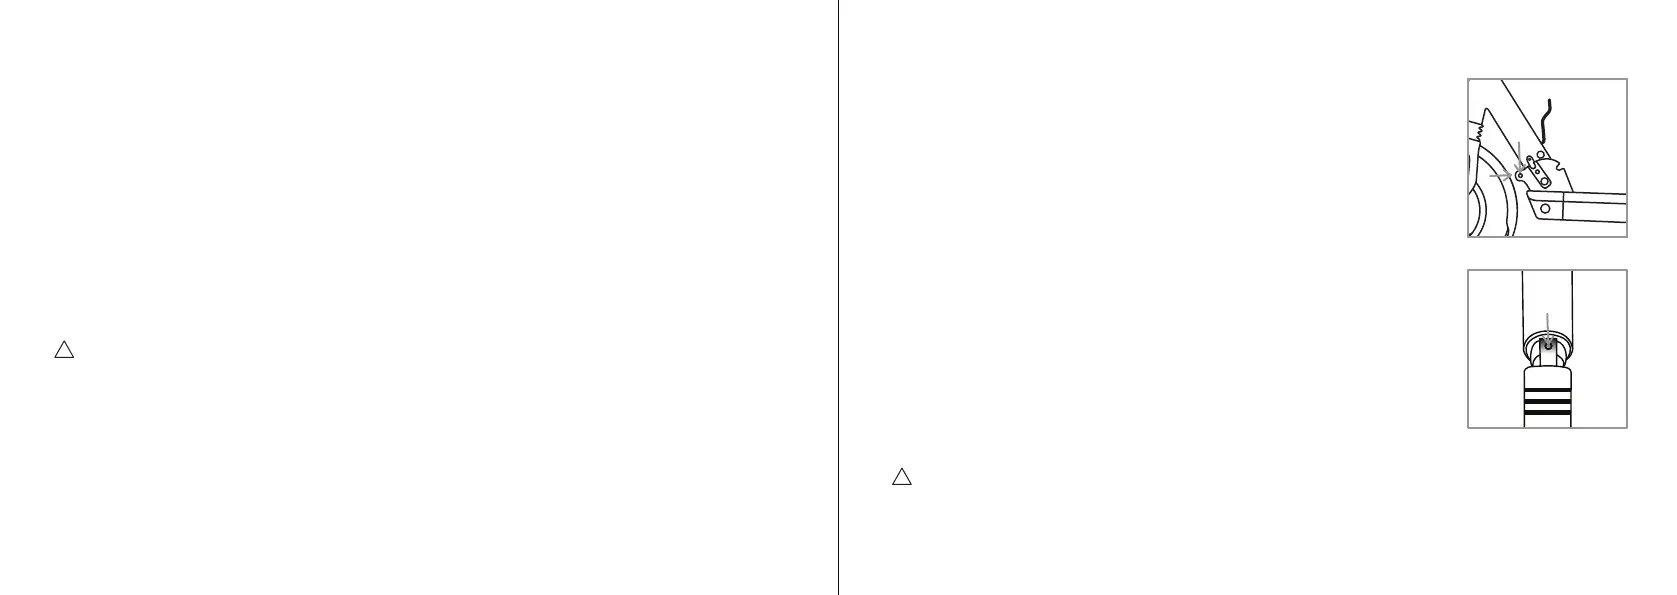
Tightening the folding mechanism - To ghten the folding system, first release
the screw A on figure 3, on both sides. Turn clockwise the screw B on figure 3,
located at the front end. Do this on both sides. Finally reghten the screws A on
figure 3.
Tightening the handlebar folding mechanism - To ghten the handlebar, open the
sleeves and fold the handlebar. Inside you find a 3mm hex screw (see figure 4).
Using the hex key, gradually turn the screw counterclockwise. Check every lile
while if the handlebar is ght enough. If the handlebar does not lock into the
driving posion turn the hex screw to the opposite direcon.
Storage - Turn the scooter off and disconnect the charger during storage. Make
sure that the baery is about 50-60% charged. You should check how much
charge the baery has le at least once a month. If the baery charge has
decreased, charge the scooter unl the baery has about 50-60% charge. Store the scooter in a dry
room at about 15 to 25°C.
WARNING! As with any mechanical component, a vehicle is subject to high stresses and wear. The
various materials and components may react differently to ware and fague. If the expected service life
for a component has been exceeded, it may break suddenly, therefore risking causing injuries to the user.
Cracks, scratches and discoloraon in the areas subject to high stresses indicate that the component has
exceeded its service life and should be replaced.
3.
A
B
!
4.
 Loading...