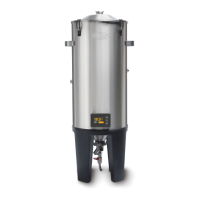
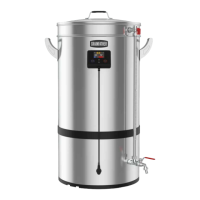
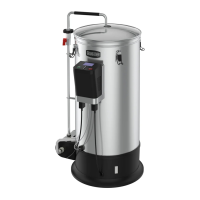
The Grainfather Conical Fermenter Pro is an all-grain brewing system designed for fermenting up to 27 L (7.1 US Gal) of beer. It features a 30W, 12V DC heating element that gently heats the environment between the fermenter walls, ensuring an even and controlled temperature increase optimal for yeast activity. The fermenter can achieve temperatures up to 10°C (50°F) higher than the ambient room temperature. For enhanced cooling efficiency, especially in ambient temperatures above 30°C (86°F), the Grainfather Conical Fermenter Pro Insulation Jacket (sold separately) is recommended.
Technical Specifications:
- Volume: 30 L (7.9 US Gal)
- Heater Power: 30W
- Controller Voltage: 12V d.c.
- Power Adapter Frequency: 50Hz/60Hz
Key Components:
The Conical Fermenter Pro includes an airlock, rubber bung, fermenter lid, fermenter body, 5 cm (2") tri clamp, cone plug seal, liquid inlet, dual valve tap, silicone transfer hose (10 mm / 0.4" inner diameter), and the Conical Fermenter Pro Controller. It also comes with a power adapter, wall plug, and a 2 m (6.5 ft) m12-3pin power cord.
Assembly and Setup:
- Dual Valve Tap Installation: Unpack all parts and assemble the dual valve tap. Attach the valve to the bottom of the fermenter by inserting the cone plug seal, then secure it with the tri clamp.
- Power Cord Connection: Plug the 2 m (6.5 ft) power cord into the back of the fermenter and then into the power adapter. Do not plug into a wall socket until ready to heat.
- Bung, Airlock, and Lid Attachment: Push the rubber bung into the fermenter lid, then insert the airlock into the bung. This prevents contaminants from entering the fermenter during fermentation.
- Cooling System Connection (Optional): For cooling capabilities, connect the Glycol Chiller or Cooling Pump Kit (purchased separately). This involves placing white seals inside the threaded holes on the fermenter's side, screwing on the threaded sections of the brass couplers, and then connecting the hoses. Ensure the hot/red hose is connected to the higher point and the cold/blue hose to the lower point for optimal flow. A minimum of 15 L (4 US Gal) of liquid is required when pumping through the cooling sleeve. Hoses can be cut shorter for maximum cooling efficiency.
Controller and App Integration:
The Conical Fermenter Pro Controller allows for precise temperature management.
- Connection Setup: Upon first power-on, the controller displays a connection setup screen. Press 'set' to access the main default screen.
- Main Default Screen: This screen shows current and target temperatures, unit symbol (Celsius or Fahrenheit), and temperature control status (heating/cooling/tracking). If managed fermentation is active, it displays session information. Use up/down buttons to adjust the target temperature. Hold 'set' to pause/resume heating/cooling. Press 'set' to enter controller settings.
- Main Menu: Access Network Config, Settings, and About.
- Network Config: Add new wireless networks or clear existing credentials for fermenter connection.
- Settings: Adjust temperature control (heating/cooling), units (Celsius/Fahrenheit), hysteresis (0.1-2.0°C / 0.22-4°F margin), lower temp limit (default 6°C / 43°F – not recommended to change significantly), and calibrate temperature (not recommended to change).
- Wireless Control & App Integration: Connect the controller to the Grainfather Community App on your mobile device (Android or iOS).
- Turn on the controller to the connection setup screen (or navigate via Network Config > Add New Network).
- Open the Grainfather App, go to the equipment screen, tap '+', select "Fermentation Tracking Equipment," then "Grainfather Conical Fermenter Pro."
- Follow the setup wizard. Android users select their controller from a list. iOS users follow on-screen instructions to connect their mobile device to the controller, then return to the app.
- Select your Wi-Fi network and enter the password to connect the fermenter to the internet.
Usage Features:
- Filling: Fill the fermenter by siphon or counter-flow wort chiller with at least 15 L (4 US Gal) of wort.
- Temperature Control: Use the controller manually or via the Grainfather App to monitor and manage fermentation remotely with automatic alerts and notifications.
- Automatic Fermentation: For automatic fermentation, ensure your chosen recipe in the Grainfather App has a fermentation profile. In the fermentation section of the app, add a new device, select "Conical Fermenter Pro Controller," and enable "managed mode" under fermentation steps. The controller, in conjunction with the Cooling Pump Kit/Glycol Chiller, will automatically maintain and change the fermentation temperature based on your profile.
- Fermentation Tracking: The app displays a graph monitoring fermentation progress. You can also connect other tracking devices like Tilt and Plaato.
- Sampling and Transfer: The dual valve tap allows for collecting samples to test gravity and transferring beer after fermentation. Connect a 10 mm (0.4") inner diameter hose to the opening and open the ball valve.
- Cold Crashing: When cold crashing, use the optional Pressure Transfer Kit to prevent suck-back from the airlock by applying 0.5 psi of CO2 and adjusting the needle valve. This creates a CO2 blanket, preventing air ingress as the beer contracts. Cooling slowly at 3°C (37.4°F) per day helps maintain pressure equilibrium.
Maintenance and Cleaning:
- Post-Fermentation: Transfer beer to kegs or bottles.
- Unplugging: Always unplug the fermenter and screw on the fermenter socket cap before cleaning.
- Rinsing: Rinse out residual trub and fill halfway with water.
- Cleaning: Add Mangrove Jack's Cold Water Cleaner Detergent. Scrub the fermenter sides and lid with a non-abrasive cloth. Drain the cleaning liquid using both taps on the dual valve.
- Dual Valve Tap: Remove, disassemble, and clean the dual valve tap.
- Sanitising: Clean all equipment with Mangrove Jack's No Rinse Sanitiser.
- Storage: Reassemble, dry, and store.
- Controller Care: The Conical Fermenter Pro Controller is splash-proof for easy exterior cleaning, but avoid high-pressure hoses directly on the controller or the fermenter power socket. Prevent the controller and power socket from prolonged contact with water, even with the cap in place.
Tips:
- Dump dead yeast and dry hops every 2-3 days during fermentation to prevent valve clogging.
- Temperature distribution can vary when cooling to low temperatures; readings from an additional probe (e.g., Tilt hydrometer) at the top of the fermenter may differ from readings in the cone.
- For brewing lager and crash cooling, refer to the online guide at https://grainfather.com/instructions/.
Read all instructions before use. Do not touch hot surfaces. Do not immerse the cord or plugs in water. Close supervision is necessary when used near children. Unplug when not in use or before cleaning. Do not operate if the appliance has a damaged cord/plug, malfunctions, or has been damaged. Return to a service provider for repair. Do not use accessory attachments not recommended by the manufacturer. Do not use outdoors. Do not let the cord hang over table edges or touch hot surfaces. Do not place on or near hot gas/electric burners or heated ovens. Use only for its intended purpose. Ensure the main power supply to the controller has overload protection (maximum load: 230V/16A) in accordance with national/local codes. Not following safety information may void the warranty.
CAUTION: Risk of fire and electric shock. Replace only with genuine Grainfather cord set. Do not immerse in water. Save all warnings and instructions for future reference. For commercial and indoor use only.