Do you have a question about the GRAUPNER DISCUS 2CT and is the answer not in the manual?
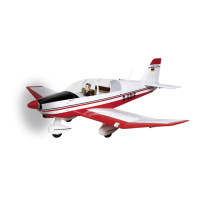
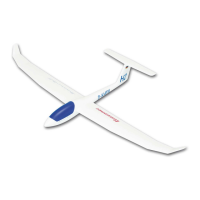
The Graupner DISCUS 2CT is a semi-scale RC model aircraft designed for outstanding performance, offering the flexibility to operate as either a pure glider or a powered glider. This model is supplied ready-to-fly, equipped with a motor pylon, three 850 mAh LiPo cells, and a HoTT receiving system, making it compatible with a HoTT COMPUTER SYSTEM for control.
The DISCUS 2CT is engineered for versatility, allowing for quick conversion between glider and powered flight modes simply by attaching or removing the motor pylon. This adaptability makes it suitable for various flying conditions and preferences. The model's control surfaces, including the rudder and elevator, are operated by factory-fitted DES 231 servos, ensuring precise and responsive handling. The Graupner GR-12S HoTT receiver and PICO 8 speed controller are pre-installed and configured, simplifying the setup process and eliminating the need for complex programming. The motor pylon, supplied as a complete, ready-to-use unit with a CAM PUSHPROP propeller, provides reliable propulsion for powered flight. The model's design emphasizes ease of assembly and operation, making it accessible to both experienced model pilots and those new to this type of RC flying, especially with the guidance of an experienced mentor.
Before operating the DISCUS 2CT, it is crucial to thoroughly read the operating instructions and familiarize yourself with your HoTT transmitter's manual. The initial setup involves charging the LiPo flight battery and the transmitter battery. The "BINDING" procedure is essential to link the GR-12 receiver in the model to your HoTT transmitter. This process typically involves moving the transmitter's right-hand stick to the "motor stop" position, connecting the BEC plug between the speed controller and the LiPo battery, and then initiating the binding procedure as per your radio control system's manual.
Once bound, a full check of the working systems is necessary. The servo leads are connected to the receiver in a specific sequence: socket 1 for the speed controller, socket 2 for the rudder servo, and socket 3 for the elevator servo. This configuration assigns throttle and rudder control to the right-hand stick, while elevator control is managed by the left-hand stick. It's important to verify that pulling the elevator stick back causes the elevator to deflect up, and moving it away causes it to deflect down. If necessary, the transmitter's "Servo settings" menu should be used to correct servo rotation directions and ensure control surfaces are precisely centered, which is vital for stable flight.
Motor function should be checked cautiously, preferably outdoors, with a friend holding the model securely. The receiving system is switched on and off by connecting and disconnecting the BEC plug and socket.
For flight, recommended control surface travels are 18 mm to either side of neutral for the rudder and 6 mm up and down for the elevator, measured at the trailing edge. These travels can be adjusted via the transmitter. Balancing the model is critical for stable flight; the Centre of Gravity (CG) should be between 62 to 72 mm aft of the wing root leading edge. The model should remain level when supported at this CG position.
Initial test flights should ideally be conducted on a day with little or no breeze, in a flat grassy field with a gentle slope facing into the wind. Avoid launching near buildings or trees due to air turbulence. The first flight should be a hand-glide, performed with the motor pylon removed. Simply "push" the model forward into the wind, with the nose angled down slightly (about 5°), rather than throwing it. Trimming the model will likely be necessary after the first launch, using the trim buttons on the transmitter.
Once the model glides well, the motor pylon can be fitted for powered flight. For powered launches, "push" the model into the wind after trotting forward, but with the fuselage nose inclined up slightly (approximately 10°). Always land the model directly into the wind, with the motor switched off. Just before touchdown, apply slight up-elevator to flare out and slow the model.
The DISCUS 2CT is designed for straightforward maintenance, with key components like the motor pylon supplied as a high-quality, ready-to-use item. The PICO 8 speed controller is pre-set for the model, eliminating the need for programming, though its separate operating instructions are provided for reference.
Adhesives like cyano-acrylate glue and activator are essential for assembling certain parts, such as gluing the tailplane to the fin and connecting the elevator horn to the pushrod. These joints are critical for the structural integrity and control of the model.
Regular pre-flight checks are paramount for safe operation. Before every flight, ensure the radio control system is working correctly by switching on the transmitter and receiver, and verifying that all control surfaces are neutral, move smoothly, and deflect in the correct "sense" relative to stick movements.
It is crucial to inspect the model and all its attached components, including the propeller and tailplane, for any damage before each flight. Any faults found must be corrected before flying. The receiving system is easily switched on and off by connecting and disconnecting the BEC plug and socket, which simplifies power management.
For battery maintenance, ensure the LiPo flight battery and transmitter battery are fully charged before use. The model comes with safety notes for the 3/850 LiPo battery, which should be observed. Charge leads with BEC connectors and transmitter battery charge leads are necessary accessories for proper charging. The ULTRA TRIO PLUS 14 battery charger is recommended for this purpose.
Environmental protection notes advise against disposing of the product in ordinary domestic waste at the end of its useful life, recommending local collection points for recycling electrical and electronic equipment. Dry cells and rechargeable batteries must be removed and taken to a suitable battery disposal center.
The manufacturer emphasizes using only the parts included in the kit and genuine Graupner accessories and replacement parts to ensure reliable system operation and maintain guarantee validity. Avoiding short circuits and reverse polarity, and understanding the risks associated with high-energy-density rechargeable batteries, are also important aspects of maintenance and safe handling.
| Type | Glider |
|---|---|
| Recommended Age | 14+ |
| Skill Level | Intermediate |
| Power Source | Electric |
| Channels | 4 |
| Battery | LiPo 3S |