This document is a manual for the Graupner/SJ racing Micro Magic HoTT sailboat. It provides instructions for assembly, operation, trimming, and maintenance of the model.
Function Description:
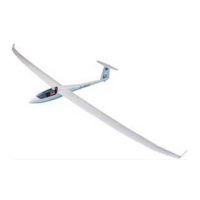
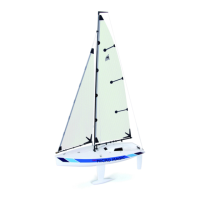
The Graupner/SJ racing Micro Magic HoTT is a pre-constructed and painted model sailboat designed for both recreational use and competitive regattas. The model requires the installation of RC components and a battery to become ready for sailing. It is part of the Graupner/SJ sailboat series, indicating a focus on quality and performance in model sailing. The manual details the steps to assemble the boat stand, install the rudder and keel, and rig the sails, including the mainsail and foresail. It also covers the setup of the RC system, sail trimming for various wind conditions, and general handling recommendations. The boat is designed to be highly adjustable, allowing for fine-tuning of sail profiles and mast settings to optimize performance in different wind and wave conditions.
Important Technical Specifications:
- Length: 535 mm
- Beam (approx.): 180 mm
- Overall height (approx.): 980 mm
- Weight (RC system incl., drive battery excl.): 870 g
- Package Content:
- Hull: Included
- Sailset: Included
- Electronics (2x Servo): Included
- GR-12 receiver HoTT: Included
- Charger, Transmitter, Batteries: Not included
Usage Features:
Assembly:
- Boat Stand: Assemble using wood or cyano glue. Optional padding (e.g., No. 701.2) can be added for the boat's surface.
- Rudder Installation: Grease the rudder shaft, mount the helm with a compression spring and tiller. Linkage is connected when the RC system is installed, with the rudder servo in a neutral position.
- Keel Installation: Plug the keel into the hull and secure with the enclosed washer and nut, using thread lock fluid. For regattas, ensure the keel protrudes no more than 135mm from the hull. If it exceeds this, the top sloping edge of the keel must be cut or ground down, and the thread shortened if necessary.
- Rig Assembly:
- The rig is designed for easy replacement for competition use.
- Slide the boom bearing onto the mast with the aluminum press-down on top.
- Run the longer cord with a sliding clamp through the plastic tubes on the boom fitting.
- Loosen both screws on the mast plate, insert the mast with the fitting into the hull, ensuring lugs engage boom bearings and the mast plate rests on the hull bottom.
- Tilt the mast backward until it stops and firmly screw the mast plate.
- Attach the backstay to the masthead, stretching it slightly without bending the mast.
- Attach both shrouds (mast bracing to the side) with very little tension. Staples should face aft, and eyelets can be twisted to prevent the jib sheet from catching.
- Mainsail Assembly:
- For regatta use, the mainsail luff can be optimized by creating a 4mm deep curve. This involves marking and cutting the luff at specific points (24cm from top, 27cm from bottom, and mid-triangle cuts) to achieve the desired curve.
- Check and adjust mast ring holes to be 2mm from the leech's front edge.
- Knot the mainsail head to the mast string, ensuring it's no more than 5mm below the boom.
- Fix the clew at the end of the boom between silicon rings.
- Loop the cord attached to the sail around the mast once or twice, ensuring the leech is 2-3mm above the silicone rings.
- Adjust press-down for slight tension on the leech, with 4mm free thread visible on each side. Secure clamping angle with cyano or tape.
- Attach the mast to the boom bearing threaded luff straightener. Insert the eyelet from the clamping slide to the front hook on the deck.
- Knot the upwardly free end from the tube with the tack and tighten the luff by moving the clamping slide. Mainsail should end about 10mm above the boom fitting.
- Run mast rings through luff holes and around the pole, hooking into the eyes. Use a 2.5mm drill or pin as a spacer when tying knots to ensure the sail rotates well.
- Keep tension out of the leech by opening the press-down slightly.
- Move silicone rings on the clew for about 20mm belly in sailing.
- When the boat is nearly horizontal and the boom yardarm is in the middle, the leech at the top should be about 3.5cm apart (twist). Memorize this as the default twist setting.
- Take back the luff tension. Avoid excessive tension on sails.
- Foresail (Fock) Assembly:
- Pull the counterweight from the jib boom. Insert the pin through the ring at the lower end of the forestay (tack) and secure with glue if loose.
- Run the downhaul from front to back through the eyelet on the jib boom and tie it with the clip at the luff.
- Attach the clew between the silicone hose pieces at the boom yardarm, similar to the mainsail.
- Knot a cord with a clamping slide to the ring 10cm below the masthead. Place clip pusher holes down.
- Run the lower cord end through the foresail head ring and back through the bottom hole in the clamping slide. Clamp provisionally with a clothespin.
- Move the ailing ring to the jib boom so it's above the front hooks on deck, with the boom yardarm about 10mm from the mast.
- Hang the ring at the prepared bowstringer in the rear hooks on deck. Position the clamping slide in the middle of the hooks.
- Run the free string end through the last existing ring, hang this ring in the front hook, and knot the cord to the ring on the jib boom. Jib boom should be no more than 10mm from the hook.
- Run the forestay upward through the ring on the mast, hang the shroud, and tie it tight. Pull the terminal tab on the forestay slightly upward for a slight curve in the headsail leech.
- Attach the clip pusher of the forestay, placing the clamping slide between the two rings slightly below the middle and tying it tight.
- Move silicone pieces at the clew for approximately 17mm belly in the sail.
- Secure all knots with cyano or plastic adhesives. Cut off excess cord and use a small lighter flame to prevent fraying (do not burn the cord or sails).
RC System:
- Receiver Placement: Behind the sail servo, possibly with an additional switch, on the side of the keel mast. Ensure cables do not interfere with servo arm movement.
- Servo Connection: Connect servos to the power strip on the right side of the receiver. The connector system is polarized (brown wire (-), red (+), orange (signal)).
- Graupner HoTT 2.4 Receiver: Servo sockets are numbered. Connection "6" is for the battery terminal. A V or Y cable (No. 3936.11) can connect servos to the power supply.
- Binding Process (HoTT Transmitter):
- Turn on the transmitter and receiver (receiver powers on when battery is connected).
- Press the SET button on the receiver for at least 3 seconds until the green LED stops flashing.
- Start the binding function on the transmitter.
- After about 1 second, the receiver is bound, and the LED will light solid green.
- If binding fails (red LED on receiver, blue LED on transmitter), repeat the process.
- Servo Function Test: After binding, test sail and rudder servo functions. Typically, the left stick controls sail (pulling back for tight sailing, pushing forward to release), and the right stick controls rudder.
- Rudder Servo Setup: Place the rudder servo arm slightly forward in neutral. Bring the rudder blade to the center and fix pushrods by tightening the grub screw. Limit rudder travel on the transmitter to prevent blockages.
- Sail Servo Setup: Set the sail servo to "hauled" position (right side of servo arm backward). Hang one snap-hook to the main boom ring. Fasten mainsail provisionally on carabiner, with the tree at about a 5° angle. The tree's extension should be in the middle between the outer corner at the mirror and the cockpit rim. Fine adjustment is made with the clamping slide in the cockpit.
- Foresail Cord Setup: Open the jib boom slightly further. When hauled, it should be halfway between the mast and deck outer edge. Fine adjustment is done by moving clips on the jib boom.
- Sail Opening Angle: Ease pods out by pressing the transmitter lever. In the fully open position, the jib should be at approximately 90°, and the mainsail slightly less. The mast should not be straight on the shrouds. Adjust servo travel as needed.
- Pivot Points: Angle settings can be adjusted by placing pivot points (blocks) on the servo arm. The mainsail block should be one or two holes further out than the headsail block. For the mainsail, the ring on the mast can be slid forward or rearward. Knot pods firmly and shorten protruding servo arm pieces.
Trimming of Sails and Profiles:
- Sail Trim: The Micro Magic is a regatta boat with many trim settings for various wind/wave conditions.
- Mast Tilt:
- Mast backward: More weather helm, higher tendency for gusts with the bow.
- Mast forward: Less weather helm, immerse mast less.
- Adjusted by moving the plate on the deck.
- Mast Deflection:
- Slight bend in mainsail luff: Flatter mainsail profile.
- Too much bending: Diagonal crease in mainsail.
- Main Sail Tension:
- Set on backstay and forestay, matching wind strength.
- Increase tension with increasing wind to prevent excessive luffing and jib twisting.
- If the jib shuttles back and forth downwind, tension is too high.
- Changes in forestay/backstay tension affect mast deflection, mainsail profile, and twist. Check forestay tension after adjusting stag tension.
- Shroud Tension:
- Micro Magic mast can be driven without shrouds.
- Avoid excessive shroud tension. If removing shrouds, remove eyelets and seal holes.
- Forestay Tension:
- Should always be tightened to be straight and unwrinkled.
- Do not over-tighten to compensate for other wrinkles; sailing requires luff on both sails.
- Sail Flection (Profile):
- Lower profile: More power, higher resistance.
- More curved profile: Weaker wind or waves.
- Flatter profile: Stronger winds (shift attachment points on boom yardarm slightly aft).
- Foresail usually has less tummy than mainsail.
- Adjusting sail changes the sail pressure point.
- More deflection in foresail or less deflection in mainsail: Quieter porting.
- Opening Angle of the Sail:
- Opening sails: Driving force rotates more forward, heel decreases, but boat loses height.
- Adjust permanently with remote control to fit desired course.
- Change sail pressure point from basic setting by slight changes to sail deflection.
- More opening angle of jib or denser large neutral: Boat can port or hold weather helm.
Twist:
- Describes the course of the leech of a sail, significantly impacting sailing qualities.
- Zero twist (stretched leech): Not desirable, as boat stands wind on the spot.
- Stronger wind: More twist (more curvature in leech).
- Low wind: Less twist.
- Stronger waves: More twist than smooth surface.
- Unilateral twist adjustment influences sail properties similar to opening angle.
- Jib twist increases by tightening (shortening) forestay.
- Mainsail twist set by turning the pressing.
- Starboarding boat can be set neutral with a little more twist in the mainsail without changing other control variables.
Base Settings (During Assembly):
- Mast tilted all the way back.
- Mainsail without luff curve: Mast not bent. Otherwise, a slight bend aft.
- Main sail forestay deflection should extend easily into the mast.
- Forestay slightly stretched, not just hanging, about half the length of the clip pusher.
- Foresail of both sails straight without much tension.
- Jib tread depth: About 17mm.
- Main tread depth: About 20mm.
- Jib boom position: Close to the middle between mast and deck edge.
- Boom extension: Middle of the sloping cockpit rim.
- Main twist (sagging against backstay, mast in middle): About 35mm.
- Jib twist (sagging against forestay): About 25mm.
- These settings are for constant 1 to 2 Bft. wind.
- Check that the boat has the same sail performance on both starboard and port tacks.
- Avoid deviating too far from recommended values without sufficient knowledge.
- Adjustments are in the millimeter range and have significant impact.
Handling with Different Wind Conditions:
- Center of Effort and Lateral Resistance: Driving behavior depends on their interaction, which changes with wind conditions. Settings are specific to an area.
- Battery Placement: Primarily to avoid bow immersion in high winds.
- Very Weak Winds:
- Micro Magic ports (bow turns away from close-hauled course).
- Prevent by keeping some wind to get the next gust at the right angle.
- Shift pressure in sails slightly astern (e.g., move mainsail clamping slide closer, less twist, open jib further, or more twist).
- Do not exceed 17/20mm tread depth from base trim.
- If jib commutes in broad courses/light wind, reduce forestay tension (and possibly luff).
- Stronger Winds (from default):
- Micro Magic starboards (bow turns into wind) because sail pressure point moves astern.
- If surprised by a gust on half or close-hauled course, open sails slightly and use counter rudder.
- Opening the sail is more important than rudder movement.
- Reduce/compensate sail pressure point displacement by changing basic trim.
- Keep boat hauled, sailing angle to wind, and watch foresail (never hold at right angles to strong wind).
- If jib boom is raised significantly (twist increases), increase forestay tension. Adjust headstay in two steps, backstay once.
- Don't forget to twist the sail again by tightening forestay. Readjust entire remaining trim rig after main sail tension changes.
- Reduce jib and bulk tread depth (e.g., 12/15mm). Increase jib/main twist (e.g., 30/40 or 35/45mm) with swell.
- If the boat stops moving in lower wind, a larger jib opening angle and turning with start-up (more open, more speed, helm tight) can help. These conditions require more open sailing, not tight fetched, to prevent excessive lateral drifting.
- Broad or Downwind Courses:
- Boat dives by the bow. Place battery as far back in the hull as possible in strong wind.
- If boat becomes uncontrollable, adjust sails.
- Easy kill ends sailing on a half-hauled course can save the boat to shore.
- For stronger wind, competition solutions (heavier keels, smaller sails) can extend the range.
Maintenance Features:
- After First Sailing: Check for loose screws, interlocked ropes, untied knots, and water inside the hull. Small amounts of moisture are normal and can be removed with a paper towel or sponge.
- After Each Sailing:
- Release tension from sails (relax backstay, relieve luff at mainsail and jib).
- If driven with strong bent mast and little twist, twist after releasing backstay and press-down device to relieve mainsail leech.
- Open cabin cover, remove battery, and any wet cloth/sponge.
- Wipe boat with a soft cloth and place on boat stand to dry.
- For Longer Breaks: Dismantle keel and remove water from keel and mast support.
- Periodic Checks: Check ropes for damage and replace if necessary.
- Lubrication: Approximately twice a year, lubricate the rudder shaft and the thread of the press-down.