Assembly of the main sail
Even the mainsail can be optimized a bit for the regatta use. Please skip to the next para-
graph if you do not need it.
Insert the leading edge of the mainsail (luff) in parallel with a ruler or other straight line flat on
a surface. If the luff is straight, you can subsequently set an approximately 4 millimeters deep
curve with the round part facing to the mast. Attach to the sail as with masking tape smoothly
but without tension on a flat surface. Suitable is, for example, glas or an old mirror. Mark a
point about 24 cm from the top (sail top) and about 27 cm from the bottom (tack) to the top of
the luff. Cut with a very sharp knife (a fresh snap-off blade is normally sufficient) from the top
point upwards and 2 mm from the bottom point down 1.5mm diagonally backwards. Attach
the luff again on the pad and mark at about half of the triangle cuts, ie 12 cm from the top and
14 cm from the bottom two more points. Now repeat the process and cut off the new points
again about 2 mm and 1.5 mm from the bottom. Now you have an approximate curve by 4
mm depth, the deepest point is slightly above the center and corresponds approximately to
the course of a bent mast. This luff curve will later push something extra tread depth to the
mainsail. Tension the backstay a little more, so that the mast deflects approximately 3mm.
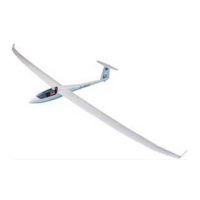
Please check the holes that have been done along the luff to accommodate the mast rings.
They should be about 2 mm away from the front edge of the leech. If the distance is too lar-
ge, you can use a hot needle to make new holes near the old ones. If you have re-cut your
luff as described above, place the holes in each place where they meet the cut edges. You
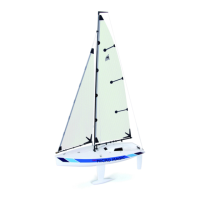
should also have holes for attachment to the mainsail head (above) and the bottom (front bot-
tom), each at about 2 to 3 mm from the luff and 3mm spacing from upper or lower edge of the
sail.