EN - 24
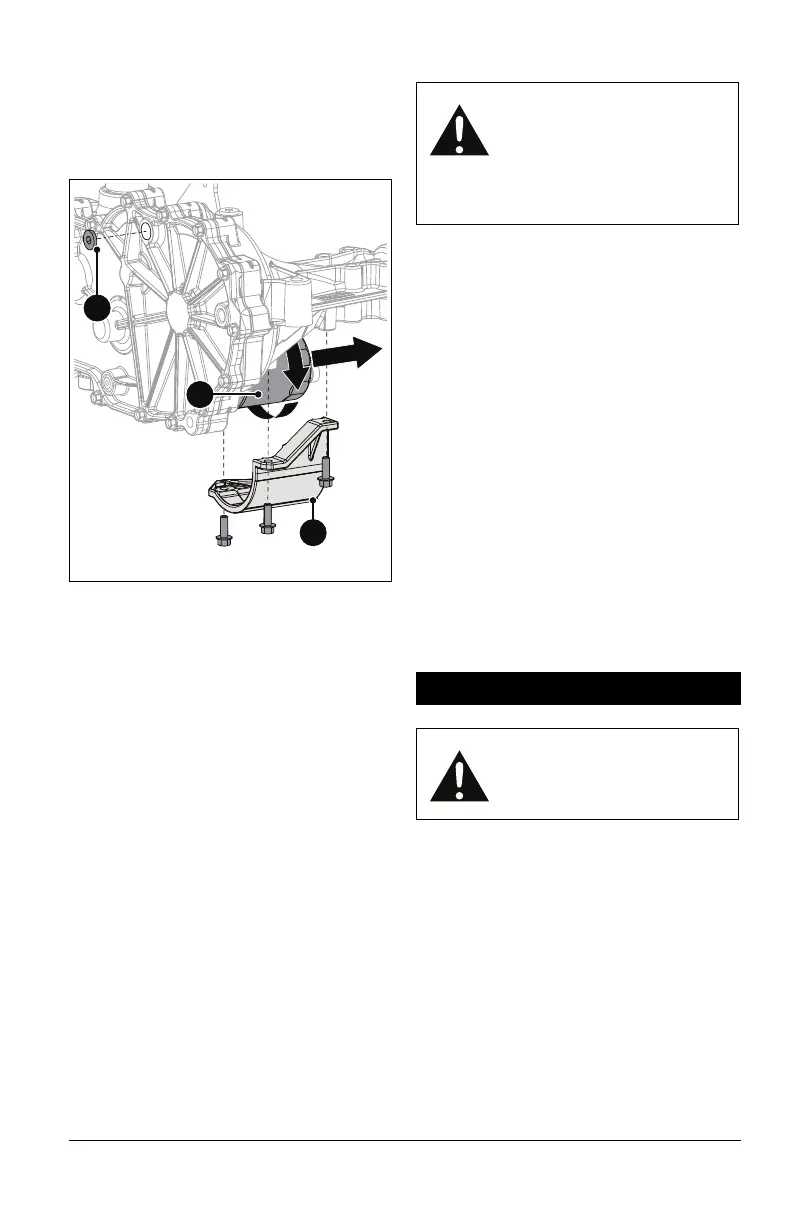
See Figure 31.
4. Remove filter guard and oil filter from
transaxle.
5. Remove the vent plug from the inlet port
and allow the transaxle to drain
completely.
6. Wipe filter-mounting surface clean.
7. Lubricate rubber gasket on new oil filter
with clean hydraulic oil.
8. Spin filter onto filter housing until it makes
contact, and then turn filter 3/4 turn to
tighten.
9. Reinstall filter guard and torque to 7.3
N•m (65 lb-in). DO NOT overtighten.
10. Add 15W-50 synthetic motor oil (Gravely
p/n
00057100) or equivalent until oil
appears at the bottom of the vent port
(1892.7 mL (64 fl. ounces) per transaxle).
11. Reinstall the vent plug and tighten to 20.3
N•m (180 lb-in).
12. Add hydraulic oil to expansion tank until
oil reaches cold fill indicator mark.
See
Add Hydraulic Oil on page 23.
13. Repeat steps 3 – 12 for other transaxle.
14. Purge hydraulic system. See Purge
Hydraulic System on page 24.
Purge Hydraulic System
1. With the unit up to and facing a wall, jack
up the unit so that both drive wheels are
off the ground.
2. Disengage the parking brake and put the
transaxle bypass levers in the neutral
position.
See Move Unit Manually on
page 18.
3. Start the engine and slowly move the
steering levers in forward and reverse five
or six times.
4. Stop the engine and put the transaxle
bypass levers in the drive position
(see
Move Unit Manually on page 18).
5. Start the engine and slowly move the
steering levers in forward and reverse five
or six times.
6. Stop the engine, check the oil level and
add oil as needed.
7. Repeat steps 2 – 6 until the transaxles
operate smoothly in forward and reverse
at normal speeds without excessive
noise.
POSITION SEAT
Models 915258, 915259, 915260, 915261,
915262, 915263, 915264, 915274, 915278
See Figure 32.
1. Pull seat adjustment lever up to unlock
seat.
2. Move seat to desired position.
3. Release seat adjustment lever to lock
seat in place.
Figure 31
1. Vent Plug
2. Oil Filter
3. Filter Guard
1
3
2
WARNING: This adjustment
requires operating the engine.
Use extreme care to avoid
contact with moving parts and
hot surfaces. Be sure rear of
unit is well supported and
secure before starting engine.
ADJUSTMENTS
WARNING: AVOID INJURY.
Read and understand the
Safety section before
proceeding.