This document describes the Green Automotive Components Electric Air-Conditioning Unit, available in two models: DS630051 (12V) and DS540059 (24V). This manual provides comprehensive information on the unit's components, functions, technical specifications, error codes, troubleshooting, installation, usage, maintenance, and warranty.
Function Description
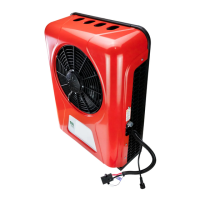
The Green Automotive Components Electric Air-Conditioning Unit is designed to provide cooling within a vehicle. It consists of an internal evaporator unit and an external condenser unit, working together to circulate refrigerant and cool the air. The system is controlled via a display on the internal unit and a remote control, allowing users to adjust temperature, fan speed, and operating modes.
Important Technical Specifications
The two models, DS630051 and DS540059, share many features but differ primarily in their nominal voltage and current requirements.
Model DS630051 (12V):
- Nominal Voltage: 12V
- Current: 60-80A
- Power: 960W
- Refrigerating Capacity: 1000-3000W
- Performance Coefficient: ≥ 2.5
- Refrigerant: R134a
- Oil: ISO VG 68
- Refrigerant Quantity: 600g
- Speed (RPM): 1000-3000
- Internal Dimensions (Evaporator Unit): 460 x 160 x 320mm
- External Dimensions (Condenser Unit): 660 x 490 x 210mm
- Power Cable Specification: 3.0m x 8mm
Model DS540059 (24V):
- Nominal Voltage: 24V
- Current: 15-45A
- Power: 950W
- Refrigerating Capacity: 1000-3000W
- Performance Coefficient: ≥ 2.5
- Refrigerant: R134a
- Oil: ISO VG 68
- Refrigerant Quantity: 600g
- Speed (RPM): 1000-3000
- Internal Dimensions (Evaporator Unit): 460 x 160 x 320mm
- External Dimensions (Condenser Unit): 660 x 490 x 210mm
- Power Cable Specification: 3.0m x 8mm
Both models utilize R134a refrigerant and ISO VG 68 oil, with a refrigerating capacity ranging from 1000 to 3000W. The internal (evaporator) unit measures 460 x 160 x 320mm, and the external (condenser) unit measures 660 x 490 x 210mm.
Usage Features
The air-conditioning unit offers flexible control options through its internal display and a remote control.
On/Off:
- Press to turn the unit on or off.
Temperature Configuration:
- Press "TEMPERATURE" to adjust the desired temperature.
- Press "TEMPERATURE" again (up) or "SPEED" (down) to adjust the temperature within a range of 12°C to 32°C.
Speed Adjustment:
- Press "SPEED" to define the fan speed after turning on the system.
- Press "TEMPERATURE" again (up) or "SPEED" (down) to adjust the fan speed (8 speeds).
Tension Configuration:
- After pressing "ON/OFF" three times to access the tension adjustment, press "TEMPERATURE" again (down) or "SPEED" (up) to adjust the tension.
Remote Control Functions:
- On/Off: Press to turn the unit on or off.
- Temp +/-: Controls the temperature.
- Speed +/-: Controls the speed.
- 26°C: Adjusts to 26°C.
- Strong: Increases maximum power.
- Standard: Standard performance.
- Sleep: Economic mode.
Error Codes and Troubleshooting:
The system includes an internal board error code display (Evaporator Unit) to help diagnose issues. Common error codes and their solutions include:
- H23 (Outlet sensor failure): Indicates the mode may need to be changed after returning to normal function.
- E04 (Temperature sensor of the pipe (Air-Outlet)): Indicates a sensor issue.
- E05 (Compressor is overheating): Reduce air-conditioning speed and turn it off for 10 minutes. If the problem persists, turn off the system and contact specialized assistance.
- E06 (Check if the circuit, coming from the compressor in direction to the Condenser Fan, is open): Verify circuit integrity.
- E07 (Verify for possible short circuit between the Compressor and Condenser Fan): Check for electrical shorts.
- E09 (Defect at the command board of the Condenser Fan): Replace the board.
- E10 (Replace the Condenser Fan): Replace the condenser fan.
- E11 (Verify the cables connecting the Compressor to the Condenser Fan): Check cable connections.
- E01 (Tension/battery is low): Check battery voltage.
- E02 (Probable bad connection of the Blower Motor): Check cables, connectors, or replace the blower motor.
- H22 (Inlet sensor failure): Indicates the mode might alter after returning to normal function.
The manual also provides a comprehensive troubleshooting table for various incidents, such as insufficient refrigeration, obstructions in air inlets/outlets, dirty condenser surface, low refrigerant, low voltage, sensor failures, and issues with the evaporator or condenser units.
Maintenance Features
Regular maintenance is crucial for the optimal performance and longevity of the air-conditioning unit.
General Maintenance:
- Clean the internal surface of the Evaporator Unit using a clean and wet cloth.
- Clean the cores of the Condenser/Evaporator Units by removing the unit and cleaning the surface using compressed air.
- Avoid hitting the Evaporator Unit with objects or using them to remove dirt.
Recommendations:
- Cleaning is recommended once a month.
- If the system is exposed to excessive dirt/dust, more frequent cleaning may be required.
- For good functioning of the device, regular cleaning of the components is recommended.
- The air-conditioner should be inactive for a time; unplug the device and protect it from impacts.
- After much time without use: Clean the Evaporator and Condenser Units, check for any objects or dirt inside the internal/external parts that could cause damage to the product. Also, check the drains, pipes, and cables, insert the battery in the remote control, perform an inspection, and turn on the device.
Installation Instructions:
Before installing, ensure all necessary components and accessories are received.
- Outside (Condenser Unit): Choose the position and place for the installation and make 6 holes at the driving cabin. Fixation screws should be of type MB Grau 12.9. A padded damping must be placed between the external unit and the driving cabin.
- Inside (Evaporator Unit): It is recommended to install the internal unit to the right side of the passenger's seat. First, assemble a wooden board at the driving cabin with self-tapping screws. Screws might also be used to break the board and fix it on the cabin bar. 4 screws should be used, at least. After the wooden board is fixed, use self-tapping screws to fix the Evaporator Unit along with the wooden board. On each side of the Evaporator Unit there are 3 screw-holes. If necessary, screws must only be inserted.
- After the Condenser Unit and the Evaporator Unit are fixed: Connect the pipes and install the Expansion Valve during installation. Observe if part of the valve junction and the connection pipe are clean. Check if the sealing ring is not damaged and pour in the appropriate quantity of refrigerant before installation is made.
- Connection of power cables: All electric cables of the Evaporator Unit and Condenser Unit come with specific connectors.
- Organize the wires to avoid any wrong cable crossing.
- During the installation of battery cables: It is extremely important to check if the positive (red) and negative (black) poles are not inverted.
- If the power cable length is too short: You might extend it for a maximum of 1.5m, and the connector must be protected (waterproofed).
- Important: The cable alimentation of the air-conditioned unit must connect to the battery's positive and negative terminal connectors only, after the Evaporator Unit and the Condenser Unit are installed. The total length of the power cable shall not be longer than 5 meters.
- For the system's vacuuming process: It is essential to use a specialized vacuum pump.
- Connect the (high/low pressure) hoses along with the vacuuming pump to the Condenser Unit.
- Open Manometer (high/low pressure) valves completely.
- Start the vacuuming process for approximately 20 minutes. Check if all pressurized air has been emptied from the system. After doing so, close (high/low pressure) valves and wait for 10 minutes. Check if the manometer's pressures remain unchanged, and only then, it is possible to fill in with refrigerant R134a without contrast.
- After the refrigerant has been filled into the system: Turn on the air-conditioned unit and check if high/low pressure figures are according to the normal parameters (high pressure: 1.2-1.4, low pressure: 0.2-0.25).
- With the air-conditioning system on: Test all the air-conditioner's operational modes, checking if all functions are on normal operation. After the device turns back to its normal function, turn it off and wrap in the connection pipes with binders. Then, apply sealant and, finally, install the boards to close the holes.
Attention: The system is filled with oil before its delivery. After first installation, do not combine the system with more oil. In case of gas refrigerant and/or oil during the installation do air-conditioned, add 80ml. The oil used in this system must be of high quality (ISO VG68).
Warranty and Services:
- This product comes with a user manual/installation handbook, which is offered by GREEN, and SHALL be strictly followed by its installation staff and/or users. In case of user's misuse and/or because of recklessness at installation, due to unforeseen instructions of this manual have not been followed, any damage, accident and/or failure, therefore, caused to the product in question, is of their full responsibility.
- Installation staff and users should, also, observe those questions related to security during installation.
- This device warranty covers for any material defects, in case of correct handling procedure has been carried out, for a period of 3 (three) months from the date of acquisition, as well as this warranty foresees for any repairs and/or for a Unit replacement, in case of defect.
- Any damage or malfunction caused by negligence, abuse, non-conformity to the manual usage instructions and/or for any changes made at the product, shall not be covered by this warranty.
- No warranty shall be granted for defects or damages caused by unauthorized services.
- It is, herewith, understood, that Installation staff and users are in accordance with the legal notices, as well as with the instructions, herein, provided for this product, as it was acquired.
The manual also includes a warranty request form where users can provide details such as CNPJ, customer information, address, contact details, invoice number, date of emission, product code (DS630051 (12V) or DS540059 (24V)), and a description of the defect.